The deeper you go into the Forbidden Lands of Monster Hunter Wilds, the more wild and eccentric the monsters become. Some are fearsome sights to behold, while others make for some of the most memorable battles in other ways.
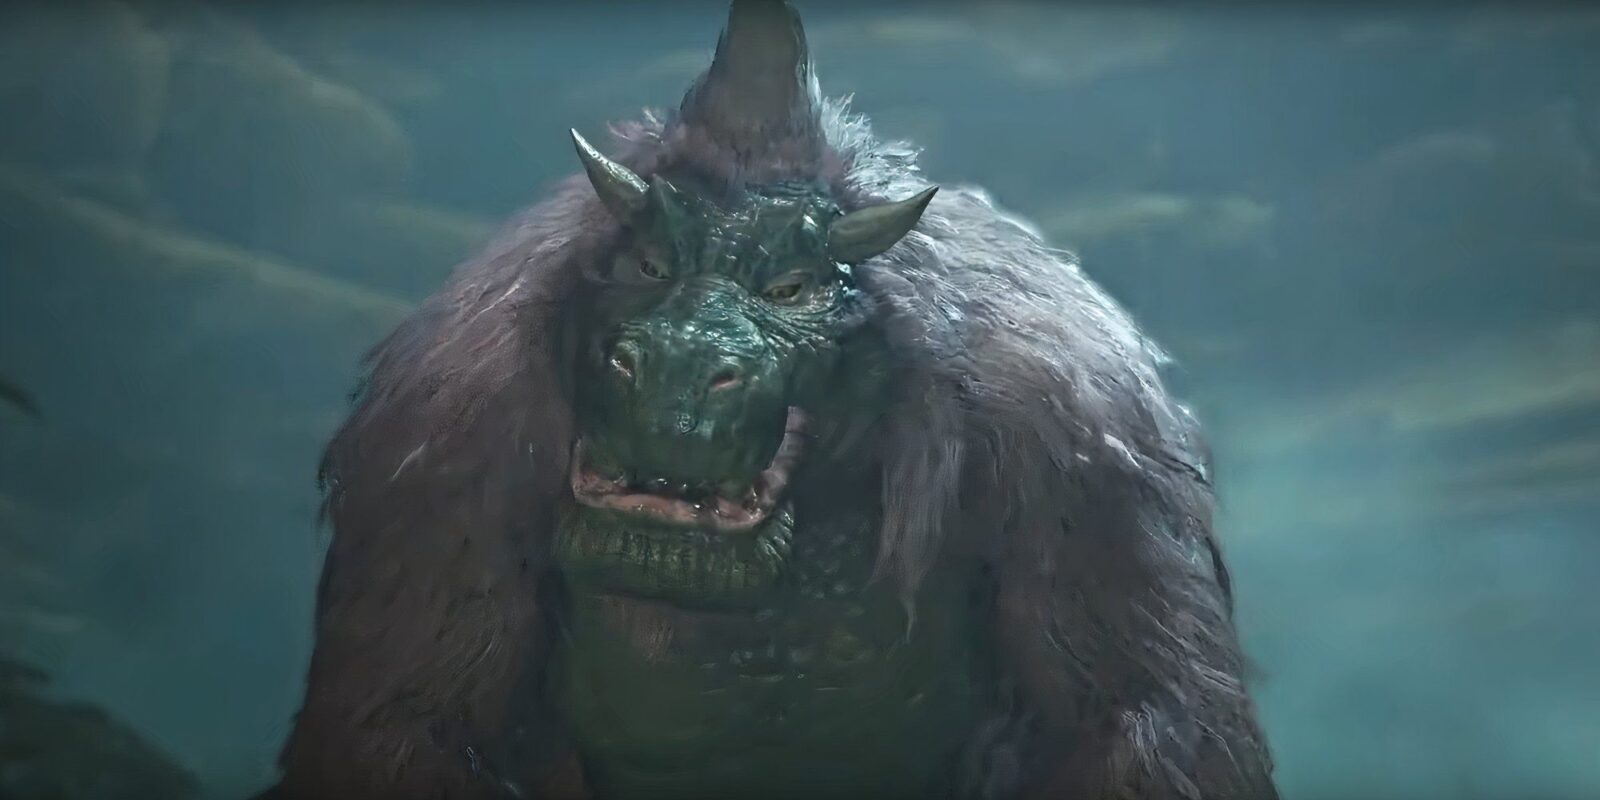
One such creature in Monster Hunter Wilds that fits perfectly into the latter category is Congalala. This rambunctious ape monster can be a bit overwhelming for inexperienced hunters, and if you find yourself having a difficult time, here are some tips to keep in mind.

Related
Monster Hunter Wilds: 10 Things the Game Doesn’t Tell You
Monster Hunter Wilds is a complex game with lots of hidden mechanics. Here are some things that the tutorials don’t cover.
Where to Find Congalala in Monster Hunter Wilds

Congalala is a Fanged Beast-type monster found deep in the Scarlet Forest region (and later in the Ruins of Wyveria) of the game, and you’ll first encounter it during the story’s ‘Forest Findings’ mission in Chapter 1, soon after hunting Lala Barina. It’s one of the more formidable monster fights found early on in the game, not just because of Congalala’s abilities, but because it’s also the first monster you encounter that’s flanked by “minions” called Congas.
Congalala typically wanders around Area 8 in the Scarlet Forest, but throughout the battle it can move to other areas in the region. You’ll have many opportunities to battle it again, including a Tempered version, in other quests and assignments, including:
- Tussle in Pink – Optional Quest (HR2 or higher)
- Flippant Flatulence – Optional Quest (HR9 or higher)
- Drive Off the Congalala! – Assignment (HR2 or higher)
- Fur Damagings Are Dislikeworthy – Optional Quest (HR31 or higher)
- Make Fluffy Dealings – Side Mission (can also be done during ‘Flippant Flatulence’ quest)
How to Beat Congalala in Monster Hunter Wilds

Despite its otherwise comical appearance, Congalala is not a monster to be taken likely, especially so early on in the game. First off, you’ll find it surrounded by a troupe of smaller Conga monsters that will do their best to give you a hard time while you try to focus on the biggest ape. It is worth it to kill them as well, however, as they can drop useful items such Brute Bones.
Congalala has a somewhat lengthy and unique set of abilities that feature a variety of special counter moves, punishing physical attacks, and even an unexpected explosive blast. The most distinct (emphasis on “stink”) of them are its Stench-related attacks, which incorporate clouds of putrid flatulence that Congalala emits from either its posterior or its mouth.
These inflict the Stench status ailment, which temporarily prevents you from being able to use recovery items. This can be especially dangerous if you’re already low on health, so try to keep your distance until Stench wears off. Or use cleansing items such as Deodorant if you have them on hand.
All of Congalala’s main abilities include:
- Body Slam – A standard physical attack in which Congalala will rise into the air and slam back down toward the target
- Fury Swipes – Congalala will use its long front claws to swipe at the target repeatedly in a straight line
- Slashing Lunge – Congalala will jump back and then lunge forward with a swiping attack
- Tail Snatch – Congalala will grab items in the area with its tail; if a mushroom it will eat it and then spew Stench gas from its mouth; if a boulder it will hurl it toward the target
- Tail Swipe – Congalala will swing its tail behind it in response to targets attacking from behind
- Dive Attack – Congalala will crouch low and then leap into the air and dive toward the target, landing on its belly
- Stench Bomb – Congalala emits a cloud of flatulence from its posterior that will inflict Stench if close enough
- Stench Breath – Congalala emits a cloud of flatuence from its mouth that will inflict Stench if close enough

Congalala is weakest against Fire and Ice elements, so if you have the opportunity to equip a weapon of either element you should absolutely do so. Item drops from Quematrice in the Windward Plains can help craft a fire-element weapon, if you have some on hand. Otherwise, try to craft some armor and/or weapons from Lala Barina, if possible, as they can inflict Paralysis, which Congalala is vulnerable to. Other status ailments that can be used on Congalala include Poison, Sleep, Blastblight and Stun.
While fighting Congalala, remember to focus on destroying Wounds when they appear (use your Focus Mode to see them more easily). Also take advantage of Congalala’s known weak points, which include its Head, both Forelegs, its Rear and its Tail. This makes the monster particularly vulnerable in most targetable areas, especially against melee weapons.
Congalala Item Drops in Monster Hunter Wilds

Congalala drops a variety of useful items that players can use to craft a full set of Conga armor as well as weapons (depending on your preferred weapon type). Low-Rank items can be obtained from the initial story encounter with Congalala, along with certain Optional Quests such as ‘Tussle in Pink’.
Meanwhile, you can acquire High-Rank items from the stronger variants of Congalala (including its Tempered version) encountered in quests such as ‘Flippant Flatuence’ and ‘Fur Damagings Are Dislikeworthy’. When you have enough items, pay a visit to Gemma at the Smithy to craft whichever gear you need.
Low-Rank Item Drops
- Congalala Pelt (27% Drop Rate; 100% from Broken Tail; 33% Body Carve Rate; 100% from Destroyed Wound)
- Congalala Claw (20% Drop Rate; 100% from Broken Left/Right Foreleg; 20% Body Carve Rate)
- Vibrant Pelt (15% Drop Rate; 100% from Broken Head; 15% Body Carve Rate)
- Congalala Fang (27% Drop Rate; 30% Body Carve Rate)
- Congalala Certificate (8% Drop Rate)
High-Rank Item Drops
- Congalala Pelt+ (27% Drop Rate; 100% from Broken Tail; 33% Body Carve Rate; 100% from Destroyed Wound)
- Congalala Claw+ (20% Drop Rate; 100% from Broken Left/Right Foreleg; 20% Body Carve Rate)
- Vibrant Pelt+ (15% Drop Rate; 100% from Broken Head; 15% Body Carve Rate)
- Congalala Fang+ (27% Drop Rate; 27% Body Carve Rate)
- Congalala Certificate S (8% Drop Rate)
- Beast Gem (3% Drop Rate; 5% Body Carve Rate)

- Released
-
February 28, 2025
- ESRB
-
T For Teen // Violence, Blood, Crude Humor
- Multiplayer
-
Online Multiplayer, Online Co-Op
- Engine
-
RE Engine
- Steam Deck Compatibility
-
Unknown
- X|S Optimized
-
Yes
- Number of Players
-
1
- OpenCritic Rating
-
Mighty
- Cross Save
-
No
- Cross-Platform Play
-
Yes, all platforms
- PC Release Date
-
February 28, 2025
- PS5 Release Date
-
February 28, 2025
- Xbox Series X|S Release Date
-
February 28, 2025