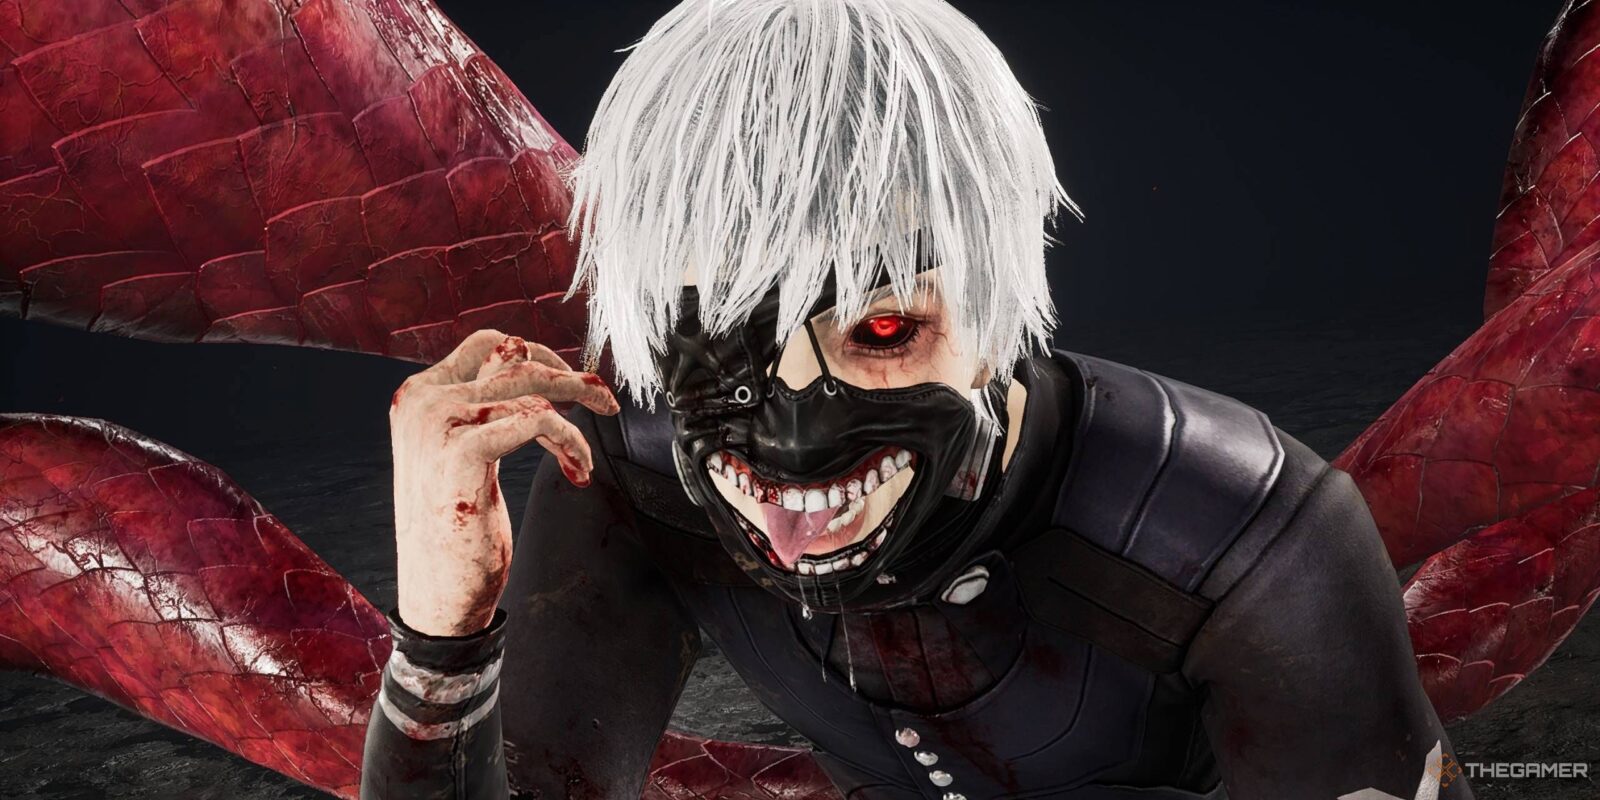
What’s one thousand minus seven? Those five horrible words with no meaning to them were all Ken Kaneki had, as his mind and body were tortured. Now embracing his transformation as a Ghoul and freed from the shackles of his torturer, Jason, he pushes open those heavy doors to freedom. That is, until a black fog pooled at his feet.

Related
Tokyo Ghoul has collaborated with Dead by Daylight in the form of The Ghoul. This guide will go through all you’ll need to know about the Killer. From how their power works to the best builds and add-ons to run.
How Does The Ghoul’s Power Work?
The Ghoul’s power is called One-Eyed Terror, giving them access to Kagune Leap, which allows them to traverse the map at high speeds, vault windows and pallets to catch up to Survivors. The power is split between two modes, Base Mode and Enraged Mode.
In Base Mode, The Ghoul will only have access to two leaps. However, this changes once you acquire the taste of blood. After performing your first Kagune Leap, aim your second leap onto a Survivor to initiate a grab-attack and apply the Kagune Mark.
When charging your Kagune Leap, you’ll notice a set of teeth appear should you hover over a Survivor. To enter Enraged Mode, make sure the teeth are open before leaping onto a Survivor to apply the Kagune Mark.
Once the Kagune Mark is applied, The Ghoul will enter Enraged Mode, increasing the maximum number of Kagune Leaps to three. Vaulting speeds for both windows and pallets are also increased so long as you remain in the mode. Survivors with the Kagune Mark can remove it by mending, which will begin a countdown that will remove you from the Enraged Mode should it hit zero.
To extend the Enraged Mode time, you may inflict another Survivor with the Kagune Mark. You may also increase the time in Enraged Mode with a well-timed grab-attack by pressing the attack button before impact.
Tips For Playing As The Ghoul

The Ghoul’s gameplay revolves around dealing quick damage to Survivors using the Kagune Leap, then cutting them off while they attempt to escape. Below are a few tips on how to use The Ghoul’s power to its full potential:
- At the start of the match, use the Kagune Leap to traverse across the map and get into Enraged Mode as early as possible.
- The grab-attack has a long hitbox and is very forgiving, allowing the ability to hit Survivors over windows, pallets and short obstacles even when they break line of sight (LOS).
- After entering Enraged Mode, you have the choice to find another Survivor to apply the Kagune Mark or continue to pursue your current target.
- Whilst chasing your chosen Survivor, use your Kagune Leap to close the gap by aiming at the nearest obstacles to them.
- Should the Survivor be nearing a pallet or window, use your Kagune Leap to get ahead of them and cut them off.
- When playing a pallet or window in Enraged Mode, use your Kagune Leap to vault the obstacle quickly should the Survivor be close to it.
The Best Add-Ons For The Ghoul
Even without the use of add-ons, The Ghoul is still a very powerful Killer. Selecting add-ons that further increase The Ghoul’s ability to traverse the map by reducing Kagune Leap’s cooldown time or increasing the speed are ideal candidates.
|
Add-on |
Rarity |
Effect |
|---|---|---|
|
Fresh Coffee |
Common |
Increases the Movement speed during Kagune Leaps by 14% |
|
Kaneki’s Satchel |
Uncommon |
Increases the Movement speed of the third consecutive Kagune Leap by 30% |
|
Broken Chain |
Uncommon |
Reduces the Cool-down duration of Kagune Leap by -35% when outside Enraged Mode |
|
Hinami’s Umbrella |
Very Rare |
Reduces the Cool-down time after performing a Kagune Leap by -10% |
The Ghoul’s Unique Perks

The Ghoul, similarly to every new Killer, has access to three unique perks. Each of them works to further empower The Ghoul by giving an increase to action speeds whilst weakening the Survivors via slower movement and limiting their escape options.
The Ghoul’s three perks are listed below and are fully upgraded:
|
Perk Name |
Description |
|---|---|
|
HEX: Nothing But Misery |
After damaging Survivors 8 times with a basic attack, a Dull Totem will become a Hex Totem. Anytime a survivor loses a health state, they will become Hindered for 15 seconds, reducing their movement speed by 5%. |
|
Forever Entwined |
Injuring a Survivor will grant you 1 token up to a maximum of 8. Picking up, dropping, and hooking speeds are 4% faster for each token acquired. |
|
None Are Free |
For each unique Survivor you hook, you’ll gain 1 token with a maximum of 4. Once all generators are completed, all vaults and unused pallets will be blocked for 16 seconds for each token obtained. |
Best Builds For The Ghoul And Perk Synergies

Now that you have a better understanding of The Ghoul’s power, it’s time to delve into some builds. With multiple games played with a multitude of perks used, here are a few builds that synergize well with their kit and make The Ghoul go from a threat to an unstoppable force:
All perks in the following builds will be fully upgraded.
Chase Build

Whilst The Ghoul is exceptional in chases, they may fall victim to more experienced Survivor players who can loop effectively. This Chase Build will capitalize on this by limiting the available options for Survivors.
|
Perk |
Description |
|---|---|
|
Dissolution |
Injuring a Survivor by any means and waiting 3 seconds will activate Dissolution. Whilst activated, it will remain for 20 seconds. The next Pallet that a Survivor performs a Fast Vault across will instantly break while inside your Terror Radius. The Ghoul’s ability to guarantee a hit on a Survivor with Kagune Leap is strong on its own. Pairing it with Dissolution will instantly activate the perk and put pressure on that Survivor whilst looping a pallet. |
|
Bamboozle |
After vaulting a Window, it will be blocked for 16 seconds. Whilst blocked, the Window will be unavailable for Survivors to use. Bamboozle will also increase your Vaulting speed by 15%. Windows aren’t that much of an issue for The Ghoul when getting that first hit with Kagune Leap, but what about the second? Whilst Enraged Mode’s vault speed is increased, it is enough to catch up to a Survivor and you may need to chase them for a few more seconds. Bamboozle not only blocks the window, it also stacks with the Enraged Mode’s vault speed too! This, in turn, will allow you to catch up much faster and negate another one of the Survivors’ options. |
|
Dark Arrogance |
Increases your Vaulting speed by 25%. Increases the duration of both Blinds and Pallet Stuns by +25%. Dark Arrogance alone is a very niche perk that many Killers cannot use. Pairing it with Bamboozle and The Ghoul’s Enraged Mode vault speed will further increase the speed to +40%! This will allow you to catch up with Survivors much quicker. |
|
Grim Embrace |
Each time a Survivor is hooked for the first time, you gain a token. After hooking a Survivor and you are at least 16 meters away from the Hook, Grim Embrace activates: For the first 3 tokens, all Generators are blocked for 10 seconds. At 4 tokens, all Generators are blocked for 40 seconds and the Aura of the Obsession is revealed for 6 seconds. No build is complete without a Generator slowdown, in this case, Grim Embrace. Grim Embrace pairs extremely well with The Ghoul’s ability to get across the map quickly as this perk only activates when you are further than 16 meters from the hooked Survivor. |
Though Dark Arrogance makes this build much stronger, it isn’t a necessity. You may exchange Dark Arrogance for another perk should you wish to.
Hex Build

Hexes are strong perks in their own ways, though they are susceptible to being destroyed almost immediately. This build blends multiple hexes together for both an offensive and defensive playstyle.
|
Perk |
Description |
|---|---|
|
HEX: Blood Favor |
Whenever a Survivor becomes injured by any means, Hex: Blood Favor activates. All Pallets within 32 meters of that Survivor’s location are blocked and unable to be used for 15 seconds. Similarly to Dissolution, The Ghoul’s ability to net that first hit on a Survivor with Kagune Leap will automatically activate HEX: Blood Favor and will block all pallets within range. This, coupled with The Ghoul’s ability to cut off the Survivor, will leave them with no other options. |
|
HEX: Thrill Of The Hunt |
For each Totem remaining in the environment, Hex: Thrill of the Hunt is granted 1 token. Cleansing and Blessing speeds are reduced by 12% for each token. Ideally, for this build to work, you want your HEX totems to last throughout the trial. HEX: Thrill Of The Hunt will increase the time to destroy your totems drastically, giving you ample time to interrupt a Survivor attempting to cleanse. |
|
HEX: Pentimento |
The Auras of cleansed Totems are revealed to you in white. Approaching a cleansed Totem and activating it with the designated prompt will rekindle it. For each Rekindled Totem active at the same time, the following effects will occur:
You may not always be able to protect your totems and may eventually lose some of them during a match. HEX: Pentimento is here to fix that problem by penalizing Survivors for doing so by reducing various action speeds. |
|
HEX: Ruin |
Whenever a Generator is not being repaired by a Survivor, it will immediately begin to regress at 100% of the normal regression speed. Whilst HEX: Ruin isn’t as powerful as it was back then, it is still a very useful perk. In this case, it works as both a Generator regression perk and as an incentive for Survivors to waste time looking for the totem. |
The Yamori’s Mask add-on will cause all Survivors to scream after hooking a Survivor whilst in Enraged Mode. Screaming Survivors will be interrupted from their current actions, including cleansing totems.
HEX: Nothing But Misery Synergies

HEX: Nothing But Misery is a very straightforward perk that hinders Survivors after the requirements are met. Being a Hex perk, it is susceptible to being destroyed when Survivors become aware of it. Despite this downside, it’s best to pair this perk with another that will further shorten chases with Survivors.
Here is a perk combo that synergizes well with it:
|
Perk |
Description |
|---|---|
|
Save The Best For Last |
Whenever you hit a Survivor other than your Obsession with a Basic Attack, you gain a token with a maximum of 8 Tokens. For each token gained, reduce the cool-down of Basic Attacks by -4%, up to a maximum of -32%. Hitting the Obsession with a Basic or Special Attack will remove 2 tokens. When the Obsession is dead, you will no longer gain tokens and the count is frozen. Save The Best For Last pairs extremely well with HEX: Nothing But Misery thanks to the reduced cooldown of basic attacks. This will allow you to catch up to already injured much more quickly. Be mindful, however, as injuring the Obsession will reduce the effectiveness of the perk. |
|
Rapid Brutality |
You can no longer gain Bloodlust during Chases. Successfully hitting a Survivor with a Basic Attack will grant you a 5% movement speed increase for 10 seconds. Similarly to Save The Best For Last, Rapid Brutality will also benefit from the Hex. The main downside is the inability to enter Bloodlust, which can leave certain Killers weakened. Be mindful of who you use this perk combo on to guarantee their usefulness. |
Forever Entwined Synergies

Forever Entwined is a simple action speed modifier which increases the speed you pick up and hook Survivors. This perk does not have many synergies as it is pretty much a “throwaway” perk.
Despite this, here are a few perks that can work well with it:
|
Perk |
Description |
|---|---|
|
Fire Up |
For each completed Generator, you gain 1 token with a maximum of 5. Increases all action speeds by 6% per token, up to a maximum of 30%. The original perk that increased pick-up speeds was Fire Up. Combining both perks together will further increase the speed and increase the speed of other actions such as kicking or vaulting. |
|
Agitation |
While carrying a Survivor, increase your carrying speed by 18%. Your Terror Radius is also increased by 12 meters while carrying a Survivor. Pairing Forever Entwined with a perk that can get him to hooks quicker is an obviously good choice. In this case, the always reliable perk Agitation comes into play as it does just that. |
None Are Free Synergies

Of the previously mentioned perks, None Are Free is the most powerful. An endgame perk that blocks all available resources like pallets and windows for a maximum of 64 seconds. Running this perk on an endgame build is highly recommended as it provides the best results.
Here are a few endgame perks that synergize well:
|
Perk |
Description |
|---|---|
|
HEX: No One Escapes Death |
Once the Exit Gates are powered and a Dull Totem remains in the trial, Hex: No One Escapes Death activates. Gain a 4% increase in movement speed and give all Survivors the Exposed Status Effect. The Aura of the Hex Totem is revealed to all Survivors within 4 meters and will grow to 24 meters over the next 30 seconds. The forever controversial Hex perk is, of course, an obvious choice for an endgame build and for good reason. Whilst all pallets and windows are blocked, that leaves Survivors with nothing to defend themselves against getting one shot. Coupled with the increase in movement speed, they are unable to outrun you. |
|
No Way Out |
For each Survivor you hook for the first time, you gain a token. Once the Exit Gates have been powered, any Survivor that interacts with an Exit Gate Switch will create a Loud Noise Notification. After which, both Exit Gate Switches will be blocked for 12 seconds per token, up to a maximum of 60 seconds. No Way Out works extremely well when paired alongside both the previous perks. Combining the inability to use any resources with None Are Free and the one-shot capabilities of the Hex, all that’s left is to prevent the option to escape entirely. Additionally, the perk also requires the same prerequisites as None Are Free, requiring four unique Survivor hooks to activate. |
