
With the Version 5.5 update in Genshin Impact, the war of Natlan has finally come to an end in the main story, but the aftermath is still being faced by the people. This aftermath comes to challenge the Children of Echoes tribe as one of their saurians gets sick in the Tournament of Glory in Bloom event.

Related
Genshin Impact: Secret Source Dragon Puzzle Guide In Atocpan
Atocpan is the Collective of Plenty tribe’s area in Genshin Impact, and here’s how you can solve the maze puzzle on the tiny island in it.
While Ifa and his companions try to find a cure for the saurian’s illness with the traveler, you can take part in events like Saurian Treasure Seeker and Bloomflower Trials. However, getting all the rewards in these can be difficult.
The Tournament of Glory in Bloom event is getting unlocked slowly, and we’ll update this article as more of the event gets unlocked.
How To Unlock Tournament Of Glory In Bloom Event

To unlock the Tournament of Glory in Bloom event, you’ll first have to finish the Song of the Dragon and Freedom quest, which is the third act of the game’s prologue. You can directly take part in the event after this quest, though you’ll get spoiled about a bunch of things that happen in Natlan’s story.
If you have time and you’ve progressed enough in the story, it’s recommended to do the entire Natlan story and Mavuika’s first story quest before taking part in this event. Once you start it, you’ll have to go through a prologue quest before unlocking the main game modes called Saurian Treasure Seeker and Bloomflower Trials.
All Saurian Treasure Seeker Stage Solutions

The Saurian Treasure Seeker is the main game mode in this event that might give you some trouble since it’s easy to lose the sense of direction in it. While doing this game mode, you have to guide little Saurians to either collect some fruits around the tracks or get all the chests.
The fruit collection game mode has a time limit and asks you to collect a certain amount of fruits. On the other hand, the chest collection one doesn’t have any time limit, but you can only get detected a certain number of times at maximum to get all the rewards.
While doing these stages, you can switch between Saurians depending on the terrain below.
If a Saurian is on their favorable terrain, they get some movement speed, while having an opposite effect if they aren’t.
Here’s the path you can follow for each of these stages to easily get past them:
Twinkle Twinkle Little Fruit Guide
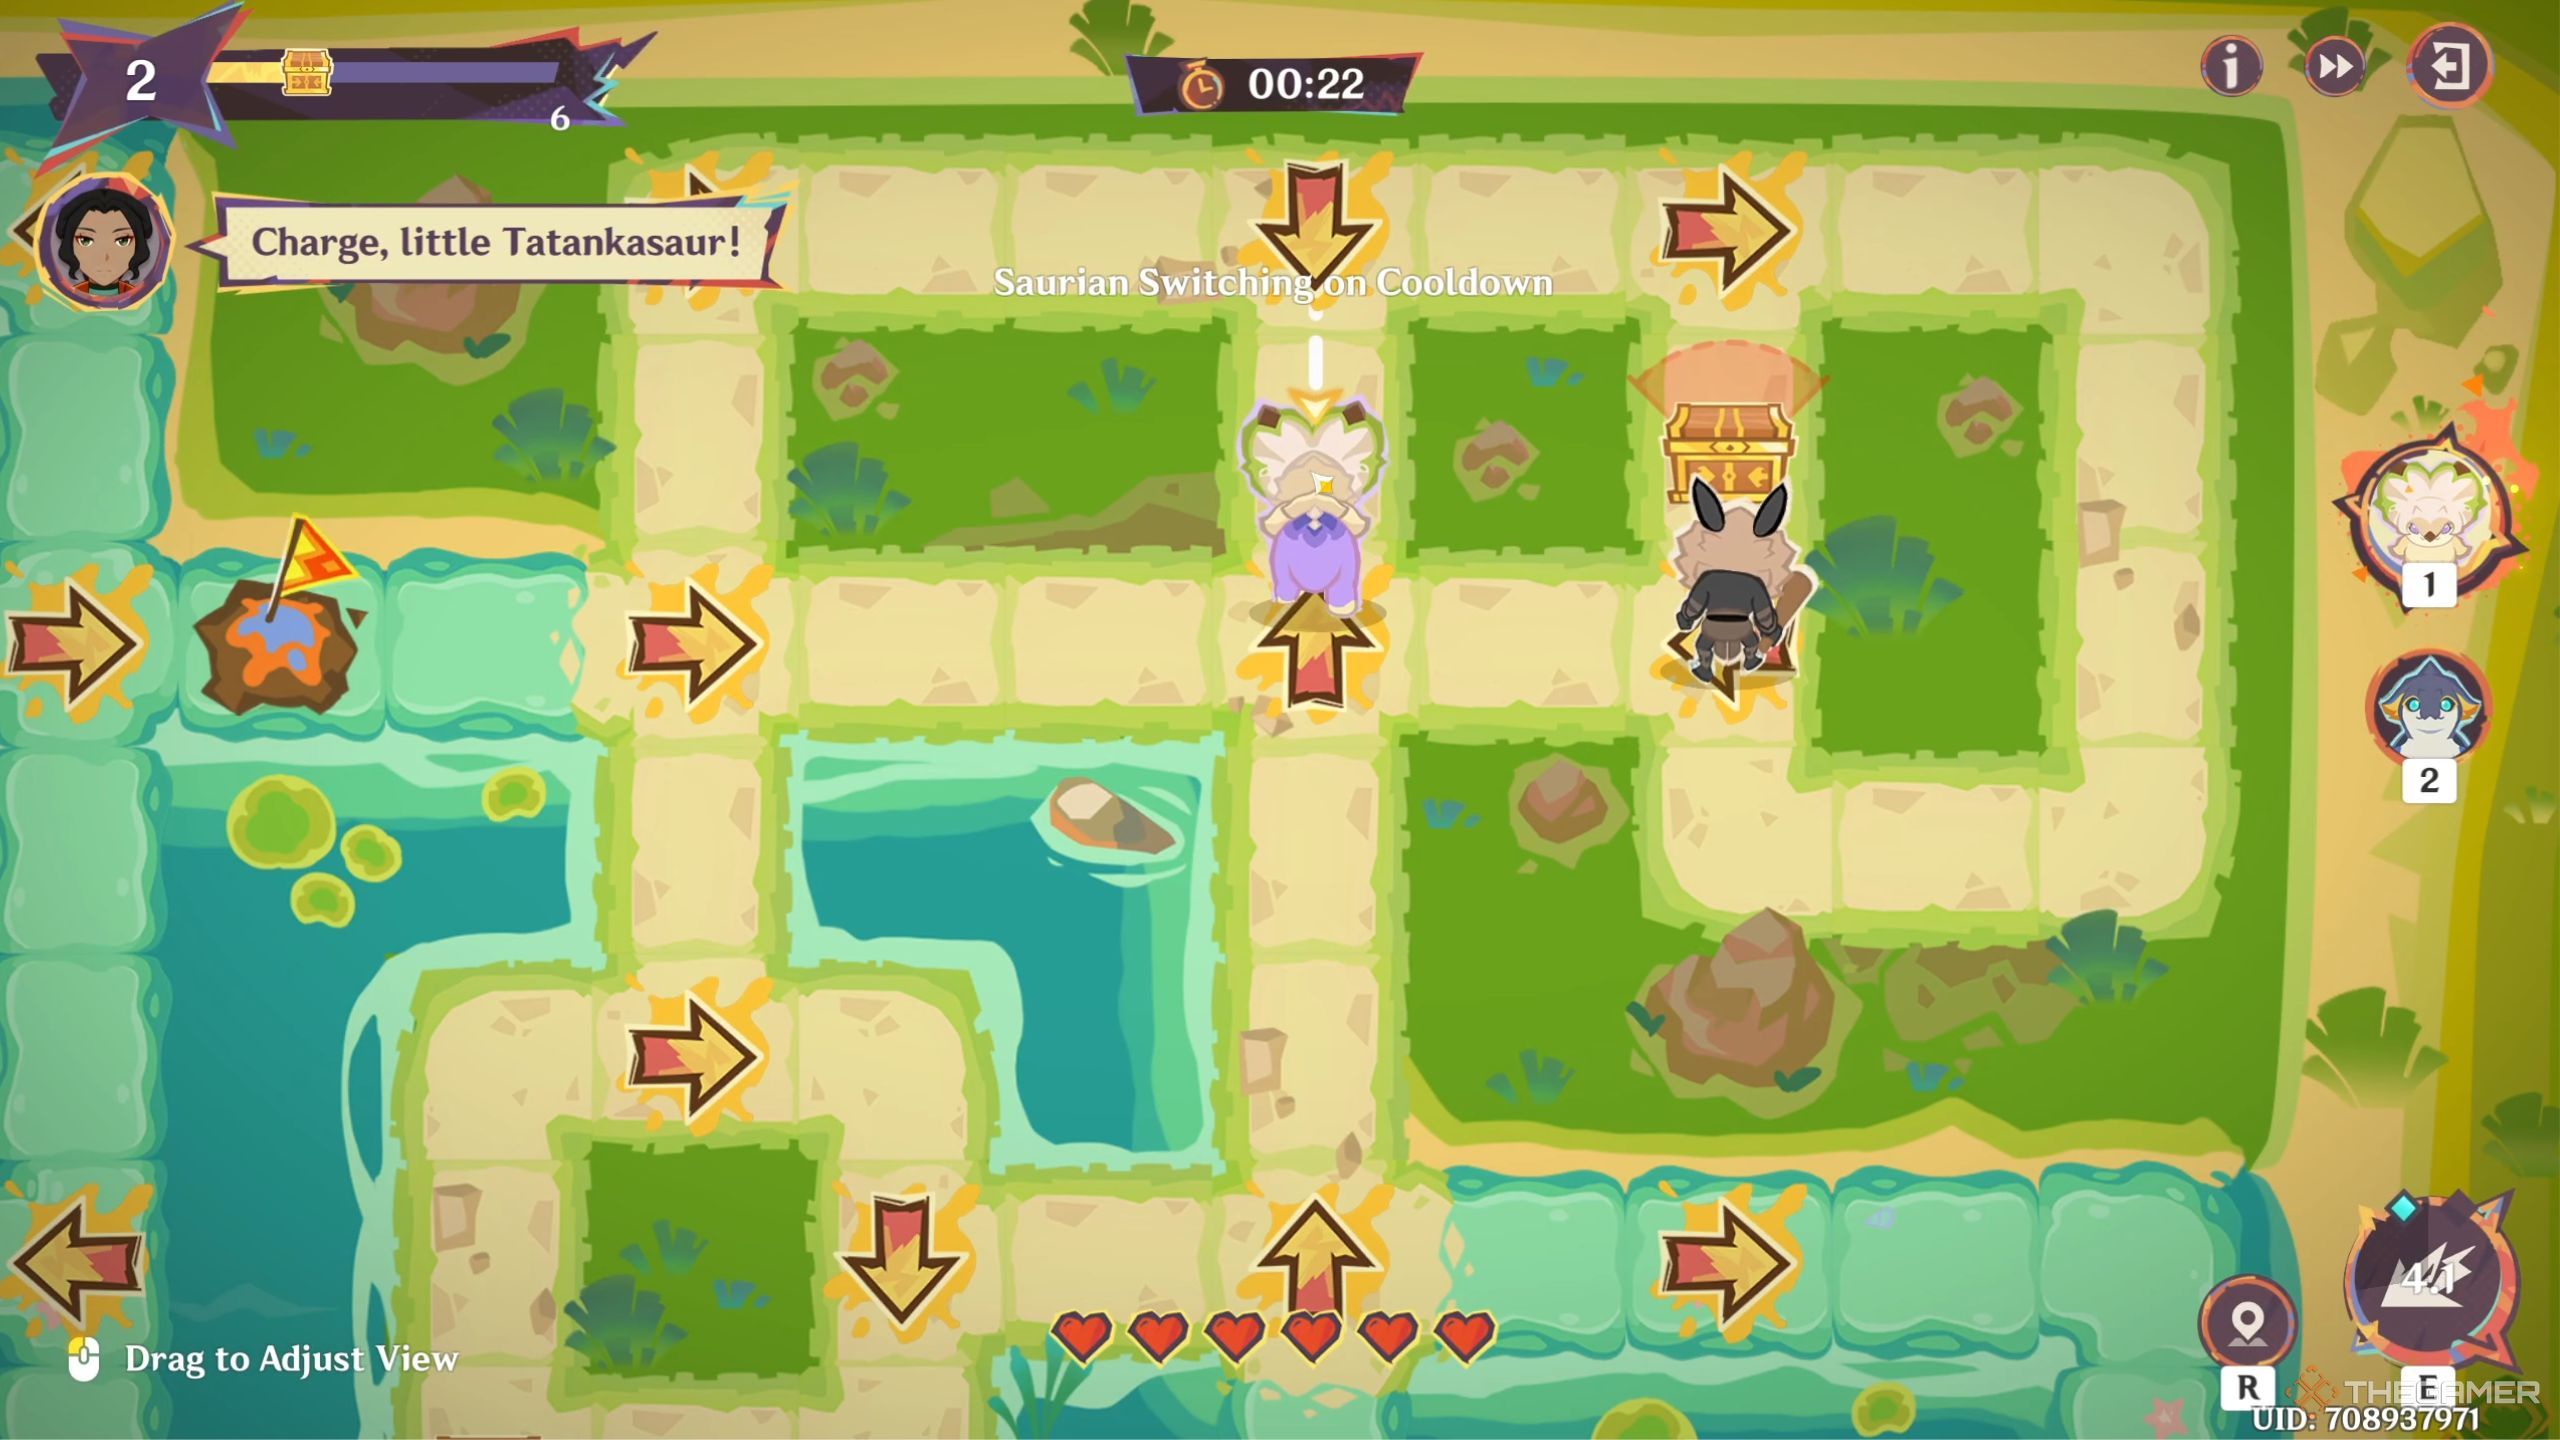
In this stage, you start with a little Koholasaur and Tatankasaur. The main obstacle you encounter while collecting fruits in this is the dropping magma. You’ll see some red circles appear on the tracks randomly, and when these circles are filled, magma will drop at their location and damage your health bar if your saurian is in it.
You start on the bottom left side of the track and can follow these steps to easily get 40 fruits before the timer runs out:
-
-
Start moving up with your Koholasaur (the blue Saurian) and it’ll automatically turn right after a bit. Before it reaches the next arrow, click on it and turn it up.
You can then turn the next arrow to the left so that your Saurian goes through the secluded area on the left. Leave the next two arrows as they are so that the Koholasaur can go through the top left side.
-
-
Before the Koholasaur comes back to the top left arrow, turn it to the right and as soon as it crosses that arrow again, change into the Tatankasaur. As the Tatankasaur moves to the right, turn the next arrow up.
Go through the top part until you reach the water tiles again, where you can turn the first arrow to the right. Change back to Koholasaur and let it go to the right, down, and then left.
-
-
You’ll once again enter the ground area where you can turn the arrow to the left and change to Tatankasaur. Turn the next arrow down and go through a couple of water tiles before going back up.
While going up, you’ll see three more fruits to your right that you can get by turning the arrow to the right. From there, keep going down until you reach the bottom left edge and automatically turn left.
After all this, you can turn the final arrow to point downward and get the last few fruits. The stage will automatically end when you gather 40 of them.
If you run into magma while following the steps above, you can either use the accelerate or switch the saurian to slow your speed till it falls.
The Truth Of Churlish Treasures Guide
In the Truth of Churlish Treasures stage, you’ll have to get six chests while avoiding detection by the Hilichurls on the tracks. These Hilichurls will be patrolling various locations and you can see their detection radius in front of them. The Saurians you’ll have in this trial are the same as the one above.
Here are some easy steps you can follow to beat this one:
-
-
Start your Tatankasaur’s journey by moving to the right and then turning the first arrow up. This will already take you to the first chest. Keep going right from here until you enter the water tiles and move the arrow up.
Follow the next couple of arrows as is and you’ll be able to get the second chest. After getting this chest, turn the next arrow to the right to get to your first checkpoint/hiding spot.
-
-
After the checkpoint, turn the next arrow to the right and the one after that upward. This will take you to the top where you can turn the arrow to the right again and then the next one down to get the third chest.
If you’re getting too close to the Hilichurl patrolling here, you can switch to Koholasaur to slow your speed down. After getting the chest, turn the next two arrows left and down respectively.

-
-
You’ll then reach a middle area with another chest on the left. Get this chest and go right on the next arrow. After that, keep the next two arrows to the right as you enter the water area and switch to Koholasaur.
Here, you can easily get your fifth chest by turning the next arrow to the left and going down after it. Keep going down to the bottom and then left to get your last chest.
Bloomflower Trials Guide

The Bloomflower Trials is the capture and defense game mode in the Tournament of Glory in Bloom event. There are two different modes in this one as well:
-
Offensive Mode
-
Defensive Mode
-
The offensive mode requires you to capture various flags by using Combat Supplies. You can get some of these supplies at the start, and you have to collect more by taking part in various side activities.
The more flags you have and activities you finish, the more points you can get. Once you fill the bar at the top with points, you can use a ritual item to break a part of the enemy stronghold’s shield.
-
On the other hand, the Defensive Mode is completely focused on your combat abilities. In this one, you’ll have multiple flags to defend. You can see the spawn point for enemies.
This will help you determine where you should bring your characters since you wouldn’t want the enemies to get anywhere close to your flags. You can also get buffs at the start of each wave switch. These buffs are different for each floor.
Other than the basics above, we have a detailed guide to beat each stage below.
Attack From The Waterway Guide

|
Best Team |
Mualani (compulsory), Mavuika, Citlali, Xilonen |
|---|---|
|
F2P Team |
Mualani, Xiangling, Thoma, Shielder |
In the first stage, you have to play as Mualani to break the shield on the enemy stronghold and defeat the final enemies. You can start by taking her down below and getting the first flag on the dock. You can get various buffs whenever you capture one of the flags in the offensive mode.
The most important buffs for the first flag are 70 percent reduced Phlogiston consumption and 40 percent reduced Elemental RES for nearby enemies. The former will essentially let you surf with Mualani for an infinite amount of time.
Every time you capture a flag, you’ll see some events pop up around you. It’s important to finish this event to get more supplies.
These events can include battle, collecting various particles, or getting a supply chest.
After the first flag, you can capture the southern flag on the map first and then the northern one. Every time you reach 100 points on the top bar, a ritual point will start blinking on your screen. Trigger it to break one stack of the stronghold shield. Do this thrice and you’ll be able to challenge the final enemy.
The final boss in this trial is a level 95 Fluid Avatar of Laval. To defeat it, you can simply trigger all your abilities and use Mualani as the main DPS, even in the Mavuika team.
Crush The Enemy Head-On Guide

|
Best Team |
Varesa (compulsory), Iansan, Xilonen, Xianyun |
|---|---|
|
F2P Team |
Varesa (compulsory), Iansan, Xiangling, Chevreuse |
The second stage is a defensive one where you have to use Varesa to defeat many waves of enemies. When you obtain the buff by taking the favor that regularly drops near the enemy spawn, you’ll create a storm at the center of where your Plunge Attack hits the ground. This storm pulls in all the enemies.
When you see the enemy spawn location, it’s important to not run into it and instead wait between the flag and the spawn. When they get close, you can use one Plunge Attack with either Varesa or Xianyun to pull them in and then execute your regular team rotation to defeat them.

Next
Genshin Impact: Should You Pull For Varesa In Version 5.5?
Is this Electro Catalyst worth the primogems?