Ancient Sacred Mountain is a new addition to Genshin Impact version 5.5. Located inside a volcano in Atocpan, Natlan, players will discover an extremely huge area where the dragons once dwelt. To unlock this map, Travelers need to start ‘The Way Into the Mountain’ Quest in “Collective of Plenty”, which will help carve a path leading to the new area.
This quest tasks players to re-stabilize giant fireballs named Astral Assemblages in different areas of the Ancient Sacred Mountain to discover the Dragons’ Residence and Heart of the Sacred Mountain. While the mission is simple on paper, it may be hard for some players as each Astral Assemblage has complicated actions to be done in Genshin Impact.

Related
Genshin Impact: Dracolite Locations & Farming Route
Dracolite is a unique resource in Natlan and is used to ascend certain characters in Genshin Impact.
How to Start Chronicler of the Crumbling City Quest Chain
The Frozen, Rekindling Land is the first quest inside the Chronicler of the Crumbling City Quest Chain. By starting ‘The Way Into the Mountain Quest, you will discover a floating island above Atocpan called Skyfire Circlet. Use the waypoint north of Skyfire Circlet and you will get a cutscene of a Qucusaur kidnapping a Secret Source Servant and diving into the volcano. After that, indwell a Qucusaur and fly straight to the volcano to start the quest and unlock the new map, Ancient Sacred Mountain.
How to Start The Frozen, Rekindling Land Quest
Start the quest by following the navigation to reach the Sacred City of Tollan (the center of the Sacred City) in Genshin Impact. Once you arrive, a Secret Source Servant will notify you that the city is under lockdown, and you need to re-stabilize two giant fireballs called the Astral Assemblages. After that, you will unlock two new quests: The Forsaken Sea of Wisdom and Sealed Site of Sacrifice.
There is no correct order of quest completion, but it’s best if you start The Forsaken Sea of Wisdom Quest first, as it is closer to your current position and will unlock the many waypoints along the way.
How to Complete The Forsaken Sea of Wisdom Quest

Open the Quest Menu and tap the Navigate button for The Forsaken Sea of Wisdom Quest. Follow the navigation to the Sea of Shifting Sentience. Along the way, huge Pulverite rocks are blocking the way. Use the nearby Yumkasaur Saurian Indwelling and jump across the blocks.
The first Astral Assemblage can be seen in the middle of this location, on top of the huge flower-looking rock. Indwell a Koholasaurus in the Phlogiston pool beside it and jump on the Jet-Set Eddies to reach the rock. Once you activate the mechanism, a new task will pop up, which is to charge the Astral Assemblage.
The next spot you need to go to is under another tall rock with an enemy guarding a locked treasure chest and two Secret Source Servants. Defeat the enemy so the robots can create a Spiritway. After that, indwell a Koholasaurus and use the Spiritway to reach the top of the rock. At the top, still in the Koholasaurus form, soak in the lava pool until you get a black screen with the description, “As you immerse yourself in the liquid Phlogiston, images flash through your mind like warm memories.” If the prompt doesn’t appear, try jumping into the lava pool with the Koholasaurus.
Now, follow the quest navigation to another tall rock to the southwest of the Sea of Shifting Sentience. Same as before, you need to defeat a group of enemies surrounding a Secret Source Servant to free them. The robot will then create a Spiritway for you to glide with Koholasaurus. On the rock, follow the Spiritway as it will lead you to another rock in the southwest. Defeat the spawned Tenebrous Mimiflora enemy and indwell a Koholasaurus to soak inside the lava pool to continue the quest.
After receiving the next narration on top of a black screen, use the new Spiritway spawned before you reach the last lava pool. It’s located south of the Sea of Shifting Sentience, and there will be no enemy for you to defeat here. Instead, the lava pool is dried up, and you need to indwell a Tatankasaurus nearby to charge against the Phlogiston block beside the pool so the liquid Phlogiston will flood into the pond. Only after that should you indwell a Koholasaurus again and take a swim inside the lava pool.
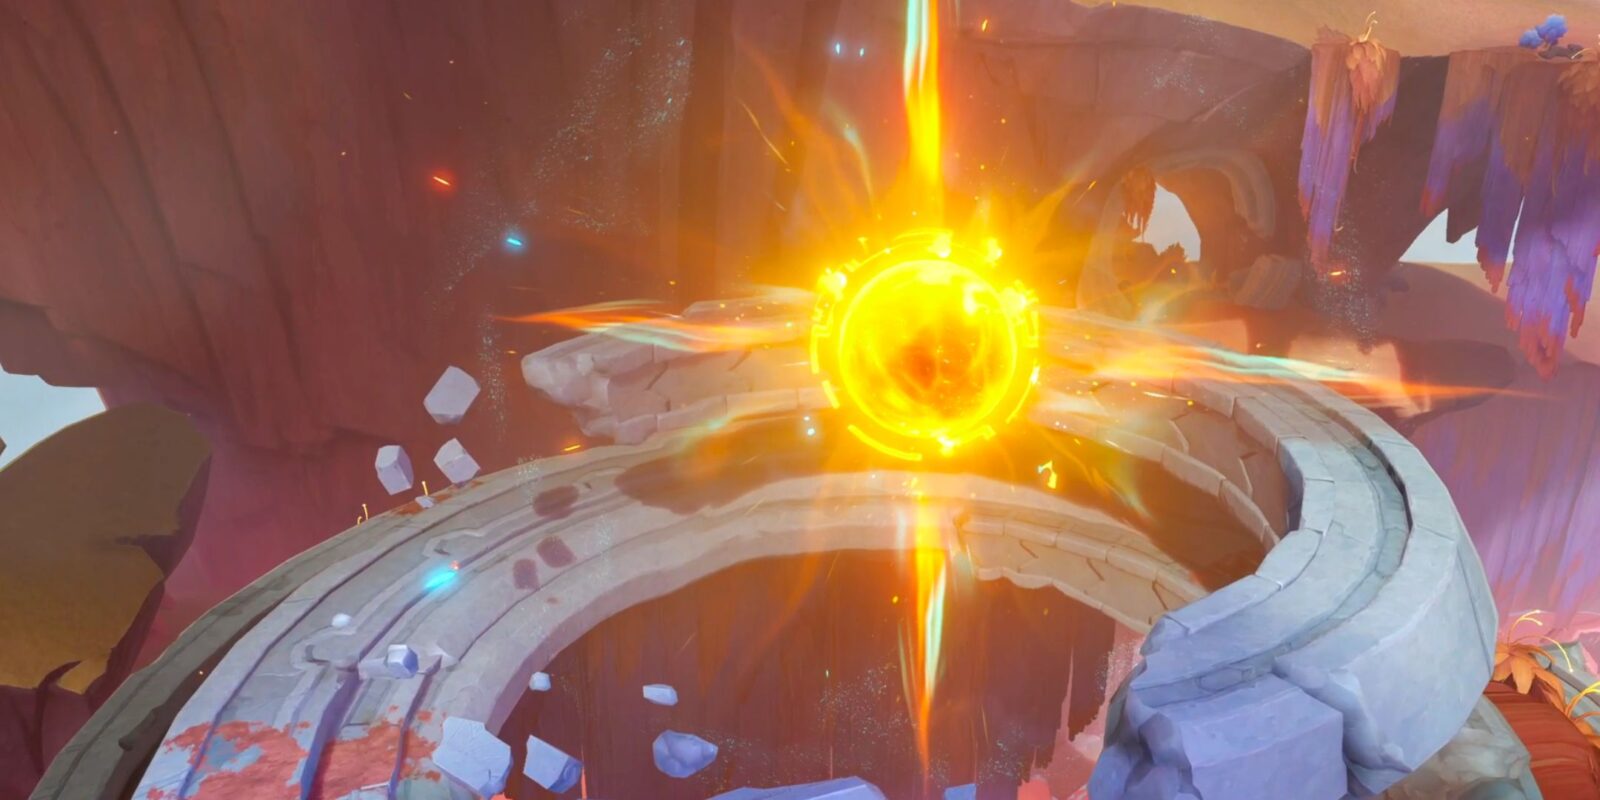
With that, the Astral Assemblage is charged, and you can go toward it to activate the mechanism. Once you reach the Astral Assemblage, the lava in this area will rise, and you need to defeat the Abyss enemies using the Iridescent Beam.
Simply go to each Iridescent Beam, which will be marked by the quest navigation, and click on the Activate prompt so it will attack the Abyss surrounding the Astral Assemblage. Make sure to indwell a Koholasaurus during the entire battle (or Mualani) as the Phlogiston liquid below can quickly deplete all of your character’s health.
Once Abyss corruption around the core is removed, use the new Spiritway at the bottom of the lava pond to reach the Astral Assemblage and re-activate the mechanism.
How to Complete Sealed Site of Sacrifice Quest

After the The Forsaken Sea of Wisdom Quest is completed, you will immediately start this quest with the same premise as before, which is to stabilize the last Astral Assemblage. The Sealed Site of Sacrifice Quest takes place in the Flame-Melding Ritual Grounds. In the previous spot of the first Astral Assemblage that you fix, use the new Spiritway that was created to reach the top of the mountain. Continue following the quest navigation to reach the destination.

In the center of the Flame-Melding Ritual Ground, you can see the Astral Assemblage on top of an altar. Around said altar are multiple platforms on which Tatankasaurus can move. The puzzle is to move three platforms until they create a straight line toward the Astral Assemblage at the top.
For the bottom platform, control the Tatankasaurus and push the platform from the right side.
Then, go to the second floor, head to the left side of the platform, and push the platform.
You can see which way the platform can be pushed onto by the bright orange crack on the side of the platform.
Go to the fourth floor and push the platform on the right side to the right to uncover a hole in the wall. Use Tatankasaurus to break the box that is blocking the way and enter the hole. Once inside, interact with the switch on the left side to activate the moving floors. Run using Tatankasaurus to reach the end and interact with another switch. Lastly, break the Phlogiston rock against the wall and push the platform outside the hole to complete the puzzle.
Once all four platforms create one line, arrows will appear on top of those platforms, and you need to sprint using Tatankasaurus to charge and break the seal over the Astra Assemblage.
How to Complete The Frozen, Rekindling Land Quest

Return to the center of the Ancient Sacred Mountain and activate the Celestial Axis to reach the depths of the ancient city. A new map will be unlocked called Dragons’ Residence in the Ancient Sacred Mountain in Genshin Impact, and you will start the next quest called In Search of Hidden Heart.

RPG
Action
Adventure
Gacha
Open-World
- Released
-
September 28, 2020
- ESRB
-
T for Teen – Fantasy Violence, Alcohol Reference