You might think the area outside the Carpenter’s Shop in Mudborne is pretty big, and you’re right, but when you venture with Dendro into the Central Junction for the first time, you’ll see just how big the map of the pond actually is. And that’s before you factor in the dream world!

Related
These lovable amphibians appear in everything from RPGs to platformers, but which are the best?
By inspecting the map boards in every area of Mudborne, you’ll have consistent access to an aerial view of the current area. This can help you plot out where you need to go next, especially if you’re using fast travel options like the Reflection Pools or Gateway Nexus.
Each Area Has Two Maps
When you begin playing Mudborne, you’ll find yourself on the Spawning Pool map to start. This massive area contains everything you’ll need to get started diving into the meat and potatoes of restoring the ecosystem and breeding back all kinds of colorful frogs. As you explore and chat with Hopert as you get your feet wet (get it?) with the mechanics of the game, you’ll undoubtedly walk past giant stone pools along the way.
These are Reflection Pools, and you’ll use them to move between the waking and dream worlds in Mudborne. Every area of the map has a corresponding dream world variant, a space whose map is largely the same but with critical variants. Sometimes you’ll see paths blocked off that are open in the waking world, while other times, you’ll find key items in the dream world that you need to use to access new areas in the waking world. Each area has its own natural obstacles and decoration style to watch for as well.
While the maps are largely similar between the waking and dream worlds, with the same buildings main story frogs, you’ll still need a map to get around! As you wander into new areas, keep an eye out for bulletin boards with a magnifying glass icon above them, which will typically be in central locations for the area they’re in or near a major landmark you’ll need to explore. By using your magnifying glass on the board, you’ll be able to save a copy of the area’s map to your Atlas, which keeps track of each area for you.
The maps for the waking and dream worlds log separately from one another. For example, going to the Kindergarten doesn’t automatically unlock the Future Farms map – you’ll need to activate a Reflection Pool and head into the dream world on each map individually. Only then will you be able to see the changes made to the environment of each map.

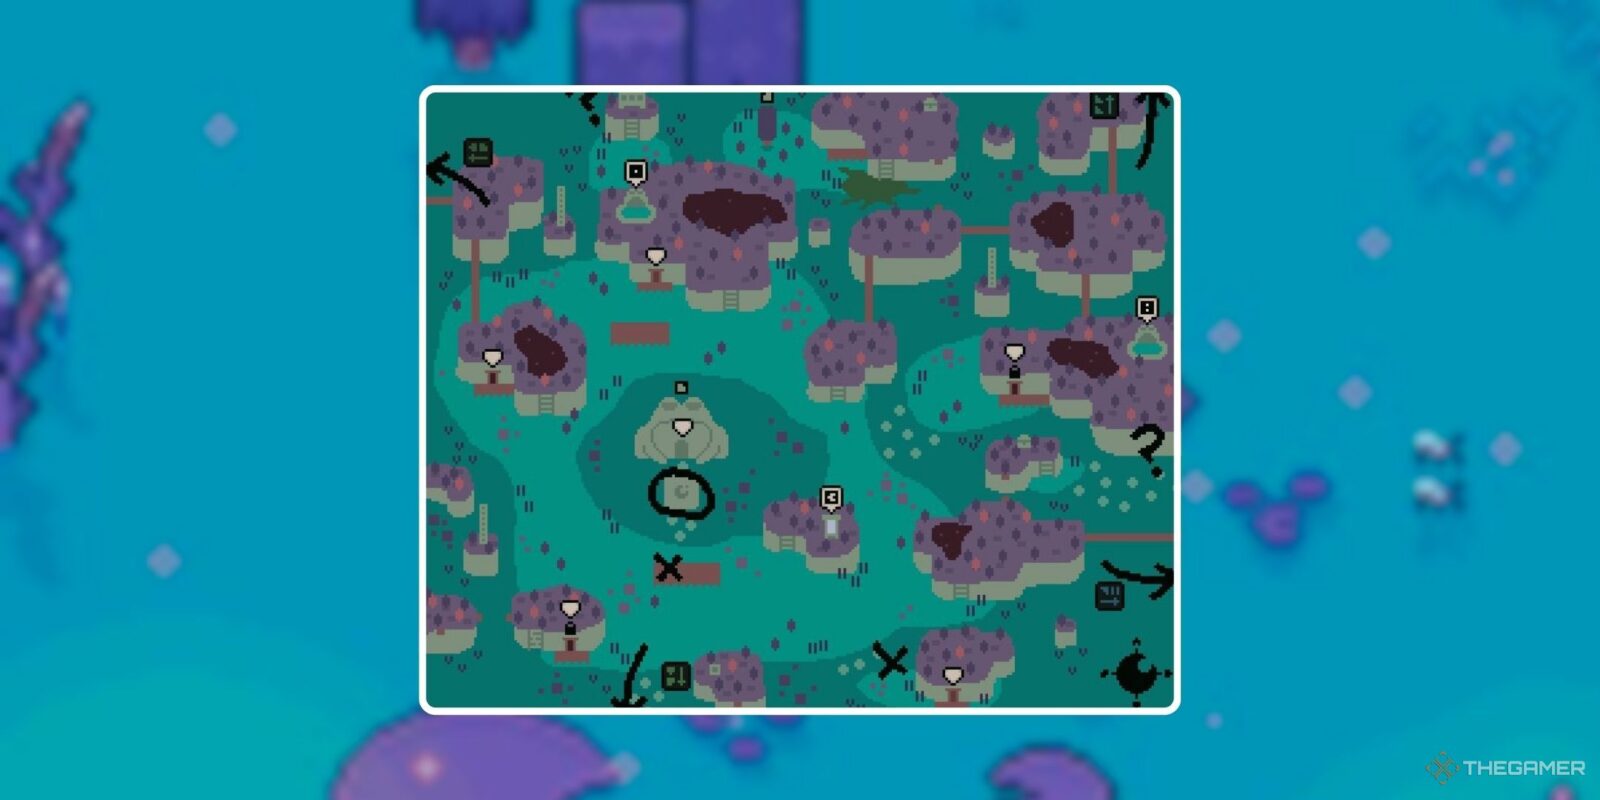
You’ll see that there are plenty of markings already made on each map when you first check it out, so pay attention to places marked on the map when you first see it. These will often be things like important buildings, key item locations, hints toward what to do next, and so much more. You’ll also see that both stepping stones and any natural environmental blockades (like algae, for instance) are denoted as well, to help you see where you can and can’t go.
Not only does each area have a distinct waking and dream world, but you can also find unique resources depending on which variation of the world you’re exploring. The Common Green frogs you see around the different waking world maps are replaced by Dozy Dreamers in the dream world, a frog whose base A.N.O.U.R.E.S. stats have all been increased by one, and you’ll need to balance resources from both worlds in order to proceed in the story of Mudborne.
Additionally, you’ll want to keep an eye out for stone archways that are dotted around each map. These are the entry portals into the Gateway Nexus, allowing you to fast travel between regions in a fraction of the time and the steps it takes if you’re walking in the overworld!

In the table below, we’ve made a note of the important buildings and features of each map in Mudborne to help you navigate a bit easier.
What You’ll Find On Every Map In Mudborne
|
Map |
Key Features |
Characters and Story |
|---|---|---|
|
Spawning Pools |
|
This is where you’ll learn the basics of playing Mudborne. Hopert and the Compendium both help guide you through the beginning chapters as you familiarize yourself with frog breeding, mushroom growth and cultivation, using Reflection Pools, and more. Hopert is a carpenter who will trade you a variety of tools and some adorable frog furniture, as well as ample storage options to stash all your extras. Your first home is at the Carpenter’s Workshop with a Gateway Nexus portal on the Loft roof. |
|
Kindergarten |
|
The Kindergarten is one of the three offshoot areas you’ll reach once you make it to the Central Junction, off to the west. Here, you’ll find Ribbert, a frog with a mushroom on his head who’s more than happy to help you clear the algae blooms blocking parts of the map, offering to trade not only for Filters but for a variety of bugs and mushroom-based furniture. At the Kindergarten, you’ll need to fix a series of broken lifts by replacing the missing buckets, since these act as starirs between islands and different levels of the map. You’ll want to bring a selection of frogs with a high Umbrage stat to use in the filters to clear out sections of the algae. Your Gateway Nexus portals here are just beside Ribbert’s dock, as well as on an island north of the stagnant water pools and Bug Farms. |
|
Residential District |
|
The Residential District is to the east of the Central Junction, and you may be initially overwhelmed by how massive the area appears on the map. To navigate through the Residential District, you’ll need to be able to drain flooded rooms, which you can do with the help of Kroaka and his series of helpful tools and contraptions. A big concept you’ll experiment with in the Residential District is Saturation, both raising and lowering the dampness of certain areas to permit access to key items. You’ll need a Humidifier and Dehumidifier from Kroaka, which you can use both in the Residential District’s story progression and back at your own home to continue tinkering with mushrooms and new frog breeds. The Gateway Nexus portals here are just beside Site Management where Kroaka spends his time when you first enter, as well as on the island in the center of the map with Central Engineering and the Staff Canteen. We advise getting the hang of clearing algae at the Kindergarten, since you’ll see a few algae blooms blocking key paths in the Residential District as well. |
|
Climate Control |
|
Climate Control is a bit overwhelming when you first arrive – the area is mostly frozen over since the massive storm that kickstarted the events of Mudborne, and the control equipment has gone haywire, meaning it’s up to you to fix it. You’ll find Annura, one of the project management frogs, in the Caretaker’s Rest, as you explore this snowy region. Not only will you need to use Heaters and Coolers from Annura to navigate the area by carefully freezing and thawing a path to the buildings you need, which requires tinkering with a frog’s Umbrage stat. but the large green pipes shooting off from the central Climate Control building physically block your paths. Unlike bridges, you can’t go over or beneath them and will need to find a way around the pipes by making your way across the waters of the map. Your goal is to thaw control items around the map before returning to Climate Control to try and fix the machinery inside, which allows you to more consistently explore the area. Your Gateway Nexus portals here are to the right of the Caretaker’s Rest where you’ll find Annura, as well as on the northernmost island above the Deep Storage area. |
|
Central Junction |
|
As the name implies, the Central Junction is your jumping off point for first accessing most of the other areas in Mudborne. After you’ve opened the Northern Pool and followed Dendro the Historian up into his new home at the dock just south of the Pondmother’s Pool, you’ll need to explore the Kindergarten, Residential District, and Climate Control maps fully to progress their story and forge three seals, one in each area, that allows the opening of the path that takes you to the Pondmother’s Pool directly. The only Gateway Nexus portal here is just to the east of Dendro’s dock, and it lets out just north of your house in the Gateway Nexus. This will be a central portal, since it permits quick acess between maps. |
See something you’d like to explore later once you’re able to access an area? You can also mark your map with the symbols at the bottom of any given map page to make helpful notes you yourself throughout the game.

Next
What Does Cozy Gaming Mean To You?
To me, a cozy game is less about what you’re doing and more about how it makes you feel. It doesn’t have to be all cute animals or farming fields (though those don’t hurt); if I can sink into it like a warm blanket, it’s cozy.