
Fragpunk is a 5v5 free-to-play hero shooter with 13 characters, known as Lancers, available in the game. Much like in other hero shooters, these characters come with their own unique abilities – these are largely broken into vague categories, like Vision Control, Healing, and Skill Damage to name just a few.

Related
If you love roguelikes and shooters, these are the best games that combine these genres.
This tier list covers each Lancer in detail and allocates them a spot on a list ranked S to B-tier. Keep in mind that you’ll only get a handful of Lancers for free at the start of the game, so hopefully this list can help you pick your first few Lancer purchases.
|
Tier |
Lancers |
|---|---|
|
S-Tier |
Broker, Pathojen, Kismet, Corona, Zephyr |
|
A-Tier |
Serket, Hollowpoint, Spider, Axon |
|
B-Tier |
Jaguar, Nitro, Chum, Sonar |
S-Tier Lancers

Here are the best Lancers in Fragpunk. This list is based on how useful their abilities are, while also taking into account how difficult they are to play.
- Broker
- Pathojen
- Kismet
- Corona
- Zephyr
Fragpunk feels like a fairly balanced game where all of the Lancers are fun to play and have their own advantages, but we still expect a meta to develop when it comes to just how powerful individual Lancers are.
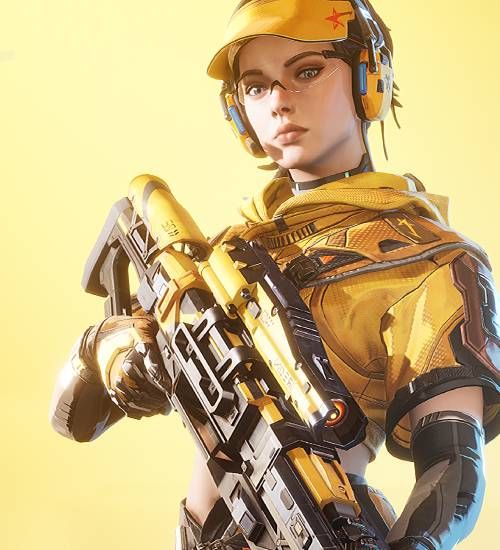
Broker
Skill Damage/Vision Control/Trap Placement
-
(Q) Goddard’s Vengeance – A shoulder-launched rocket that deals damage and knocks enemies back. Two charges.
(E) Smokestack Lightning – Throw a gadget that generates a large smoke screen along the trajectory path and around the dropped projectile.
(T) Cherry Bomb – A throwable device that generates multiple exploding bombs which are triggered by nearby enemies, but only trigger after a short delay.
Broker is a free-to-play Lancer you get right from the start of the game. His rocket launcher is fantastic and can be used to quickly eliminate enemies around corners, while his smokescreen provides plenty of cover for your team. An excellent, beginner-friendly Lancer.
Difficulty: 1/5
-


Pathojen
Health Recovery/Fortification Defense/Trap Placement
-
(Q) Emotional Rescue – Throws a healing circle on the ground.
(E) Shroom Wall – Erects a destructible wall, which can be used to block doorways.
(T) Killer Queen – A throwable trap that can be activated, or it will trigger when an enemy approaches. Deals damage over time.
Passive – Chemical Romance – Pathojen is immune to poison damage.
Pathojen is the only healer in Fragpunk, which makes her a powerful pick for a strong team composition. You can use her wall to block entrances while you heal teammates.
Difficulty: 2/5
-


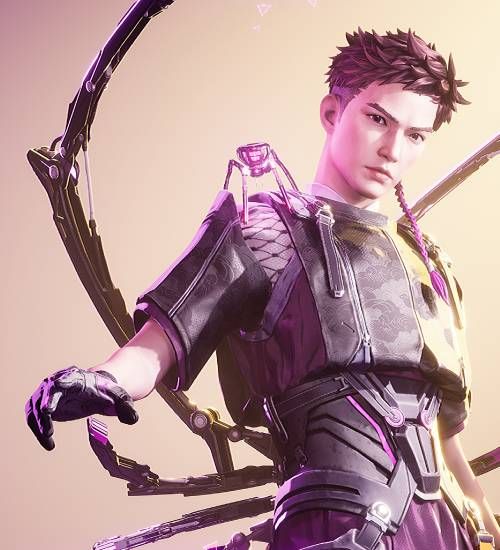
Kismet
Detection/Skill Damage
-
(Q) Hello Goodbye – Scans enemies in front of Kismet, revealing their location.
(E) Misery Angel – A bomb that deals damage to enemies in range, even behind barricades.
(T) Walk On The Wild Side – Kismet turns invisible and invulnerable for a short period of time, but you can’t see enemy Lancers while moving.
Kismet is able to flank enemies and pull off some fun plays with her T ability, while providing support for the team with her short-range scan. Her E ability is one of the best in the game because you can use it to damage enemies through terrain, or make them adjust their position so you can get a shot on them.
Difficulty: 3/5
-


Corona
Teleportation/Area Delay/Frontal Assault
-
(Q) Fast Lane – Dash forward a short distance.
(E) Ashes To Ashes – Creates a “war zone” on the ground, an area which deals damage over time to enemies and provides Corona with extra damage reduction and movement speed.
(T) Hothead – Blinds enemies in front of Corona after a short delay.
Corona is a disruptor in Fragpunk. Dash in, blind your enemies, and set them on fire with your E ability. Make use of that damage reduction while in your war zone to out-gun enemies.
Difficulty: 4/5
-


Zephyr
Asssasin/Area Delay/Teleporation
-
(Q) Midnight Rambler – Go cloaked. You can only use melee weapons while cloaked. If you take damage, or fire your gun, you become uncloaked. Only active for a limited time.
(E) Fade Away – Creates a large area where Zephyr can move around cloaked for an unlimited time while using her Q. It is temporarily disrupted when she’s attacked, as Zephyr is not invulnerable in this state.
(T) Get Back – A deployable beacon. Use it in one location, head into the fight, then reactivate the ability to return to the beacon. You can do this while using Midnight Rambler.
Zephyr is difficult to play but very rewarding. She can teleport in and out of the action using her T, and go invisible and stab enemies in the back with her E and Q combo. When handled correctly, Zephyr is a menace.
Difficulty: 5/5
-


A-Tier Lancers

These Lancers are still very good, but are a bit more situational or more difficult to navigate. If we’re using difficulty as a determiner of where a Lancer falls on this list, consider the A-tier to be great Lancers that are harder to master.
- Serket
- Hollowpoint
- Spider
- Axon
Serket
Vision Control/Area Delay/Teleportation
-
(Q) Station To Station – Conceals Serket for a short period, then allows her to teleport to her target location. Enemies within the target location’s view are revealed as Dust Storms.
(E) Gold Dust Woman – Releases a Dust Tornado that moves slowly forwards and slows enemies.
(T) Dilemma – Throws a trap that pulls enemies slowly towards its center.
Serket is a fun but difficult Lancer. Her Q allows you to move and teleport while concealed, but you are visible when doing so. You can combo this with your E for cover, but it’s still tricky to teleport unless you use it correctly.
Difficulty: 4/5
-


Hollowpoint
Skill Damage/Trap Placement/Vision Control
-
(Q) Meteora – You can use a single-shot railgun which charges up when held to shoot. When charging it reveals enemies within your field of view.
(E) Smoke Screen – A slow, forward-moving smoke screen that reveals enemies in its path.
(T) Paparazzi – Deploys a trap that attaches to nearby enemies. It can be destroyed by the enemy by interacting with it.
Hollowpoint is a useful Lancer to have on your team for her ability to reveal enemy players, but the difficulty of hitting your shots with the Meteora makes her a tricky pick. If you can hit your shots or have found a good, long-range spot to use her, she can be infinitely more useful.
Difficulty: 3/5
-

Spider
Teleportation/Area Delay/Trap Placement
-
(Q) Teleporter – Place two Teleporters. You can recall one at a time remotely, essentially moving across the map teleporter by teleporter.
(E) Spirited Away – Throws a teleportation trap which teleports enemies to the location to which you threw it from. There’s a short delay between the projectile landing and the teleportation.
(T) Spider Web – Places a trap on the floor which briefly blinds and slows enemies.
Spider is a difficult Lancer to navigate. The clunkiness of his Q means getting your teleportation right is tricky, but it can be useful once you master it. Likewise, the E is a very powerful ability to disrupt enemies, but it’s easily dodged. You can pull off a neat E into T combo to instantly snare any players you teleport.
Difficulty: 3/5
-

Axon
Skill Damage/Frontal Assault
-
(Q) Electric Guitar – A guitar shotgun, basically. You can use the Aim key (RMB) to quickly throw sticky grenades. When you get a kill with the guitar, you replenish two grenades. You can also slide while using the guitar.
(E) Sticky Fingers – Throws a bouncy sticky grenade, you can hold down the E key to continuously throw grenades. It will bounce until it sticks onto an enemy, or it will automatically detonate after a short period of time.
(T) Super Freak – Axon is immune to blinds for a short time.
Axon is extremely fun and very easy to get killed while playing. You want to play hyper-aggressive, sliding around corners with your shotgun and throwing grenades everywhere. The guitar shotgun is not a guaranteed one-shot kill, and we’ve found it to be a little inconsistent. Axon is a hard-to-master Lancer.
Difficulty: 4/5
-

B-Tier Lancers

These Lancers are very situational or might require a lot of communication with your team to get the most out of them, or they just feel a bit underpowered compared to the Lancers higher on this list.
Jaguar
Trap Placement/Vision Control/Detection
-
(Q) Live Wire – Deploys a trap on the ground that deals damage and slows enemies.
(E) Electric Avenue – Summons a large electrical cage which blocks enemy vision.
(T) I Can See For Miles – Display the number of enemies ahead that are on low health or affected by any of Jaguar’s skills. Increases movement speed.
What Jaguar lacks in mobility or strength, he makes up for in vision and control. His T ability has a long uptime which allows you to play around your E and Q to lock down an area. That being said, his trap is quite short range and he lacks any other proper utility.
Difficulty: 2/5
-


Nitro
-
(Q) Chug Chug – Deploy a drone that you can control. Fires up to 10 shots. Can be destroyed.
(E) The Wall – Deploys a small wall.
(T) Mr. PewPew – Deploy a sentry turret. Can be placed on walls and floor. Fires automatically after a short delay.
Nitro is a fun Lancer to play, but ultimately the controllable Drone is quite weak and can easily be destroyed by enemies. The turrets are good for finding out where players are, but they deal minimal damage.
Difficulty: 1/5
-


Chum
Trap Placement/Skill Damage/Vision Control
-
(Q) Chomper – Chomper patrols around the area you place him in and charges nearby enemies. He can be destroyed. You can feed Chomper different baits to change his mode.
(E) Explosive Bait – Either place an explosive trap on the wall which explodes when triggered or feed Chomper the bait. This makes Chomper follow Chum and charge enemy players. When Chomper is close to an enemy, it explodes.
(T) Smoking Bait – Either throw a smoke ball that creates a small area of smoke, or feed the bait to Chomper, who enters Smoke Mode, releasing a constant stream of smoke. Chomper’s direction can be controlled with the fire button.
Chum is a heavy utility Lancer that requires good teamwork to really shine. Chomper is useful but really only as a distraction.
Difficulty: 1/5
-

Sonar
Area Delay/Detection
-
(Q) Echolocation – Deploys a small echolocation device that will reveal surrounding enemies when they move.
(E) Sonic Surge – Launches a sonic wave that reveals enemies and deals damage after a short time, knocking back and dazing enemies while also exposing their location.
(T) Sound Of Silence – Reduces the noise of teammate’s footsteps and grants immunity to enemy Echolocation scans.
Sonar may be useful in competitive ranked play where communication is good on the team, but as a solo Lancer she’s a little underwhelming.
Difficulty: 2/5
-


The tier rankling of the Lancers in this guide are subject to change as the meta of Fragpunk develops. We may see some Lancers combined in some fun ways that make them more powerful than we first thought.

Related
The Best FPS Game From Each Year Of The ’90s
The first-person shooter genre excelled in the ’90s, mainly thanks to these games.