If you’re not fighting a dragon of some form of Wyvern in Monster Hunter, then you’re more than likely fighting an Ape. Whether it’s Rajang, Garangolm, or Ajarakan, there are countless primates for you to duke it out against, and Monster Hunter Wilds reintroduces a classic that’s been absent from the last few games.

Related
Every Flagship Monster In Monster Hunter, Ranked
Every monster in Monster Hunter is memorable, but the flagship ones leave the biggest impression. Here are the best.
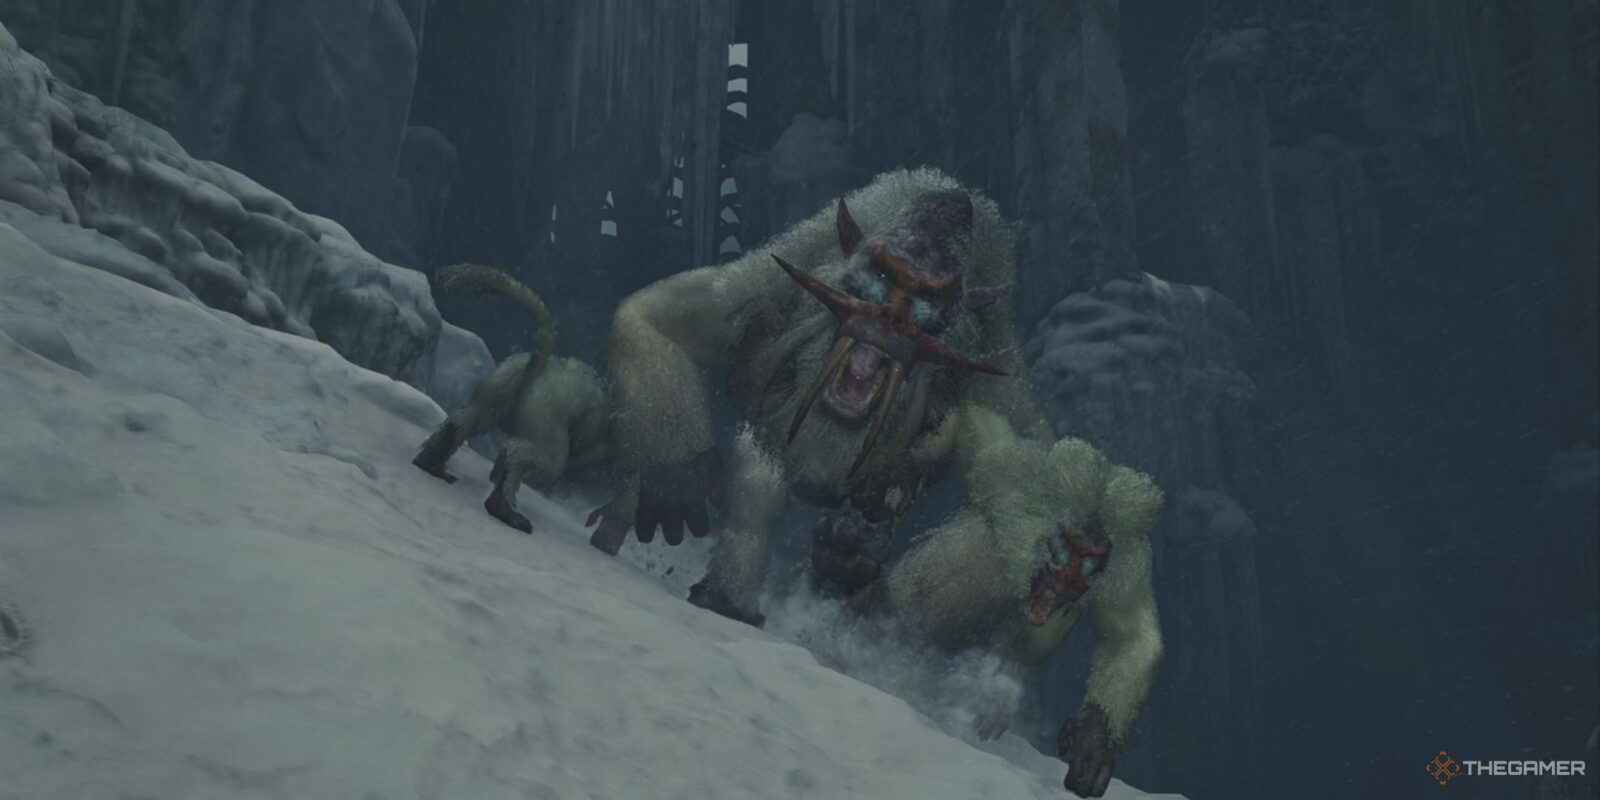
Last seen in Monster Hunter Generations, Blangonga is a fanged ape that dwells in colder regions. In Wilds, that would be the Iceshard Cliffs. They work a bit differently from other large monsters, relying on their pack of smaller monsters to help them out. They’re a unique fight and a welcome return, and here’s how to beat them with ease.
Blangonga – Strengths And Weaknesses
Despite being such a late-game monster, Blangonga is actually quite humble in terms of stature. They’re not much larger than the hunter themselves, though this gives them unmatched speed compared to others. They can attack quickly, twist around, and recover from their own attacks while repositioning at a moment’s notice.
This can make it hard to focus your attacks on just a single area, especially with larger weapons like the Charge Blade. Let’s take a quick look at their strengths and weaknesses before we discuss a strategy against them.
- Weak Point – Rear
- Elemental/Ailment Weaknesses – Fire, all Ailments.
- Elemental/Ailment Strengths – Ice, Dragon.
- Best Weapon Damage – Equal across all weapon damage types.
As you can see, and as might be obvious owing to their icy attacks and domain, but Blangonga is quite weak to fire. Of particular note though, is that they are not immune or resistant to a single status ailment. They all have the same effectiveness against them. This means that while there’s no perfect strategy, any and all can work against them.
When fighting Blangonga, there are two areas you’ll want to aim for. The first is their rear, which is the most exposed part of their body, and as such is their weak point. The other is the fangs on their face. They can both be broken independently, and with each destroyed, their pack is less likely to listen to their commands. With the pack removed, Blangonga is a significantly easier fight.
Best Equipment To Fight Blangonga
Being an ice-elemental beast, it is only logical then that you should be wearing some gear with good Ice Resistance. There are a few good options here, but the Hirabami set has far and away the highest Ice Resistance, while still being relatively easy to craft due to the ease of hunting Hirabami.
However, Blangonga can also deal Frostblight with their breath attack, which can lock you in place long enough for them to unleash some powerful moves on you. To this end, the Jin Dahaad set is great. It has high Ice Resistance, though not as high as Hirabami, while having the ability to reduce how long Frostblight lasts. It’s a great choice if you just can’t manage to stop getting frozen.
Any weapon can work well here provided you avoid anything with the Ice and Dragon Elements. With Blangonga being susceptible to every ailment as well, status weapons can work a treat against him as well. Two particularly powerful Fire weapons you can use are from the Nu Udra and Rathalos trees.
Blangonga – Fight Breakdown And Moves
Blangonga is a speedy fellow, and one that feels at home in the chilly Iceshard Cliffs. While they could realistically work in other regions, they do have some moves that rely on the snowy terrain present here. They’re not an incredibly complex monster with a fairly simple set of moves. Their pack mechanic, where they can command the smaller monsters as long as their fangs are intact, is the real unique aspect of Blangonga.
Now let’s take a quick look at their moves below:
|
Move |
Description |
Counter |
|---|---|---|
|
Ice Breath |
Blangonga breathes ice in an arc in front of themselves for a few seconds, which can inflict Iceblight. |
This isn’t particularly powerful and can easily be blocked. You can also move around to their sides to attack them during this long animation. |
|
Rushing Leap |
Blangonga will jump in place for a moment before diving towards you. This move drags them a great distance, and they turn around after landing to face you again. |
Try to dodge to the sides and then quickly follow Blangonga to catch them while they’re recovering from the attack. |
|
Arm Swipe/Punch |
Blangonga will reel back an arm and strike you. This can be done with any hand and can be comboed together. The punch deals more damage than the swipe. |
Blocking works great here and can trigger a Power Clash, though dodging to the side works as well. |
|
Snow Upheaval |
Blangonga will dig their hands into the snow and toss it ahead of them. |
This attack is quite wide and has range, so it’s best to keep your distance from it entirely when they reach into the ground. |
|
Backwards Kick |
If you are standing behind Blangonga, they will kick a leg behind to knock you over, and potentially leap backwards as well. |
Easily blocked, and can be avoided entirely by simply not attacking their rear for too long at a time. |
|
Dig |
Blangonga will bury themselves beneath the snow and jump out again a short distance away near a hunter. |
Using lock-on here makes Blangonga much easier to track. |
Overall, they’re not too complicated, though they are quite mobile. Slower weapons will struggle against them, so make sure you’re blocking as much as possible with these, and keeping mobile yourself with lighter weapons.
Blangonga – Drops And Materials
Blangonga is pretty par for the course when it comes to materials. Despite that long, bushy tail, they do not have any severable parts, though breaking their fangs does have both a gameplay effect and gives you a guaranteed drop of the self-same material. Otherwise, you should focus on destroying as many wounds as possible to boost your chances of getting more material drops.
|
Material |
Where It Can Be Acquired |
|---|---|
|
Blangonga Fang+ |
Broken Part (Head x2), Carving, Target Reward |
|
Blangonga Pelt+ |
Wound Destroyed, Carving, Target Reward |
|
Blangonga Tail |
Broken Part (Tail), Carving, Target Reward |
|
Blangonga Whisker |
Target Reward, Carving |
|
Blangonga Certificate S |
Target reward |
|
Beast Gem |
Target Reward, Carving |
Excusing the Pelt and Beast Gem, every item has the same drop rate from both Carving and Target Rewards
Being a monster only encountered in High Rank, Blangonga has no Low rank materials despite the ‘+’ featured on many of its drops. The Beast Gem is easily the rarest drop, featured on other Beast monsters rather than being exclusive to him. It’s a rare one alright, but Blangonga is one of the easier hunts, making farming them for the Beast Gem easier than their peers.

Next
Every Monster Hunter Game In Chronological Order
Monster Hunter continues to be well and alive after almost two decades. With so many titles, it can be confusing to know how to play them in order.