Across the history of Monster Hunter, there have been a lot of weapons. And with few exceptions, the roster has only grown and rarely been reduced. By the time of Monster Hunter Wilds, we have 14 different weapons to choose from, each of them distinct and giving the game and entirely different feel from one another.
Related
Monster Hunter: Every Weapon Type And The Game They Were Introduced
Picking a weapon to main in Monster Hunter is just as hard as the hunt itself. Here’s when each was introduced to give you an idea of their legacy.
The Dual Blades have always been some of the most popular, letting you move with unparalleled speed and dashing along the length of the monster for great damage and an unmatched sensation of hype. They’re the weapon for choice for those who want to feel like a bolt of lightning. They’re not too different in Wilds, so let’s get into how they work.
For clarity, we are using Xbox button prompts throughout this guide.
The Dual Blades
The Dual Blades are all about being fast. While they deal some of the lowest damage of any weapon type, the speed they offer you more than makes up for it. They can apply status effects quickly, and can cancel out of most attacks at a moment’s notice to avoid damage and reposition. It’s also a fairly simple weapon overall, so let’s check out its core mechanics.
Demon Mode
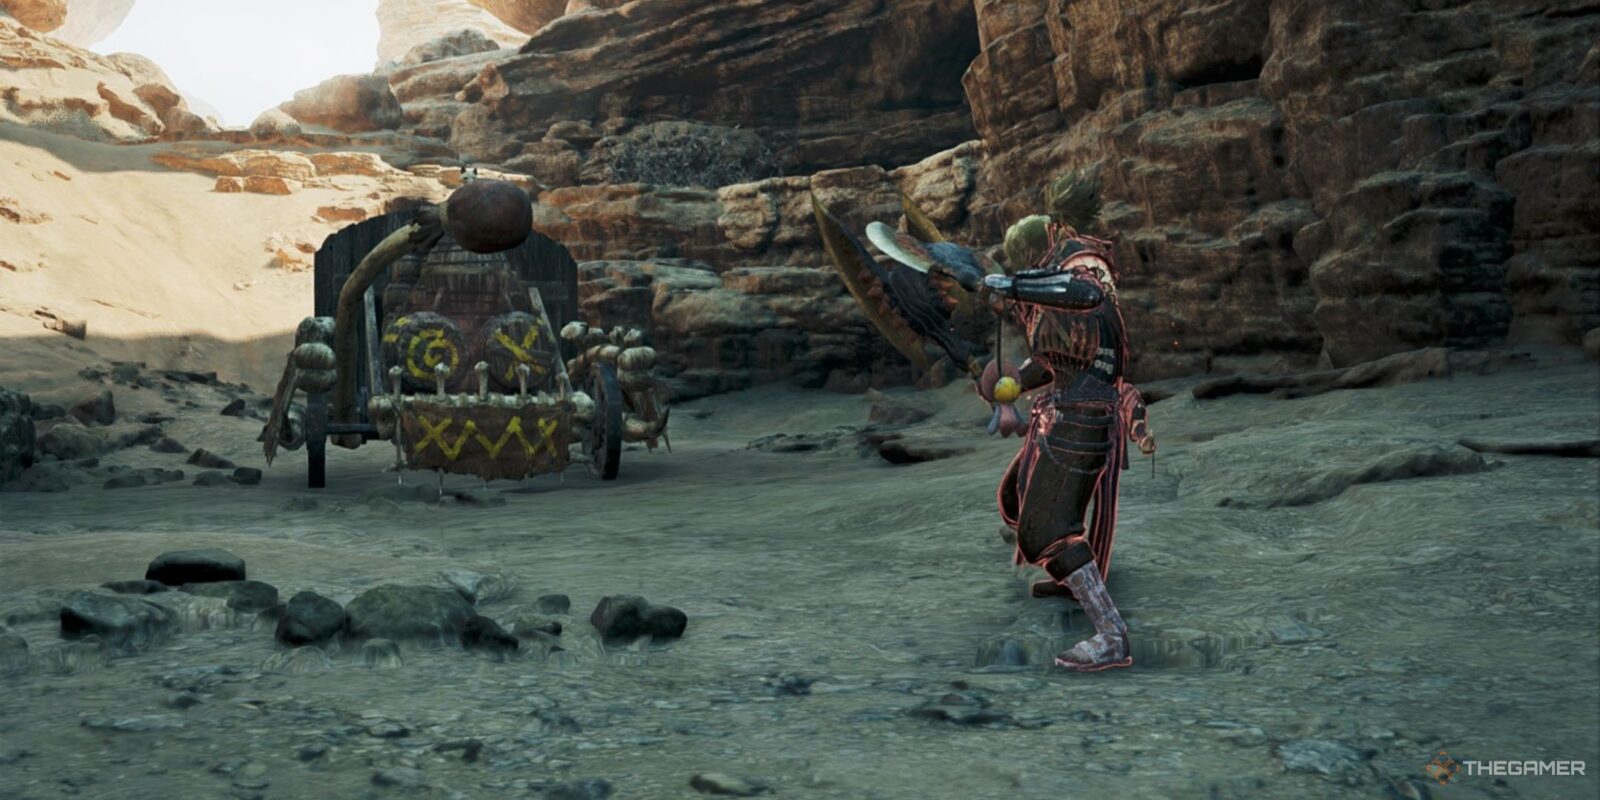
By default, all of your attacks with Dual Blades are fast enough but low damage. By pressing RT, you enter into Demon Mode. This has a series of changes, such as increasing your movement speed, damage, granting you a unique dodge, and making you immune to knockback. In exchange for all those benefits, your stamina gauge steadily decreases as you remain in Demon Mode.
You hold your weapons backwards and glow red while in Demon Mode.
Here are each of the unique moves you unlock in Demon Mode:
- Demon Fangs And Demon Slash – Replaces Double Slash, locking you in place but attacking much faster and dealing more damage. You can also move left and right between Demon Slashes to reposition.
- Demon Flurry Rush – Replaces Lunging Strike, letting you advance in Demon Mode with a series of fast, damaging attacks. Can also be used outside of Archdemon Mode after the Demon Gauge has been filled.
- Blade Dance – An attack performed by pressing Y+B at the same time. Drains a chunk of the Demon Gauge with each stage, but can be performed three times in a row for massive damage.
The Demon Gauge is charged as you perform attacks in Demon Mode, which allows you to perform Blade Dance, and lets you enter Archdemon Mode when the gauge is filled.
Archdemon Mode
While you start in a weakened state, Demon Mode lets you eventually grow to Archdemon Mode. After the Demon Gauge is filled, you enter Archdemon Mode by simply exiting Demon Mode. Rather than returning to your weakened state, you retain your high speed and unique dodge, and gain access to Demon Flurry Rush and a faster, more damaging version of Double Slash. You also gain Demon Flurry, Archdemon Mode’s version of Blade Dance.
You hold your weapons in the standard position and glow white while in Archdemon Mode.
In Archdemon Mode, the Demon Gauge slowly depletes over time, and decreases more quickly as you attack. Using the unique dodge in Archdemon Mode also reduces the Demon Gauge as well as your stamina. However, conserving your stamina is otherwise dramatically easier, letting you easily swap into Archdemon Mode to restore stamina, and then back into Demon Mode for higher damage and knockback immunity.
If the Demon Gauge completely empties, you will exit Archdemon Mode and have to fully fill it again to enter it. However, if you refill the Demon Gauge before it fully empties, you can effectively stay in Archdemon Mode indefinitely. This is why you should constantly be swapping between both modes to keep both active.
Demon Boost Mode
Demon Boost Mode isn’t a dedicated mode with the Dual Blades, but rather one that boosts both other modes. By performing a Perfect Evade, you will perform a new dodge that remains active for the length of Demon Boost Mode. With you, you dodge even further with more invulnerability frames, and attack while dodging, too.
After dodging, you can press Y to perform an additional corkscrew attack that acts as another dodge. This dodge and attack can be used in both Demon and Archdemon Mode, and replaces, the enhanced dodge of those modes until Demon Boost Mode wears off.
Dual Blades – Skills And Abilities
With the basics under wraps, let’s delve into the specific moves that the Dual Blades have access to. They’re all based on being fast and slashing away at specific spots before quickly moving out of the path of damage.
Blade Dance
This is used in Demon Mode by pressing Y+B. This unleashes a series of spinning slashes while standing place. This can be chained up to three times in a row, with each performing more hits and dealing more damage. It also takes a chunk of the Demon Gauge with each combo, so make sure you have enough for all three before starting.
Blade Dance is a very stationary attack, and is best used against slow or stationary enemies, such as when they are caught in a trap or stunned. While focused on a single area, such as the tail, this can contribute a massive amount towards severing it.
Demon Flurry
Demon Flurry is the Archdemon equivalent of Blade Dance. Unlike Blade Dance, it is much more mobile, letting you move lightly throughout the attack and letting you leap a great distance when jumping to the next stage of the combo. It deals less damage than Blade Dance and can only be chained twice, though the extra distance covered makes up for this shortcoming.
It can also be alternated with Blade Dance by pressing RT instead of Y+B. This lets you perform up to five attacks in a row, provided you have enough in the Demon Gauge to last that long.
Starting with Blade Dance will let the combo go on for five hits, while starting in Archdemon Mode makes it last only four hits.
Demon Dodge
Used in Demon and Archdemon Mode, Demon Dodge lets you cover much more ground while dodging, having more invulnerability frames, and having a such shorter recovery period. It is better in every way than the normal dodge. In Archdemon Mode, it also drains the Demon Gauge is try not to abuse it.
After a Perfect Evade, Demon Dodge covers even more distance, gives even more invulnerability frames, and lets you attack.
Turning Tide
This is the Focus attack of the Dual Blades. With it, you can instantly perform a Midair Spinning Blade Dance that drags you across the full length of a monster’s body, destroying the Wound at the end of the attack. This deals damage to every part of the monster you hit, making it particularly helpful for severing tails.
Dual Blades – Tips And Tricks
Now that you know all about how the Dual Blades work, it’s time to start mastering it. Thankfully, it’s a very easy weapon to manage, with stamina the most important system to keep an eye on. There are some tips that can really help you excel with the weapon though.
Midair Spinning Blade Dance
While you can perform this attack with the Turning Tide Focus attack, you can also perform it whenever, provided you are in Demon or Archdemon Mode. By jumping from a high position, attack while falling to perform a Midair Spinning Blade Dance. If you land on the monster at the right angle, you’ll perform the very same attack as Turning Tide, minus automatically destroying any Wounds you hit.
Get The Right Skills
Skills are what really make your builds so powerful in Monster Hunter. For the Dual Blades, there are two you’ll want to keep an eye out for – Power Prolonger, and Adenaline Rush. The former boosts the length that the Demon Gauge is empowered, slowing its passive drain to let Archdemon Mode last much longer.
Adrenaline Rush increases your attack power for a short time after performing a Perfect Evade. With the Dual Blades being able to dodge so quickly and already having its own Perfect Evade mechanic, Adrenaline Rush is just a cherry on top that further empowers what you’re already doing.
Always Alternate
It can feel like the goal of Dual Blades is to use Demon Mode to power up Archdemon Mode, use that until it’s drained, rinse and repeat. Both modes have their advantages though, and swapping between both helps you massively.
Demon Mode is less agile but deals more much more damage. Archdemon Mode has more freedom of movement and easier stamina management, but reduced damage. By alternating between both, you can recover stamina and the Demon Gauge respectively, so neither has to ever be underpowered.
Alternating between Blade Dance and Demon Flurry does actually change mode, meaning you recover stamina while using Demon Flurry, giving you more stamina when you return to the blade Dance combo.
Bring Dash Juice
Dash Juice is a consumable item like Armorskin and Demondrug, and when consumed it dramatically increases your stamina recovery speed. While it doesn’t last as long as some other consumables, it can be great in the midst of battle so that Demon Mode lasts even longer, and means you have even less downtime while using it.
Next
Monster Hunter: The 12 Biggest Monsters In The Series, Ranked
A major staple of the Monster Hunter series is the inclusion of gigantic beasts for players to defeat, and here is a look at the biggest ones.





Leave a Reply