While the majority of photo rallies you’ll participate in Like A Dragon: Pirate Yakuza In Hawaii occur in Honolulu, Madlantis is also home to one of these challenges. So, when you aren’t engaging in ship-to-ship combat, or swilling grog with your pirate peers, you can trek up and down this fortress looking for key landmarks.

Related
Dungeons & Dragons: 7 Tips For Running Pirates
Arr you ready for some tips and tricks for running pirates?
When it comes to photo rallies, Madlantis is unique in that it has the most objectives that are locked away in areas that you won’t be able to reach until you have completed certain story objectives. We’ll take you through every location, and let you know at what point in the game these locations become available. Basically, everything you need to know is contained within: you’ll be dressing like a zombie in no time.
1. Bar District – Big Anchor
“Square In Front Of Bar”
Head into the Bar District, which is in the northeast corner of the Madlantis map. There is a massive anchor in the center of this area, in between the Batting Center and the Dunghill bar. That is your first landmark!
2. Bar District – A Small Steering Wheel
“Inside The Bar”
The golden ship’s wheel is sitting on the left side of the Dunghill bar. The bar is in the northeast corner of Madlantis. Take a left after getting off your ship and you’ll run directly into it.
3. Bar District – Dunghill
“Bar Sign”
You’ll find the Dunghill sign above the entrance to the Dunghill bar, which is wedged in the northeast corner of Madlantis.
4. Bar District – Bang Bang Battling Center


“Battling Center Sign”
The batting center is located in the same area as the Dunghill bar. It’ll be on your right, just before you hit the anchor.
5. Docks – Traffic Light
“Look Up At The Pier”
This traffic light is on the main path in between the Bar District and the Coliseum. It is east of the Goromaru (your ship).
6. Coliseum Grounds – A Lost Kappa
“The Walls Of The Coliseum”
For my money, this is the hardest photo to find. As you enter into the general coliseum area, it will be above you and on your left. This is just as you are leaving the path and entering into the opening. There is a woman with a pirate hat tugging on a man’s shirt on the balcony you are looking for. The Kappa statue is to the right of them.
7. Docks – Signboard
“In Front Of The Pier”
When you are leaving your ship (the Goromaru), the MCU sign will be up against the wall you’ll be facing – just a little to the left. So, from your ship, head straight, and keep your eyes peeled. You should be facing this sign as you reach the main path that wraps around Madlantis. It is hard to miss once you know what you are looking for.
8. Bar District – A Sexy Signboard
“Bar District Entrance”
As the hint would suggest, you’ll find this signboard as you enter into the Bar District. It is actually on the wall to your right as you climb the stairs that leads directly into the Bar District. However, you’d be forgiven if you missed it, as you need to look up. Otherwise, you’ll walk right under it – I sure did!
9. Coliseum Grounds – Pirate’s Coliseum
“Coliseum Signboard”
Just head to the Pirate’s Coliseum desk. This sign is above the Coliseum Receptionist’s head.
“Near The Coliseum”
The little man crafted from coconuts is in the exact same place as the Coliseum Signboard. However, instead of being above the Coliseum Receptionist’s head, it is to the right of him.
11. Gaming Hall – Death Wheel
“Gaming Hall Square”
You won’t be able to enter into the Gaming Hall until you have engaged in your first coliseum battle. So, you will need to do that before you can find location 11, 12, and 13.
This sign is in the area north of the Golf in Madlantis center. You will need to look up to see it. However, the real trick is that the sign isn’t facing the entrance. If you look up, you’ll be looking at the backside of the sign. So, head as far north as possible (next to the Gaming Hall boat), turn around, and look up.
12. Gaming Hall – Golf In Madlantis
“Logo Of A Golf Center”
Head straight for the Golf in Madlantis center. As you enter into the Gaming Hall, it will be on your left.
13. Gaming Hall – A Lost Ukulele Boy And Ukulele Girl
“Shop At The Gaming Hall”
This pair of Ukulele figures are sitting next to the clown in the tent in the area north of the Golf in Madlantis center. It is the stall directly east of the Gaming Hall sign and directly north of the Bacchus’s Barrel restaurant.
14. The Queen’s Castle – Suspicious Man
“Cache For Cash”
Head to the Wooden Whale, which is the shop near the dock on the northeast corner of The Queen’s Castle. Head northwest of the Wooden Whale, along the path that circles The Queen’s Castle. This sign will be hanging above that path.
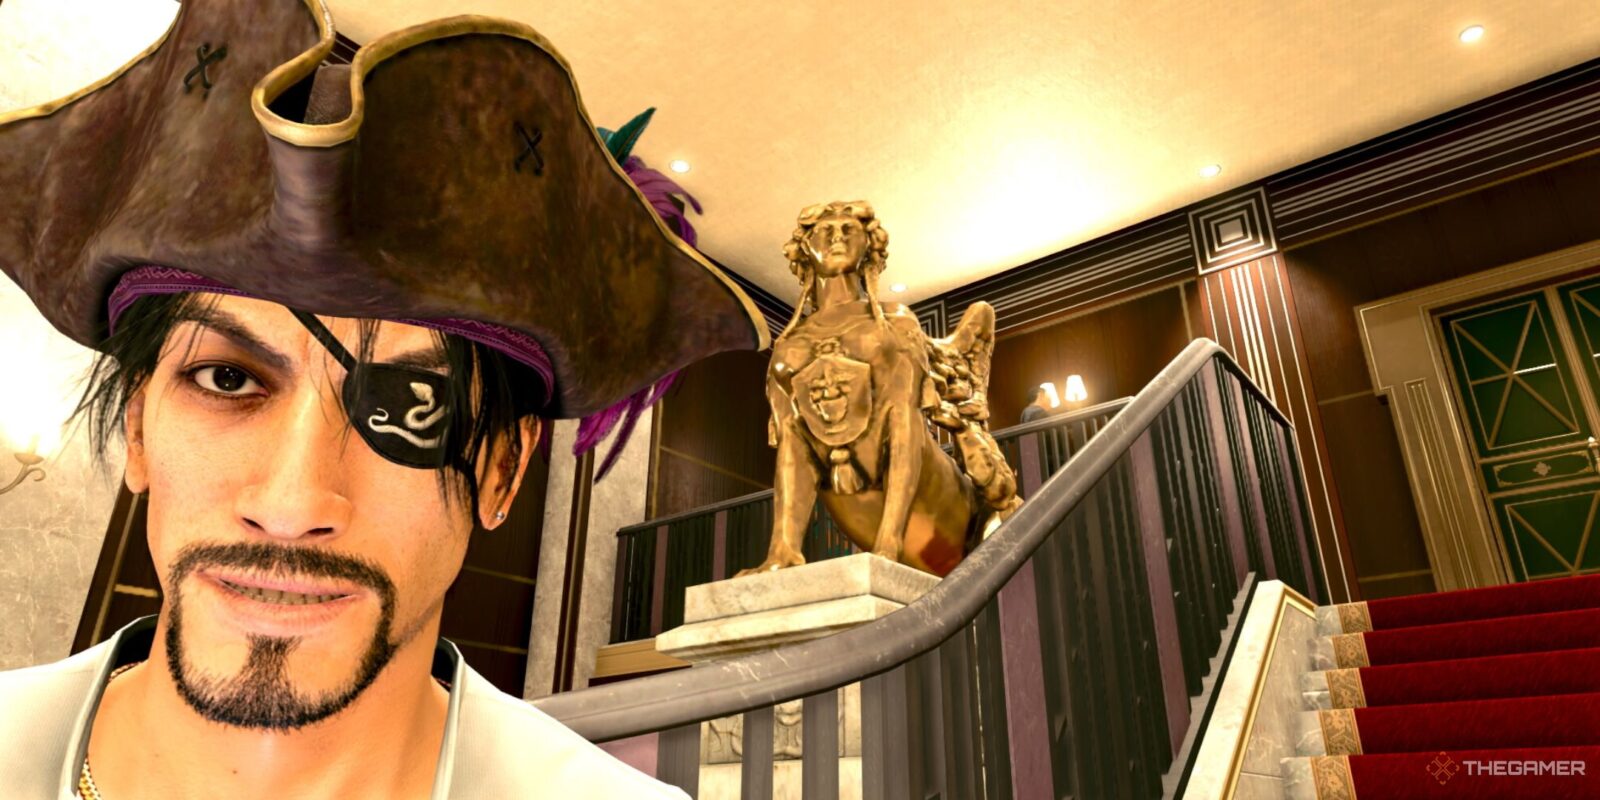
15. Luxury Palace Hotel – Chimera Statue
“Inside The Hotel”
Once you enter the hotel, this statue is directly on your left. It is nearly impossible to miss it. Of course, the real obstacle is that you won’t be able to enter the hotel until you clear the first Tournament of Captains.

Next
Like A Dragon: 8 Characters Who Change The Most Throughout The Series
Like A Dragon’s story spans decades, and its characters are always changing over the years.