Having the correct sprinkler layout in Stardew Valley is essential to making the most of the space you have on your farm. While Iridium Sprinklers can help a lot with covering more space, you can only start crafting them quite late on in the game.
So, understanding how to place each sprinkler type will inevitably help you earn more money in the game. More importantly, they will help you save time and energy, which you can instead use in the mines and foraging for other resources you need to upgrade your tools and complete the Community Center. Here are the best layouts for each type of sprinkler in Stardew Valley.

Related
Stardew Valley: Best Food To Take To The Skull Cavern
Players will need to be prepared before venturing into the Skull Cavern in Stardew Valley. Luckily, the following food items should help.
Best Sprinkler Layout in Stardew Valley

There are three types of sprinklers in Stardew Valley, namely the normal one you unlock first, the Quality Sprinkler, and the Iridium Sprinkler. Each of them requires mining materials to craft, and you’ll unlock them as you level up your Farming Skill:
|
Sprinkler |
Description |
Ingredients |
Recipe Source |
|---|---|---|---|
|
Normal |
Waters 4 adjacent tiles |
1 x Copper Bar 1 x Iron Bar |
Farming Level 2 |
|
Quality |
Waters 8 adjacent tiles |
1 x Iron Bar 1 x Gold Bar 1 x Refined Quartz |
Farming Level 6 |
|
Iridium |
Waters 24 adjacent tiles |
1 x Gold Bar 1 x Iridium Bar 1 x Battery Pack |
Farming Level 9 |
Because it takes a while to unlock the Quality and Iridium Sprinklers, it’s best to know the optimal layout for each so you can still take advantage of the time and energy saving they each provide. Not to mention that even when you do unlock them, it can take quite a lot of time to get enough material to build enough sprinklers to cover your farm – so don’t waste time waiting, and make sure you know how to lay them out.
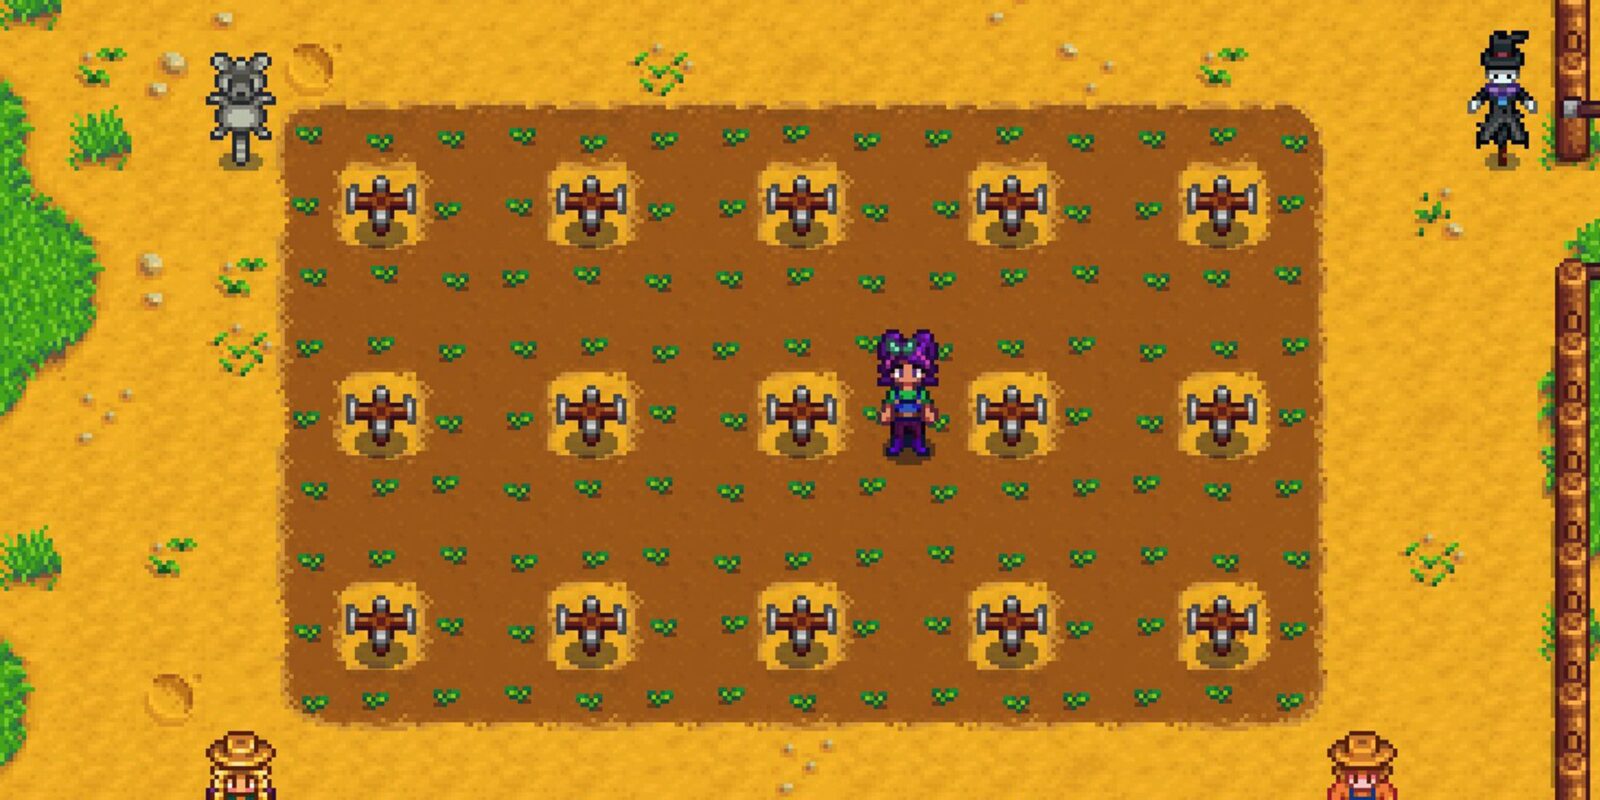
Normal Sprinkler Layout

Normal sprinklers only cover 4 adjacent tiles, so you’re going to need to get a bit creative with their layout to make the best of their capabilities. Instead of laying them out side by side, the best way to make the most out of the space you have is to lay them out diagonally as shown in the image above. Essentially, you need to make sure that they cover the spaces the next sprinkler isn’t able to.
The best part of this layout is that it makes it very simple to place your scarecrows. You can simply place them in the empty squares near the sprinklers on the edge of your layout and they’ll cover a pretty large piece of land to scare the birds trying to eat your crops away.
Quality Sprinkler Layout

When you manage to upgrade to Quality Sprinklers, you’ll have 8 tiles of ground to play around with. Unlike normal sprinklers, it’s best to lay these out next to each other to maximize the space you have available. Make sure that you have an extra space between them, though, because otherwise, the adjacent sprinklers will water the same tiles every morning.
Your scarecrow placement for this layout will need to be a bit more strategic. Scarecrows cover a large area, but the block type of layout for Quality Sprinklers may make them difficult to place if you don’t open up a space for them specifically. The easiest way to do this is to lay your Quality Sprinklers out in lines of 5, with each third line only having 4 sprinklers on the sides. Then, in the middle space, place your Scarecrow. This will allow them to cover your crops and not get in your way when you’re trying to harvest them.
Iridium Sprinklers

The best sprinklers in the game are Iridium, and they cover a massive 24 adjacent tiles. This means you can work around their placement a lot more because they naturally cover a ton of space on your farm. For the optimal Iridium Sprinkler layout, you’ll want to follow the same pattern as the Quality Sprinkler by placing them next to each other. Again, though, make sure they aren’t covering the same tiles.
As for Scarecrows, it would be best to leave openings above and next to your sprinklers and place them there. Because Iridium Sprinklers take up so much space, it would be a bit counter-intuitive to have the same Scarecrow placement as Quality Sprinklers. Depending on how you design your farm, this may look a bit different, but just make sure you’re covering your crops well.
Scarecrows cover 8 tiles to the north, east, south, and west, and 6 to each corner. In total, they cover 249 tiles – so you can work with this number to make sure you get good coverage of all your Iridium Sprinklers and the crops they water.
Best Greenhouse Sprinkler Layout

The best sprinkler layout in the Stardew Valley Greenhouse follows the same principles as the layouts above. The only difference is that you’ll need to place your sprinklers on the edge of the tillable soil so you can make the best out of the space you have.
For example, you’ll need 6 Iridium Sprinklers in total to effectively cover the Greenhouse. However, two of them will be placed on the wooden area next to the tillable soil instead of on the actual soil. This way, your plants will still get watered, and you won’t waste space unnecessarily.

- Released
-
February 26, 2016
- ESRB
-
E for Everyone (Fantasy Violence, Mild Blood, Mild Language, Simulated Gambling, Use of Alcohol and Tobacco)
- Developer(s)
-
ConcernedApe
- Publisher(s)
-
ConcernedApe