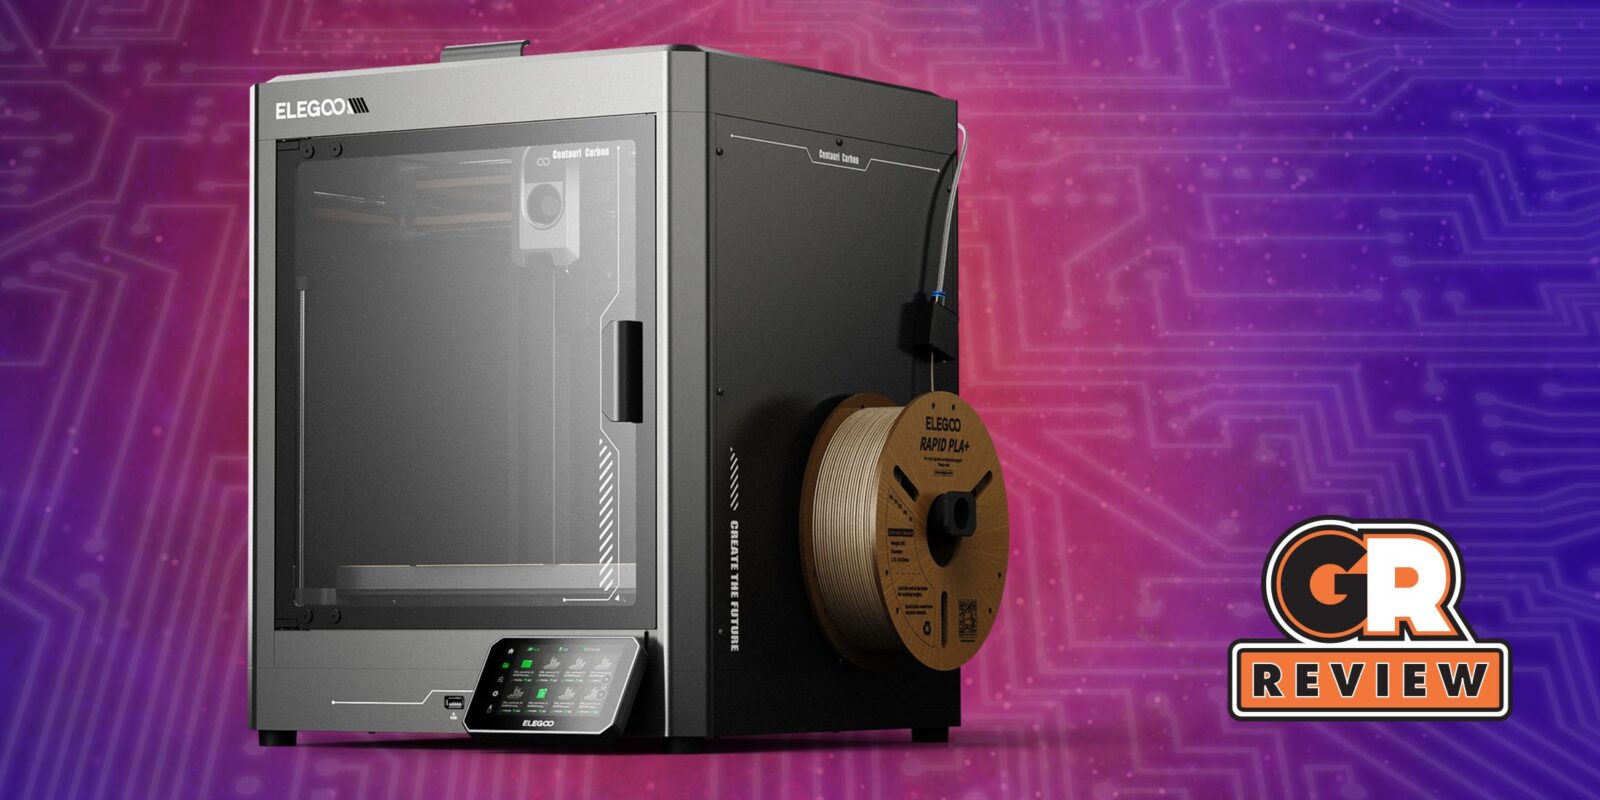
3D printing has come a long way, and the printers continue to improve in performance and user-friendliness. Elegoo has been in the 3D printing space for about ten years now, and it has a range of FDM or Fused Deposition Modeling and Resin printers. The Elegoo Centauri Carbon is the company’s first Core-XY printer with an enclosure, and it offers an excellent out-of-the-box experience for people getting into the hobby, and a fast-prototyping workflow for professionals.

Related
Pokemon Fan Shares Realistic 3D-Printed Squirtle
Thanks to the work of one Pokemon fan, a 3D-printed model reveals what a realistic version of Squirtle would look like in the real world.
Fused Deposition Modeling is the process of using material extrusion in a layer-by-layer fashion to create a physical 3D model. Those who have been involved with 3D printing will understand the difference between FDM and Resin printing, but for the uninitiated, an FDM printer has an extruder, hot end, and build plate setup, while a resin printer has a pool of resin, UV lights, and a build platform setup.
With FDM printing, the hot end heats and releases the filament onto the build plate, fed to it through a spool, in a specific pattern, one layer after the other, to create the final 3D object.
A Core-XY printer is one that employs two motors to control the movement of the print head on the X- and Y-axes. The motors themselves remain stationary and this allows for much faster printing speeds compared to traditional Cartesian 3D printers where the nozzle moves along the X, Y and Z-axes.
What’s in the Box?
- Elegoo Centauri Carbon 3D printer
- Top glass panel
- Documentation
- Tools for maintenance
- Screen
The unboxing and assembly experience for the Elegoo Centauri Carbon was quite straightforward. The printer was pre-assembled for the most part with the top glass panel packaged separately. Everything was secured in place and while I was able to get the printer out of the box on my own, a helping hand would make the process much easier. The screen and the tools you would need to get started were placed inside the enclosure with more packaging foam.
The print head was protected with some cardboard and zip ties, easy enough to cut free. The bed needed to be unscrewed from the base of the enclosure and the instructions were clearly mentioned in the box that had the screen. It is recommended to take a look at all the boxes and go through the instructions before turning on the printer. After the bed was freed, and the top glass put in place, I was off to the races.
Specifications and Features
The Centauri Carbon boasts a build area of 256x256x256mm, which is the typical size for a lot of FDM 3D printers. There are smaller and larger printers on the market, but this build volume is sufficient for most use cases. You can always split larger objects in the slicer software to fit the build plate. More on that later.
The tool head (the part of the printer that releases the filament) can move up to 500mm/s (print speed) with a maximum acceleration of 20,000mm/s, matching some of the fastest printers from other brands like Bambu Lab and Creality.
There are some printers that can go up to 700mm/s print speeds, but their acceleration is not as fast.

Related
Helldivers 2 Fan Shows Off 3D-Printed Helmet
A Helldivers 2 fan shares an impressive 3D-printed helmet with the shooter’s community, and players approve the spread of democracy.
The hot end can reach a maximum temperature of 320-degrees Celsius while the build plate can heat up to 110 degrees. The build plate is also double-sided, flexible and magnetic, with one side optimized for PLA while the other works with all kinds of filaments.
Speaking of which, the enclosure and the temperature range make the Centauri Carbon compatible with most filaments, including PLA, PETG, TPU, ABS, ASA, PLA-CF, PETG-CF, ABS-CF, ASA-CF, PET-CF, PA-CF, PET, PC, and PA.
PLA, PETG, and TPU are some of the most common filaments that most printers on the market can work with. Some others require an enclosure for an optimal printing environment.
Along with being able to reach such high temperatures, a 3D printer also needs cooling fans to maintain and bring them down once the print is completed. The Centauri Carbon comes with a Model fan under the build plate, an Auxiliary fan for the hot end, and a self-explanatory Case fan, that work together to maintain temperatures inside the enclosure.
On the outside is the 4.3-inch color touchscreen that lets you adjust the various settings on the printer and shows the progress of the print. Next to it is a USB port for transferring files to the printer. The Centauri Carbon allows for network printing as well, so you wouldn’t really need to physically move files to the printer or even use the screen for that matter. This connection to the internet also allows OTA firmware updates.
Ideal for Beginners
What makes this 3D printer ideal for beginners is the fact that it takes care of a lot of the optimizations and calibrations that need to be made before you start printing. It has auto-leveling and auto z-axis compensation, PID tuning, Input Shaping, and One-click self-check features.
Auto-leveling makes sure that the build plate is always flat so that the first layer of the print sticks perfectly. PID tuning makes sure the hot end is working as it should be. Input shaping or resonance compensation makes sure that the vibrations of the printer don’t affect the print. One-click self-check, as the name suggests, tunes all these settings with a single click. Note that during the calibration, the printer will make all kinds of loud noises and that’s part of the process.
There is also a built-in camera for monitoring your prints and recording time-lapse videos. It is not the highest quality camera, but it is sufficient for making sure your prints are printing fine.

Related
Zelda Fan 3D Prints Incredible Miniature Version of Hyrule
A Legend of Zelda fan impresses the community with a 3D-printed Hyrule map that captures the kingdom’s fine details in miniature form.
Design and Build Quality
The enclosure of the Centauri Carbon is made from aluminum, along with a glass panel at the top and a glass door at the front. It feels solid and well-built, both inside and out. The power cables and PTFE tube running to the hot end are secured inside a drag chain that is routed around the walls of the enclosure. The glass panel on top does a good job at reducing noise.
There is a ‘poop chute’ at the back that drops purged filament outside the printer. The filament spool holder is located on the right side and so is the filament sensor, though the position of the sensor feels a bit awkward. Nothing wrong with its functionality, and no complaints about the build quality of the Centauri Carbon overall.
Performance and Software
Straight out of the box, after running the self-check, I connected the Centauri Carbon to my Wi-Fi and booted up the Elegoo Slicer software. It was simple enough to establish the connection, and I was able to send the first test print to the printer in no time.
Elegoo ships a USB drive along with the printer that has a bunch of test prints and the slicer software. With the default settings in the slicer, using the Elegoo Galaxy Black PLA, I printed the ‘Benchy’ 3D model and after about 30 minutes, the end result was perfect. The layer lines in most areas of the print were barely visible. There was no stringing at all and no problem with build plate adhesion. After the Benchy, I changed a few settings and got to printing some more practical designs and the results were excellent.
The first layer, which needs to be consistent for the rest of the print to be perfect, was indeed consistent and stuck firmly to the build plate. I tested with some PLA, Rapid-PETG, TPU, ASA, and PLA-Carbon Fiber, all of which gave smooth and fine prints without any failures. Over the past week of testing, I spent about 52 hours printing different materials and objects and there was no problem with build plate adhesion or with the hot end.
Issues Changing the Filament
I did, however, notice that sometimes changing the filament required using the ‘Load’ setting twice as the filament would not extrude after the first loading process was completed successfully. Additionally, when switching to TPU, which is generally a more challenging material to print because of its flexible nature, loading it twice did not work. I had to disconnect the PTFE tube leading into the tool end and pull on the filament a bit, which did solve the issue. Other than that, I had no problems printing all the different types of filaments.
As for the slicer software, Elegoo Slicer is based on Bambu Studio, which is based on Prusa Slicer. However, for now, only Elegoo Slicer has support for the Centauri Carbon, but other slicers should start supporting the new printer soon. Like those other slicers, the Elegoo Slicer is fairly easy to use and can present only the basic settings if you don’t want to mess around with more advanced options.
A slicer lets you convert your STL or other 3D files to a Gcode file, a set of instructions for the printer to understand. This Gcode can then be sent to the printer wirelessly for convenient printing. The ‘Device’ tab lets you monitor your connected printer, and you can not only control the bed and tool head but also get a live feed through the camera.
Final Thoughts
The Elegoo Centauri Carbon offers a great out of the box experience and those who want to get into the hobby of 3D printing will appreciate the user-friendly nature of this machine. It is easy to assemble and network printing makes everything very convenient. The built-in self-checks and auto-leveling features further add to the convenience. It is a complete package that is targeted at beginners but boasts features of much more advanced 3D printers.

More
Best Laptop for 3D Printing in 2024
Maximize your 3D printing potential with our guide to choosing the best laptops tailored for your design needs.