Aerith is one of the harder characters to play as in Final Fantasy 7 Rebirth. She wasn’t easy to control in the first remake in this trilogy either because of a couple of factors. One, her attacks were slow and didn’t do a lot of damage.

Related
Final Fantasy 7 Rebirth: Every Broadsword Ability Cloud Can Learn, Ranked
Broadswords are Cloud’s go-to weapon in Final Fantasy 7 Rebirth; here’s every ability you can learn from them.
Also, Aerith’s movement speed was not fast either. However, Final Fantasy 7 Rebirth fixes Aerith and her rod weapons by giving her some interesting abilities to play with. Figuring out how to properly use these abilities can be tricky so let’s go down that strategy road now. For those interested in acquiring all seven, there will be spoilers on their locations.
Updated on February 3rd, 2025, By Joshua Leeds: Aerith will never be a front-line fighter, but she has a wide range of abilities that make her incredibly useful to have in the back line. This article has been updated to include more detailed descriptions of where to find each staff so that you can master each ability and have access to them all whenever needed. We’ve also added the ATB cost of each ability so you know everything you need to know about the ability before deciding which ones to track down.
7
Lustrous Shield (Plumose Rod)
You Shall Not Pass!

- Creates a shield to keep enemies away and block incoming projectiles.
- ATB – 1
- Location: First complete the side quest “Lament Of The Damned” in Nibelheim during Chapter 12. This will take you to Shinra Mansion, Mako Research Facility Section X, which will be Hojo’s combat exams. Complete every combat exam to unlock the treasure room, with the Plumose Rod being in the purple chest along the right side.
The Plumose Rod is not an easy weapon to get as it is hidden behind a wall of challenges for Hojo in the Shinra Mansion. Once players defeat all of the enemy challenges, this will be the best reward available. The rod will bestow Aerith with an ability called Lustrous Shield which has defensive capabilities.
Once formed, enemies cannot pass through the Lustrous Shield and it will stop projectiles. Aerith, when players put her in Final Fantasy 7 Rebirth’s party, should be the designated spell caster. Setting up a Lustrous Shield while performing spells like Cure or Fire wouldn’t be a bad strategy.
6
Chrono Aegis (Timeless Rod)
It’s A Chrono Trigger

- Creates a barrier that freezes and damages enemies that get too close.
- ATB – 1
- Location: Found in a purple chest in the main building of Bill’s Chocobo Ranch in the Grasslands region. Found back and to the right of Chloe.
After getting the quest to find the Chocobo in The Grasslands region, players may leave immediately. However, they should explore the barn first as there are rare materials, items, and a rod for Aerith called the Timeless Rod. This funky-looking rod has the ability Chrono Aegis attached to it.

Related
Final Fantasy 7 Rebirth: Every Knuckles Ability Tifa Can Learn, Ranked
In Square Enix’s Final Fantasy 7 Rebirth, Tifa learns quite a few great Knuckles abilities. Here are the best ones.
Chrono Aegis is another barrier-type ability but this one attacks back if enemies hit it. There is also a chance enemies will get afflicted by the Stop status effect which can also be cast with the Magic Materia, Time. Stop rarely works on bosses in Final Fantasy 7 Rebirth but it is useful against smaller enemies in the field.
5
ATB Ward (Ceremonial Staff)
For The Long-Ranged Heroes

- Attacking as Aerith while in the Ward will also charge up your allies ATB.
- ATB – 1
- Location: During Chapter 10 you’ll travel to the Village of the Gi. Upon arriving you’ll see a checkpoint ahead and to the left of the path forward, with the staff being in the purple chest further to the left of the checkpoint.
One of the biggest story changes in Final Fantasy 7 Rebirth happens after Red 13’s trials in the Cave of the Gi. Afterward, a Gi ancestor will take the party to the Village of the Gi wherein they will fight a few rounds of battles and gain some loot. This is where players can get the Ceremonial Staff, for example, which comes with the ATB Ward ability for Aerith.
Once summoned, the ATB Ward will increase how fast the ATB gauge recharges for everyone in it. Since the ward is stationary, it would make sense to have ranged characters in the party like Barret or Yuffie. Making the party AI stand in this zone can be tricky though.
4
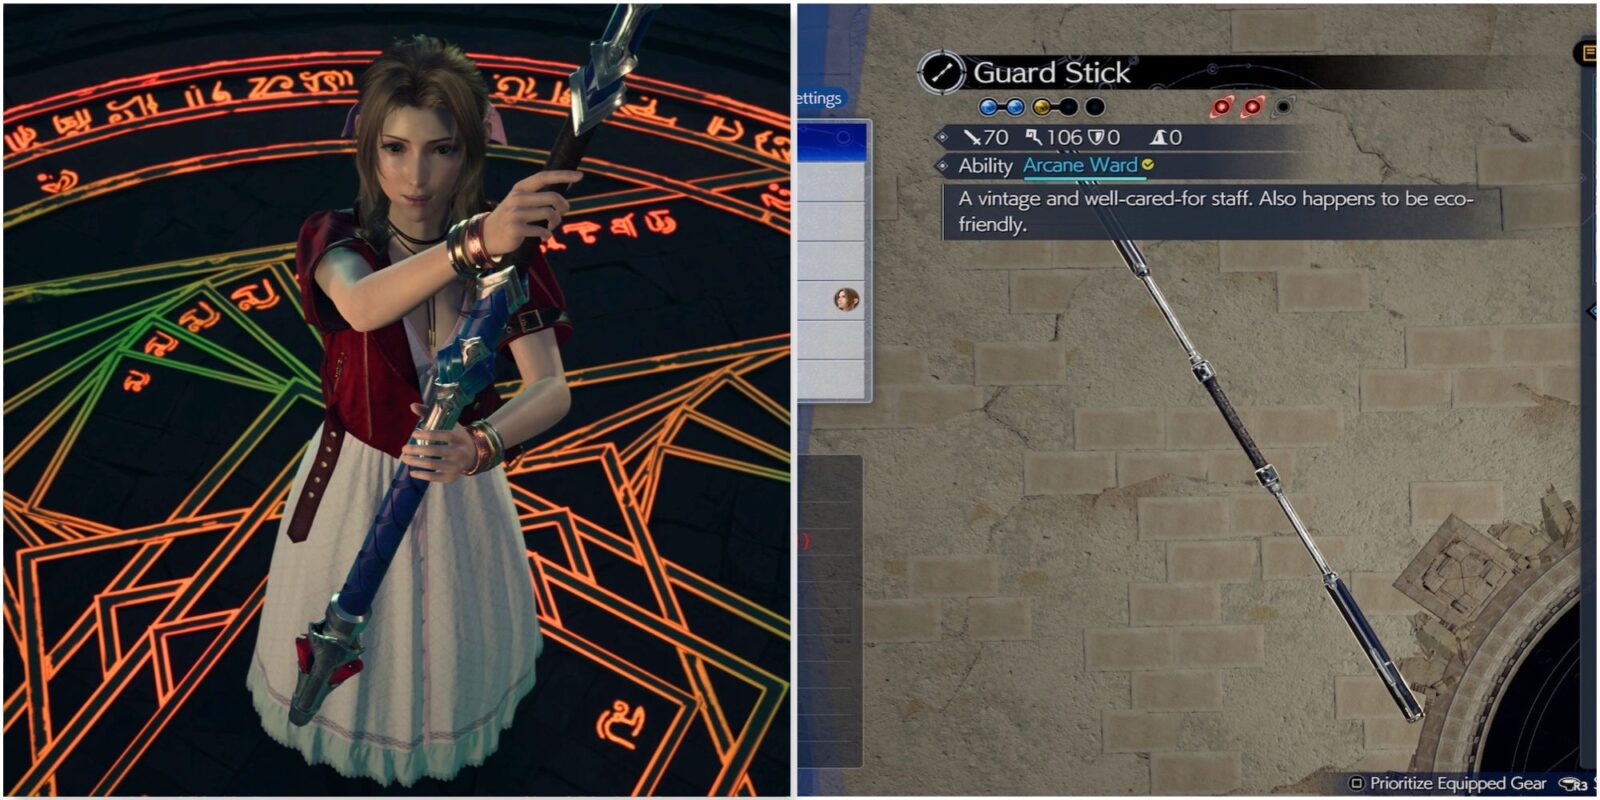
Arcane Ward (Guard Stick)
A Quadra Magic Materia Replacement

- Attack spells cast within the ward will be cast a second time for free.
- ATB – 1
- Location: Aerith’s starting weapon.
Aerith’s default weapon is the Guard Stick which is less iconic than other starting weapons for characters like Cloud’s Buster Sword. Regardless of the look, the Guard Stick has a great ability attached to it for Aerith. Arcane Ward will make her more powerful in battle.

Related
Final Fantasy 7 Rebirth: Best Healers, Ranked
Every JRPG adventuring party needs a healer, and Final Fantasy 7 Rebirth is no different. But who’s the best choice?
Any spell cast within this space will now be used twice such as Ice on enemies. There was a Support Materia in the original game called Quadra Magic that had a similar effect except it was better as it would cast the same spell four times instead of two. Maybe it will appear in the final game of this trilogy, but Aerith’s Arcane Ward is a good substitute.
3
Radiant Ward (Empress’s Scepter)
Make Aerith’s Attack Actually Hurt

- Casting spells while in the ward briefly makes party members invincible while the cast animation happens. Basic attacks from Aerith in this ward will deal increased damage and launch more projectiles at once.
- ATB – 1
- Location: During Chapter 4 you’ll arrive in Under Junon, with the chest being in Aeirth’s room at the Inn, the first door on your right when walking down the hallway.
Out of all of the characters in the game, Aerith gets showered in weapons quickly. The Empress’s Scepter can be obtained in the Junon Inn after Cloud has his moment with Aerith. It can bless Aerith with the Radiant Ward ability which will make her more powerful during combat.
For starters, her basic attack will change into a set of laser beams that deal more damage and are faster. It’s a dynamic shift in how she plays in most of the game. Spells will be more effective and Aerith will be invincible as long as she is in the space too.
2
Ray Of Judgement (Wizard’s Rod)
Piccolo Would Be Impressed

- Shoots a beam of energy to greatly damage any enemy hit.
- ATB – 1
- Location: During Chapter 7 you’ll start climbing Mt Corel and the party will split up. RIght after the other run ahead, you can stop at the checkpoint directly ahead. Go to the alcove to the left of the checkpoint to find the staff within the purple chest.
The Wizard’s Rod is a weapon obtainable on Mt. Corel during the hike up with Cloud and Red 13. The rod will grant her the ability of Ray of Judgement which is a rare offensive attack for her. Aerith will summon a laser beam that can pierce through multiple enemies on screen.

Related
Final Fantasy 7 Rebirth: Every Gun-Arms Ability Barrett Can Learn, Ranked
Barrett has access to a few Gun-Arms abilities in Final Fantasy 7 Rebirth, but not all of them are equally useful or powerful. Here’s how they rank.
The Radiant Ward’s beams aren’t as strong to pierces through enemies. Ray of Judgment then is kind of like Aerith’s version of Piccolo’s Special Beam Cannon from Dragon Ball Z.
1
Noble Sacrifice (Gambanteinn)
A Powerful Premonition

- Aerith will die, but both party members will be received.
- ATB – 2
- Location: In Chapter 13 while in the Temple of the Ancients, when the party splits up and you’re now playing as Aerith. After learning how to channel the Lifestream and rebuild the environment, rebuild the large stairwell that heads further down into the temple. Head to the Hall Of Life – Second Tier, where the purple chest will be tucked under the stairs you just came down.
The Temple of the Ancients is the final dungeon of the game and it’s where most characters can get their ultimate weapons. Aerith’s is called Gambanteinn and it has the incredible Noble Sacrifice attached to it. Unlike most of Aerith’s abilities, Noble Sacrifice costs 2 ATB bars to activate but it is worth it in a pinch.
Noble Sacrifice will force Aerith to die in battle and in that literal sacrifice, other characters will be healed fully including from death and status ailments. She can be revived as well so it’s not like a final solution for the heroine which would be weird.


- Released
-
February 29, 2024
- ESRB
-
T For Teen Due To Blood, Language, Mild Suggestive Themes, Use of Alcohol and Tobacco, Violence