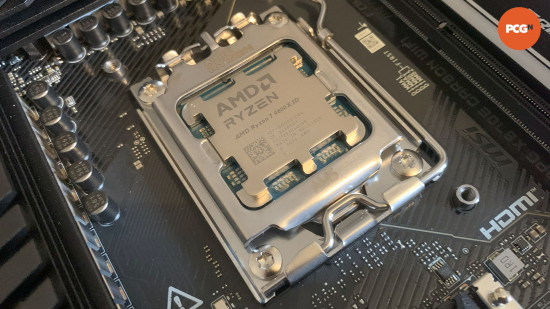
Believe it or not, you can make AMD’s latest king of the gaming CPU world even faster, and it won’t even cost you any money. In this guide, we’ll show you how to overclock the AMD Ryzen 7 9800X3D, enabling you to run the CPU beyond its stock clock speed and squeeze an even higher frame rate out of it. We’ll take you through three methods in this guide, one is an automatic overclock using Ryzen Master, and the others involve delving into your motherboard BIOS.
As we found in our Ryzen 7 9800X3D review, this CPU is already the best gaming CPU you can buy right now, which is partly down to its clock speed. Check out the 9800X3D specs, and you’ll see that this AMD CPU can boost to up to 5.2GHz, which is 200MHz faster than its predecessor, the 7800X3D.
What’s more, unlike the 7800X3D, AMD has unlocked the multiplier on the 9800X3D, meaning you can even overclock it yourself. In this guide, we’ll show you how to add yet more megahertz to the clock speed, so your CPU runs even faster.
9800X3D overclocking basics
Before we get started, let’s just cover the basic principles of overclocking, just in case you’re new to the idea. Overclocking is the art of making your CPU run beyond its rated clock speed, and there are a number of ways of doing it. Clock speed is measured in MHz (or GHz), and the higher the figure, the faster your CPU.
However, the faster the clock speed, the more heat will be emitted by your CPU. We recommend you have the best AIO cooler you can afford attached to your CPU before you start. Thankfully, the Ryzen 7 9800X3D runs cooler than the 7800X3D, due to AMD’s decision to mount the 3D V-cache chip underneath the CPU cores, rather than on top of them.
However, you’ll still need a decent CPU cooler to keep it in check. We achieved this overclock with a Corsair H100x Elite AIO cooler with a 240mm radiator, and we recommend using a cooler with a similar spec if you’re going to attempt to overclock the 9800X3D.
Another factor to consider is that overclocking your CPU typically means it requires more power to hit those clock speeds, which means you may also need to increase the voltage applied to your CPU. The 9800X3D runs at 1.22V as standard, but AMD has mandated a range of 1.28V to 1.31V as safe for overclocking. Applying more voltage will again result in your CPU outputting more heat, though, which is another reason why you need to make sure your CPU cooler is up to the job.
Before you start, we recommend downloading CoreTemp from here, and Cinebench R24 from here, and running them on your CPU at its stock speed. Run the Cinebench R24 Multi Core test to stress all your CPU cores at peak load, and keep an eye on the peak temperature in Core Temp throughout the whole ten-minute test.
If the peak temperature at stock speed stays below 85°C in this test, then your system should have enough thermal headroom for this overclock. Bear in mind that this isn’t an exact science, though, and some samples of the same CPU will overclock higher than others.
9800X3D Ryzen Master auto overclock
We’ll start with the easiest 9800X3D overclocking method, which is to use AMD’s Ryzen Master software with its automatic overclocking feature, and this is the method we recommend to most people. This handy piece of software enables you to overclock your CPU from the comfort of Windows, without getting your hands dirty in your motherboard BIOS. What’s more, it only affects the boost clock, rather than forcing your CPU to run at the same clock speed all the time, and it will also adjust the voltage on the fly.
The latter is an important factor, as running your CPU well beyond its recommended voltage can damage it if it’s overvolted permanently, but that’s not so much of a worry if the voltage is only increasing when it’s needed. Using this automatic method means your CPU won’t run at 5.4GHz with extra voltage when you’re idly browsing the Windows desktop, but it will when you’re playing games, which is when it’s needed.
1. Download and install Ryzen Master
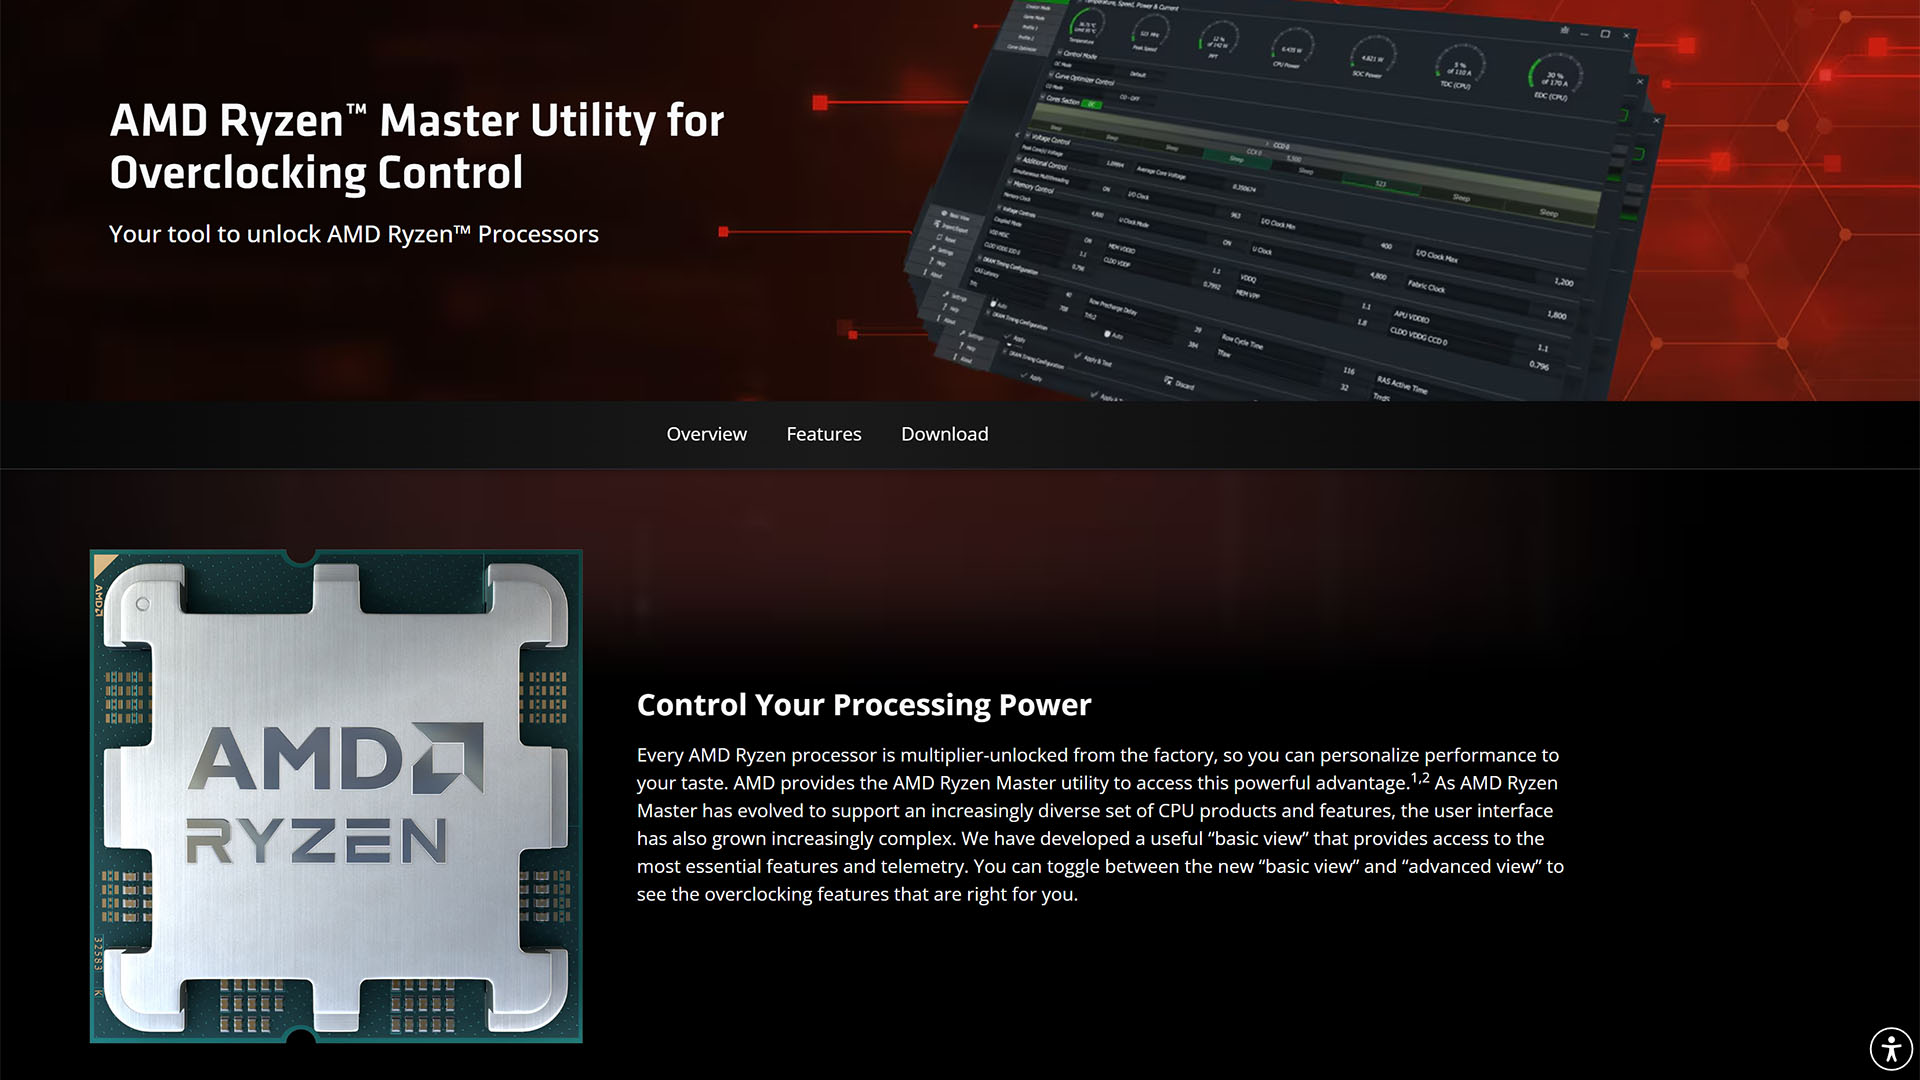
You can download AMD Ryzen Master from here. Make sure you download the version specified for “Ryzen 3000 series processors and newer,” and then install it on your system.
2. Create profile
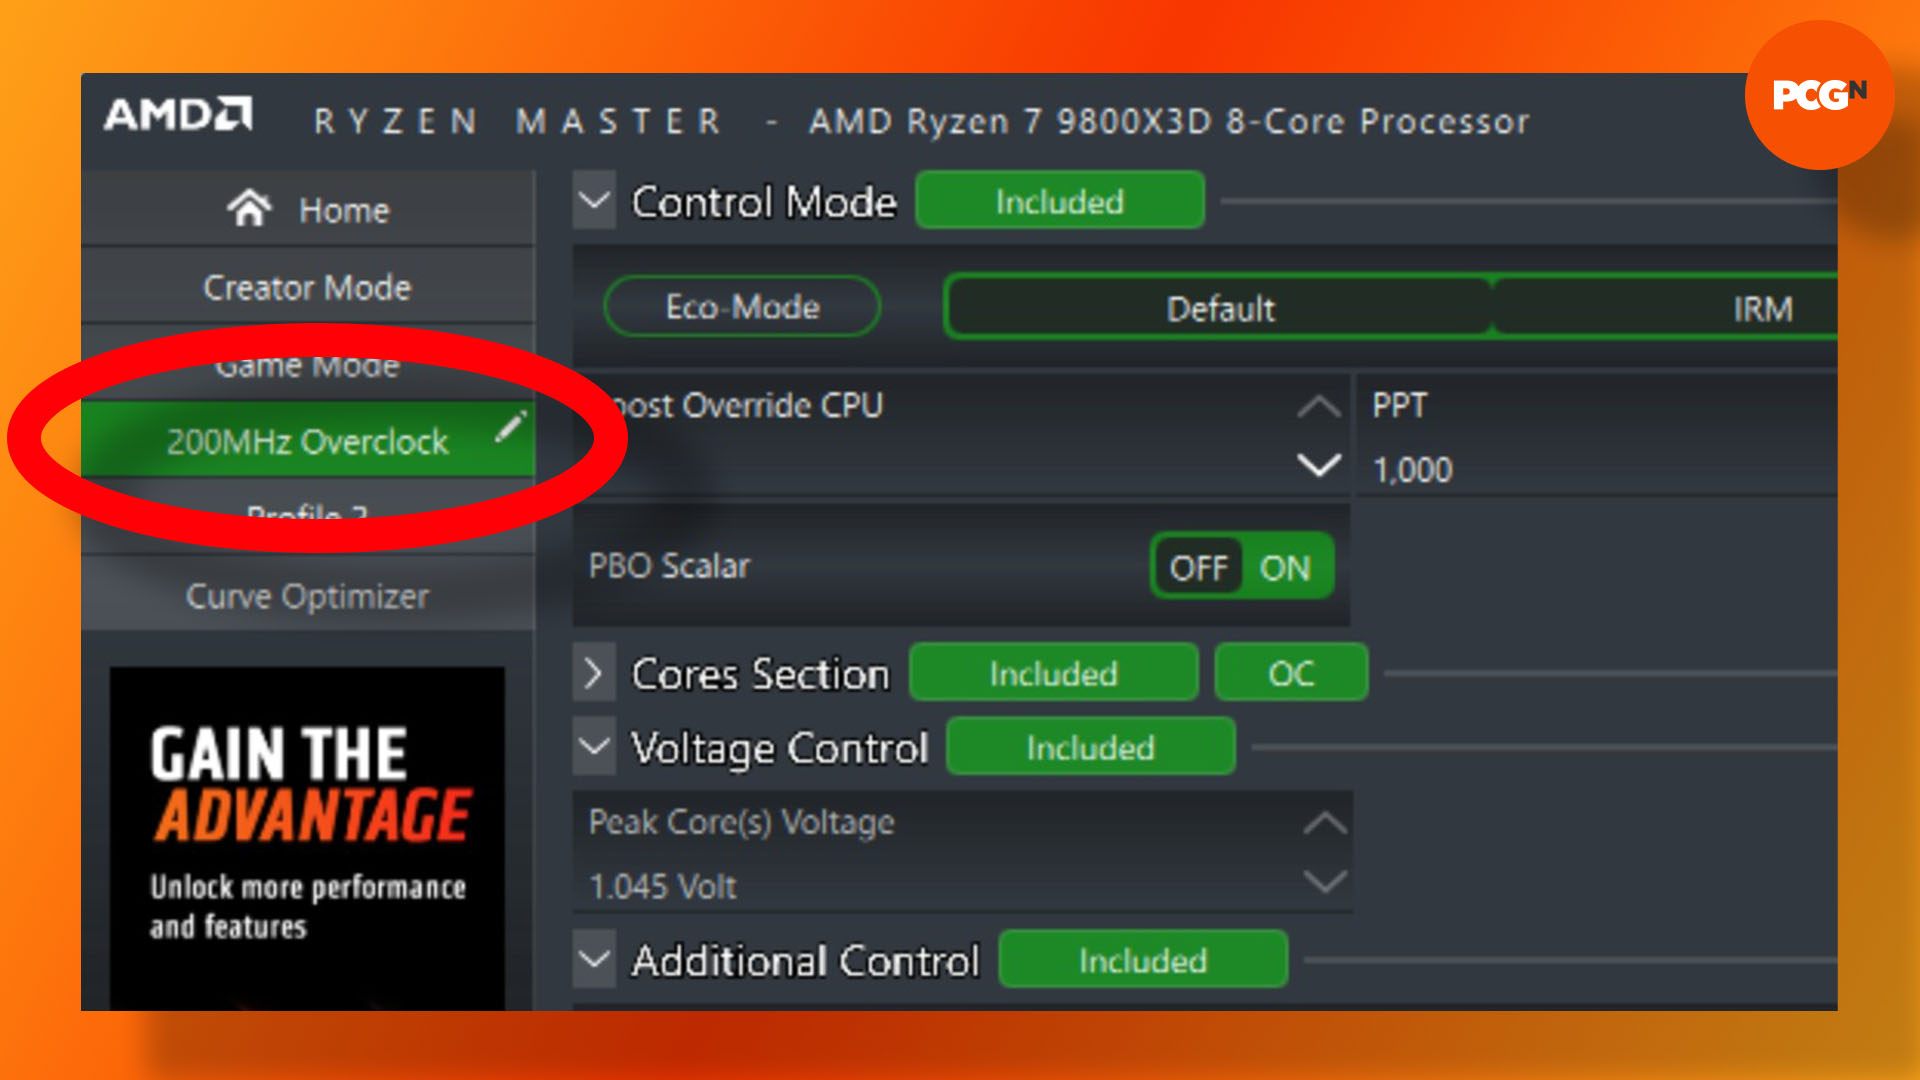
AMD Ryzen Master works with a profile system, and you can find the profiles in the top left corner. There are two blank ones ready for you to customize, called Profile 1 and Profile 2. Select Profile 1, and click the pencil icon next to it to change the name. We’ve just called ours “200MHz overclock” for future reference.
3. Input boost override
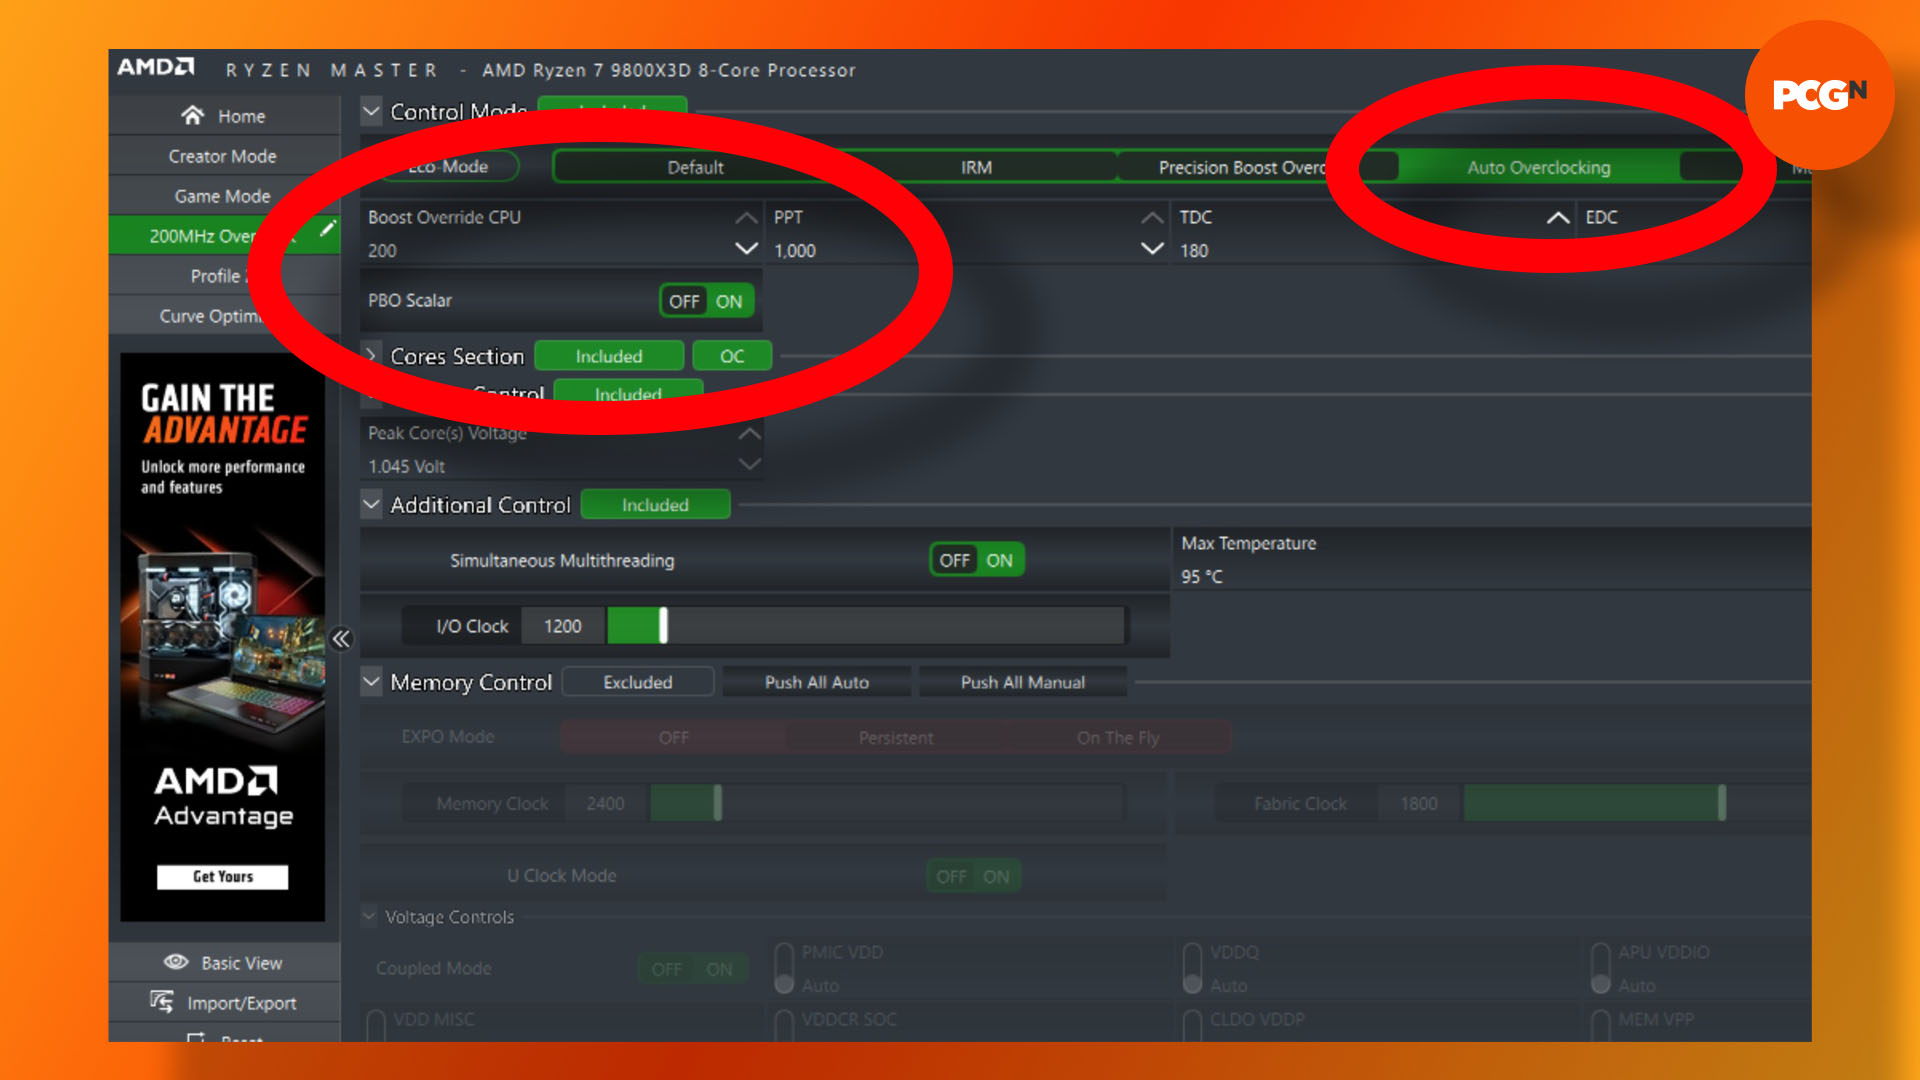
Once you’re in your profile, head to the Control Mode section and select Auto Overclocking from the green menu at the top. Then head to the Boost Override CPU section in the top left of the middle pane. In this field, you simply type in the amount by which you want to raise the clock speed, rather than the total clock speed.
So, to run your CPU at 100MHz beyond its 5.2GHz clock speed, you’d type “100” in here, and your CPU would boost to 5.3GHz. We’ve typed in “200” here, to run our CPU at 5.4GHz. While you’re here, make sure that PBO Scalar is set to On underneath this section too.
4. Apply and test
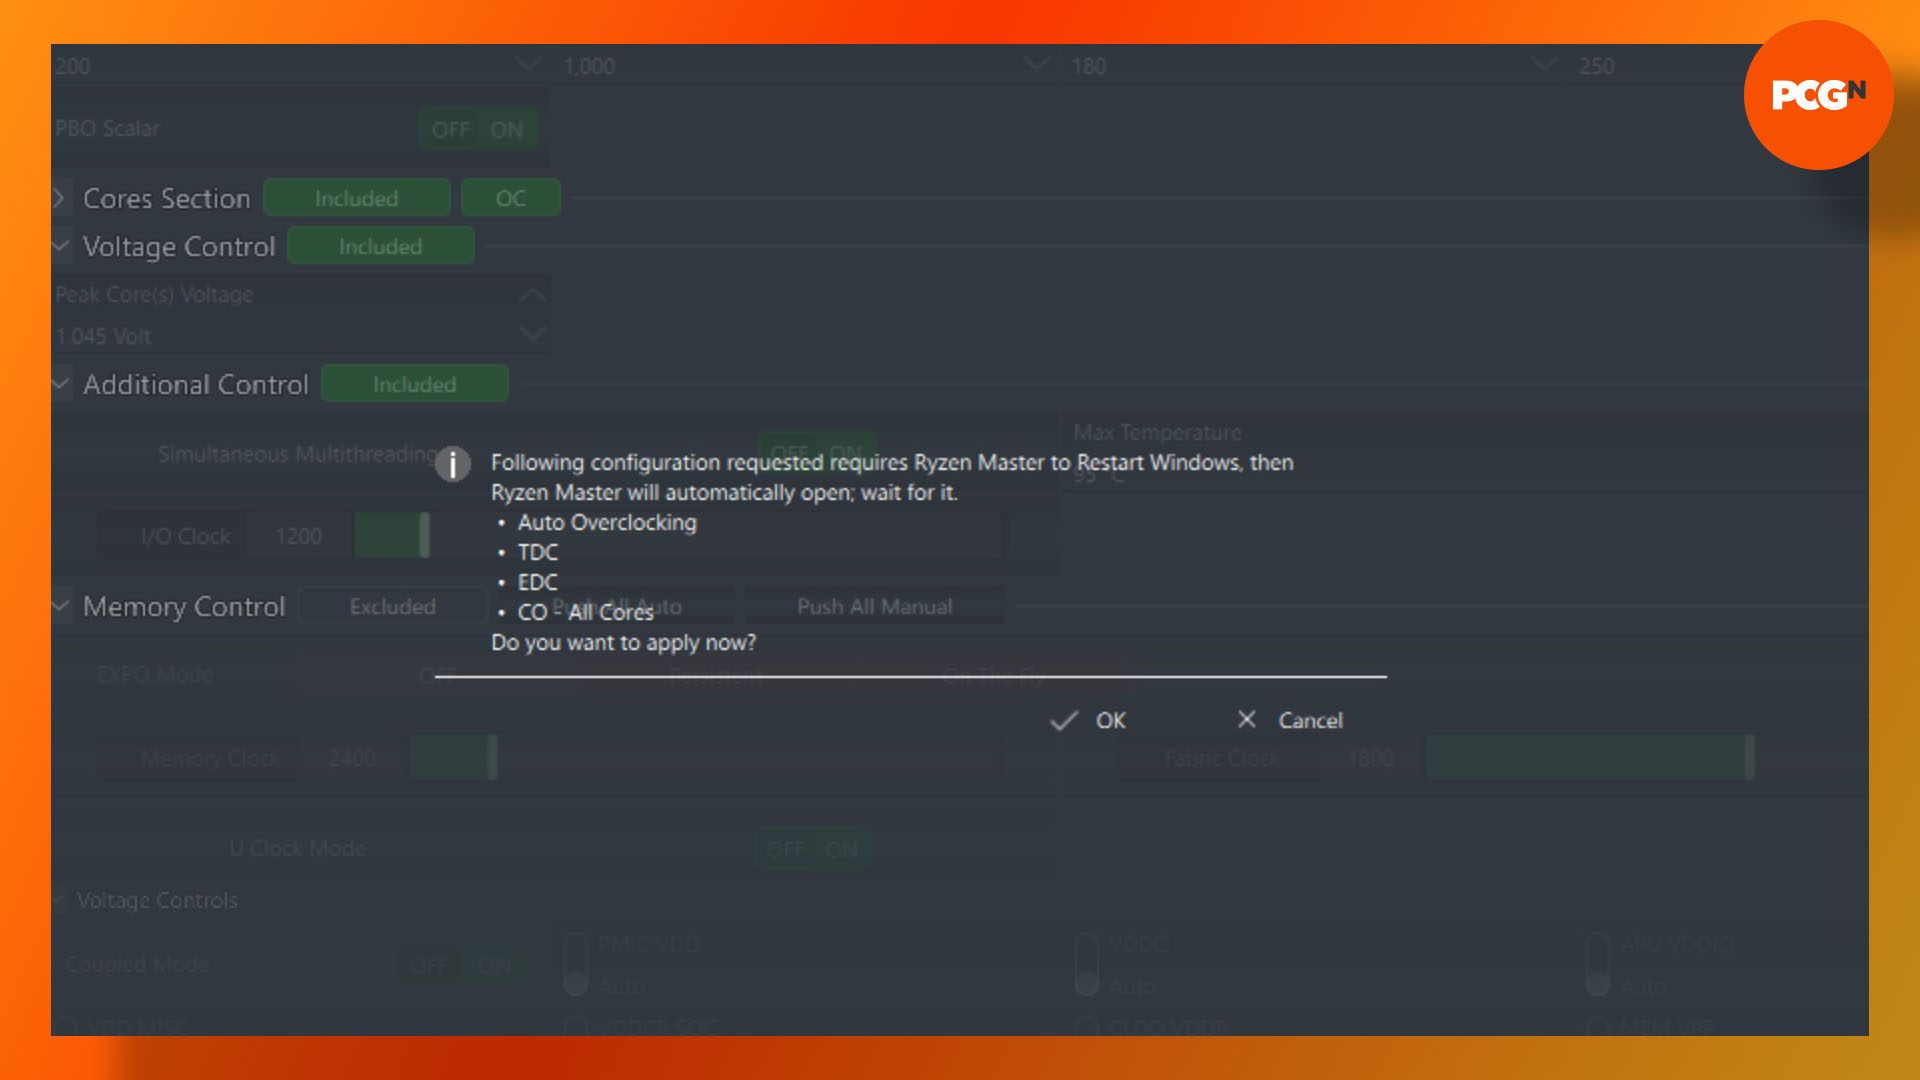
Ryzen Master now needs to make sure that your chosen settings will be stable on your system, so click on Apply & Test in the menu at the bottom of Ryzen Master. It will then provide a summary of your changes, click on OK, and Ryzen Master will then reboot your system. This may take longer than usual, so don’t be alarmed if your PC doesn’t reboot immediately – our MSI X870E Carbon WiFi test motherboard took several minutes to restart after we applied these settings.
5. Stress test
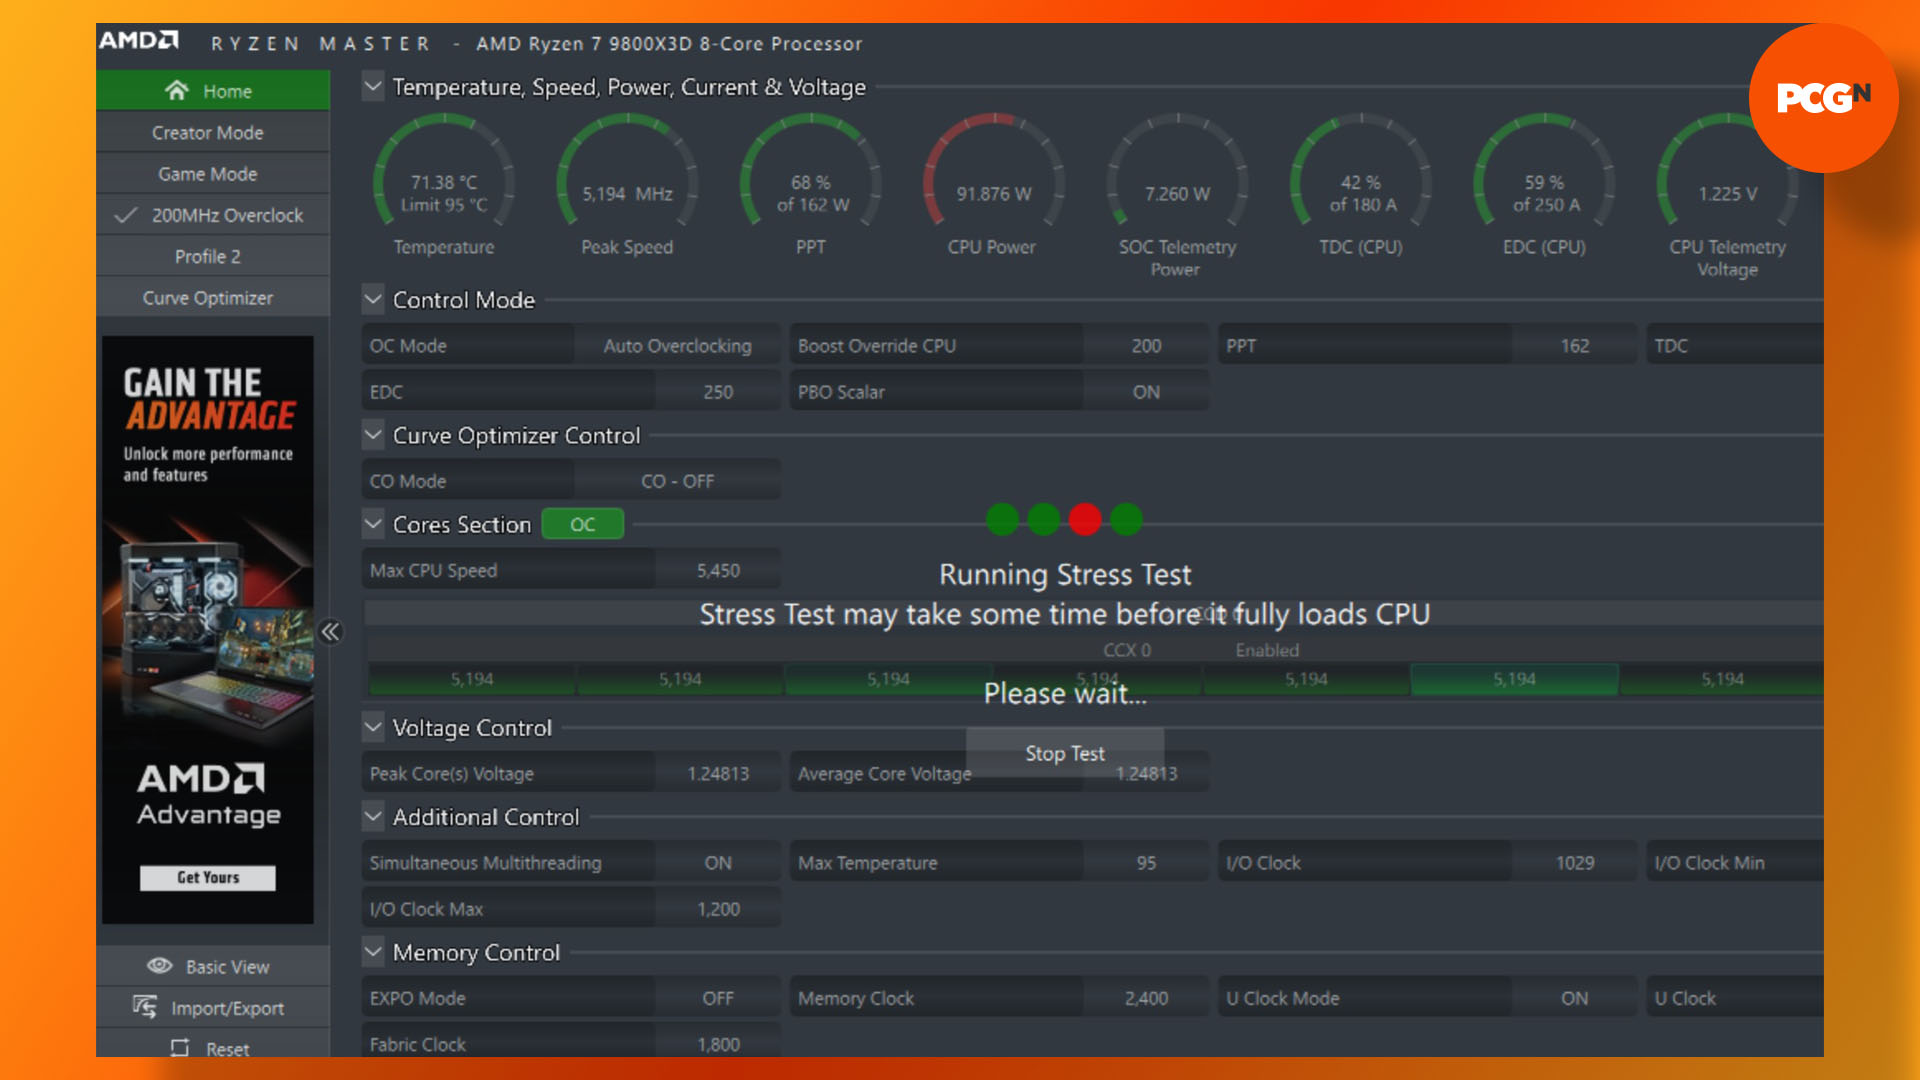
When your system reboots, Ryzen Master will start automatically, so click on OK when the warning comes up that it’s starting. Ryzen Master will then conduct a stress test to make sure your system is stable at your overclocked settings, which takes a little while. Assuming your system is OK, your CPU will now be able to boost to 5.4GHz. If not, try a smaller overclock, such as 100MHz, to see if your system can handle that instead. Our test system was fine with these settings.
6. Monitor temperature and clock speed
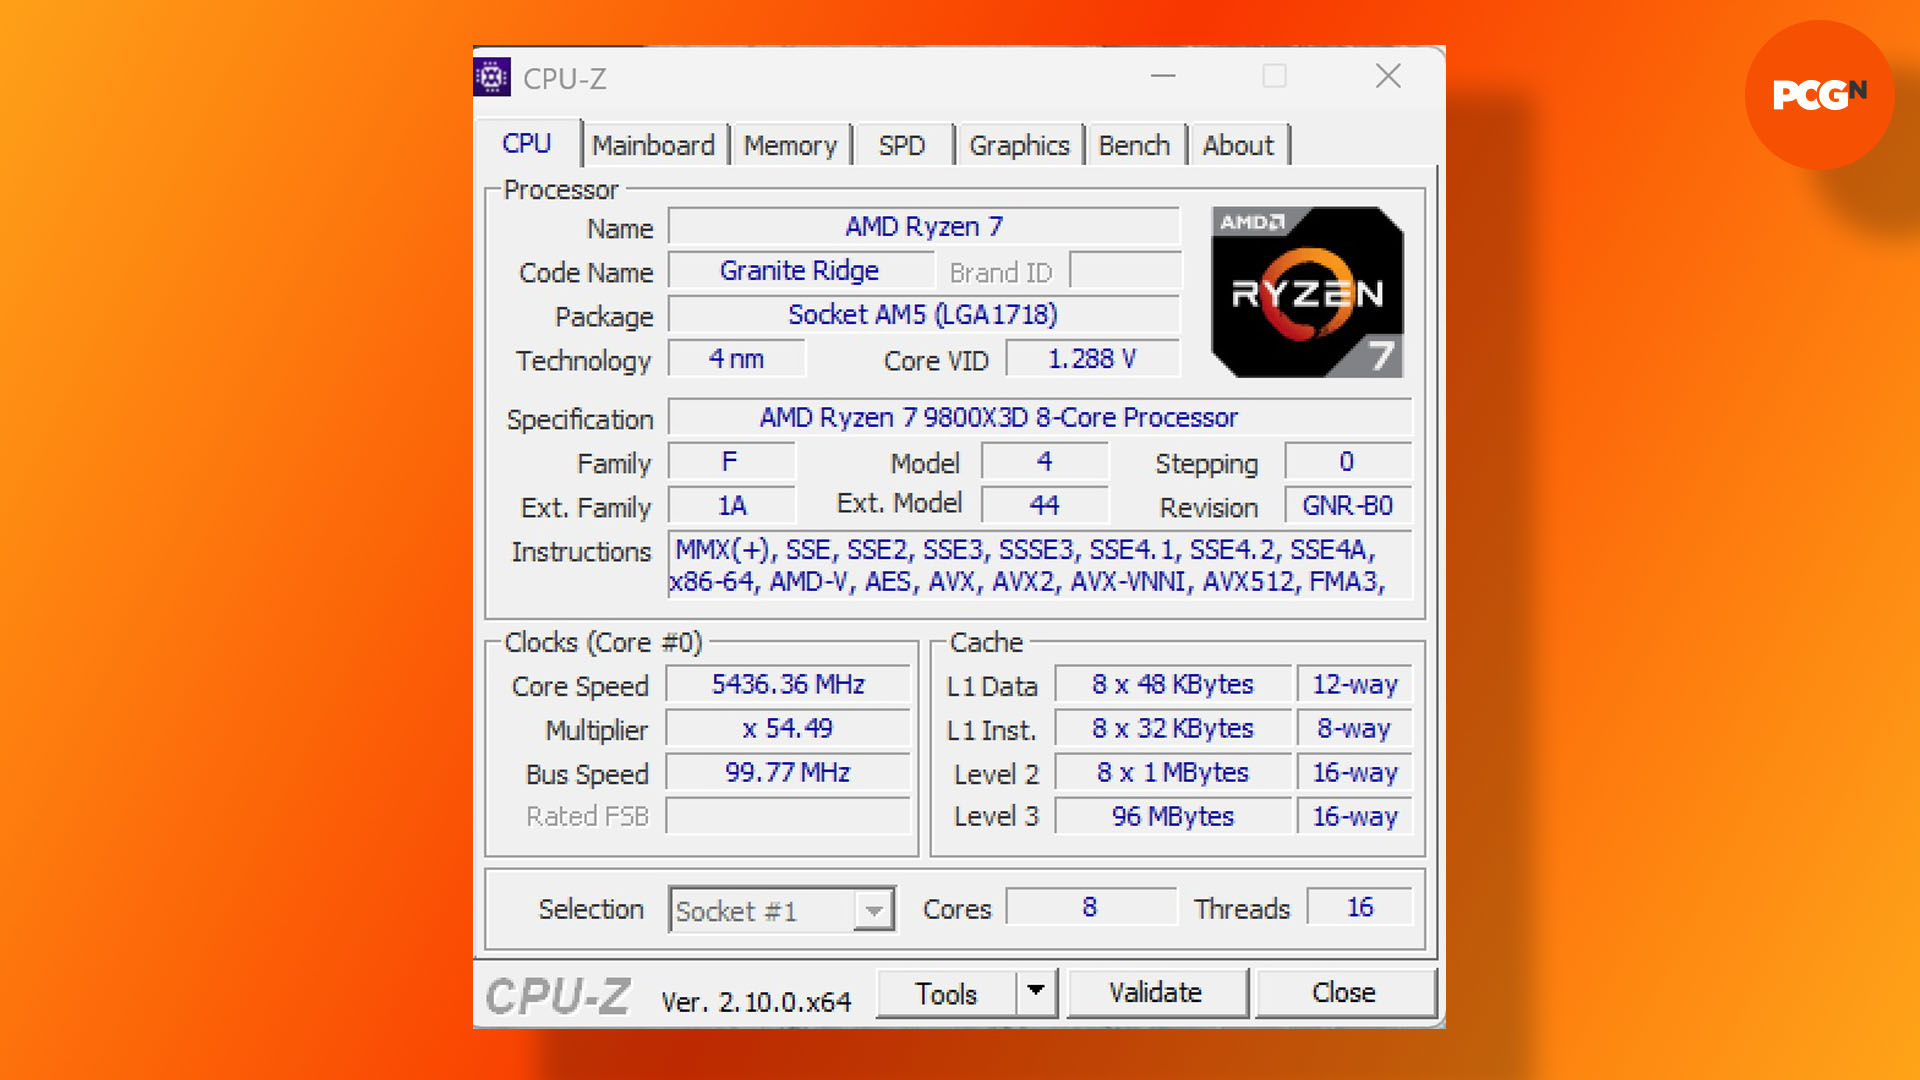
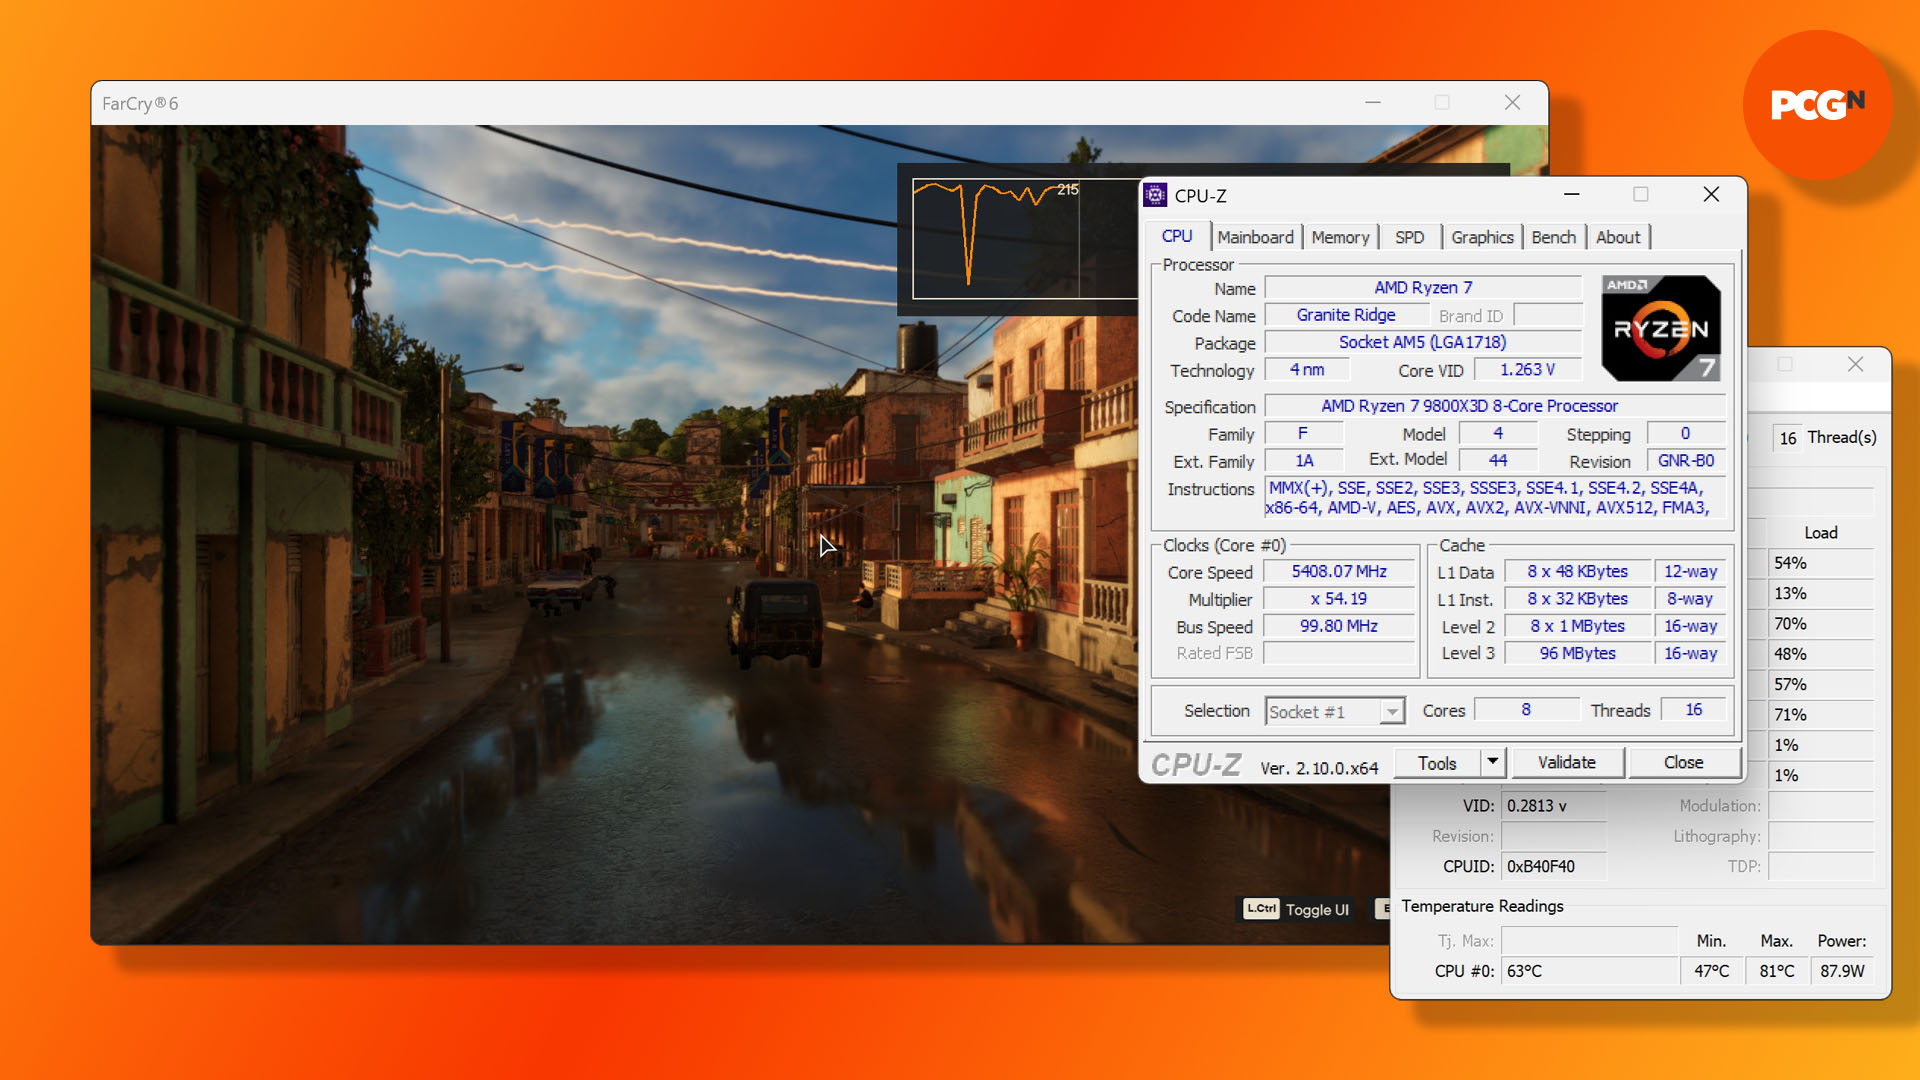
We now recommend monitoring your system to make sure it’s stable. You can run CoreTemp to monitor the peak operating temperature, which needs to stay below 95°C to avoid throttling (and damaging your CPU), and run CPU-Z (download from here) to keep an eye on the clock speed (which Core Temp can’t do accurately with this CPU). Try running a CPU-intensive game in a window and you should see the clock speed boost to 5.4GHz without it getting too toasty. The above CPU-Z screenshot was taken while running Far Cry 6, for example, and shows the CPU boosting just past 5.4GHz.
7. Enjoy your overclocked CPU
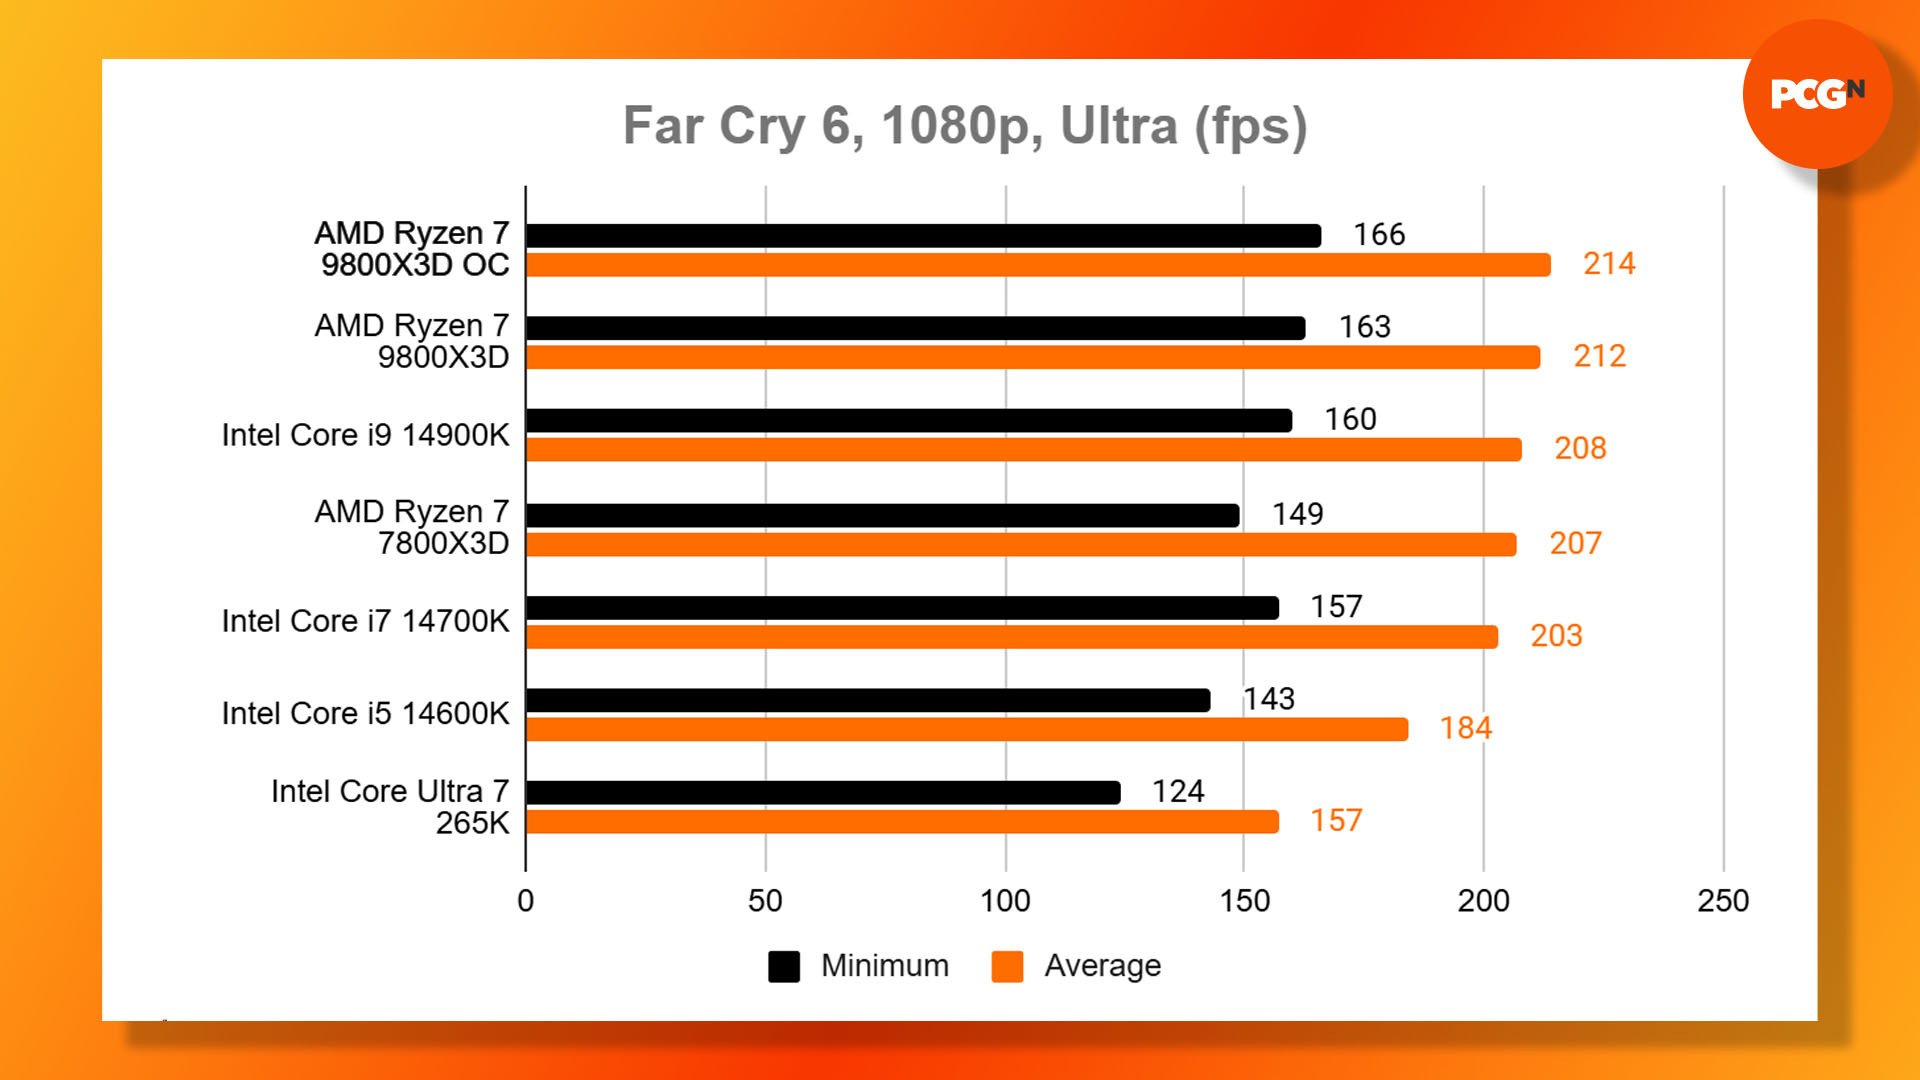
After overclocking your CPU, you’ll see an uptick in performance in games that respond well to extra clock speed, though not all your games. For example, F1 24 ran at the same frame rate before and after the overclock on our test system, but Far Cry 6 responded well to the overclock, adding an extra 2fps to the average frame rate and 3fps to the minimum. The fastest gaming CPU is now even faster.
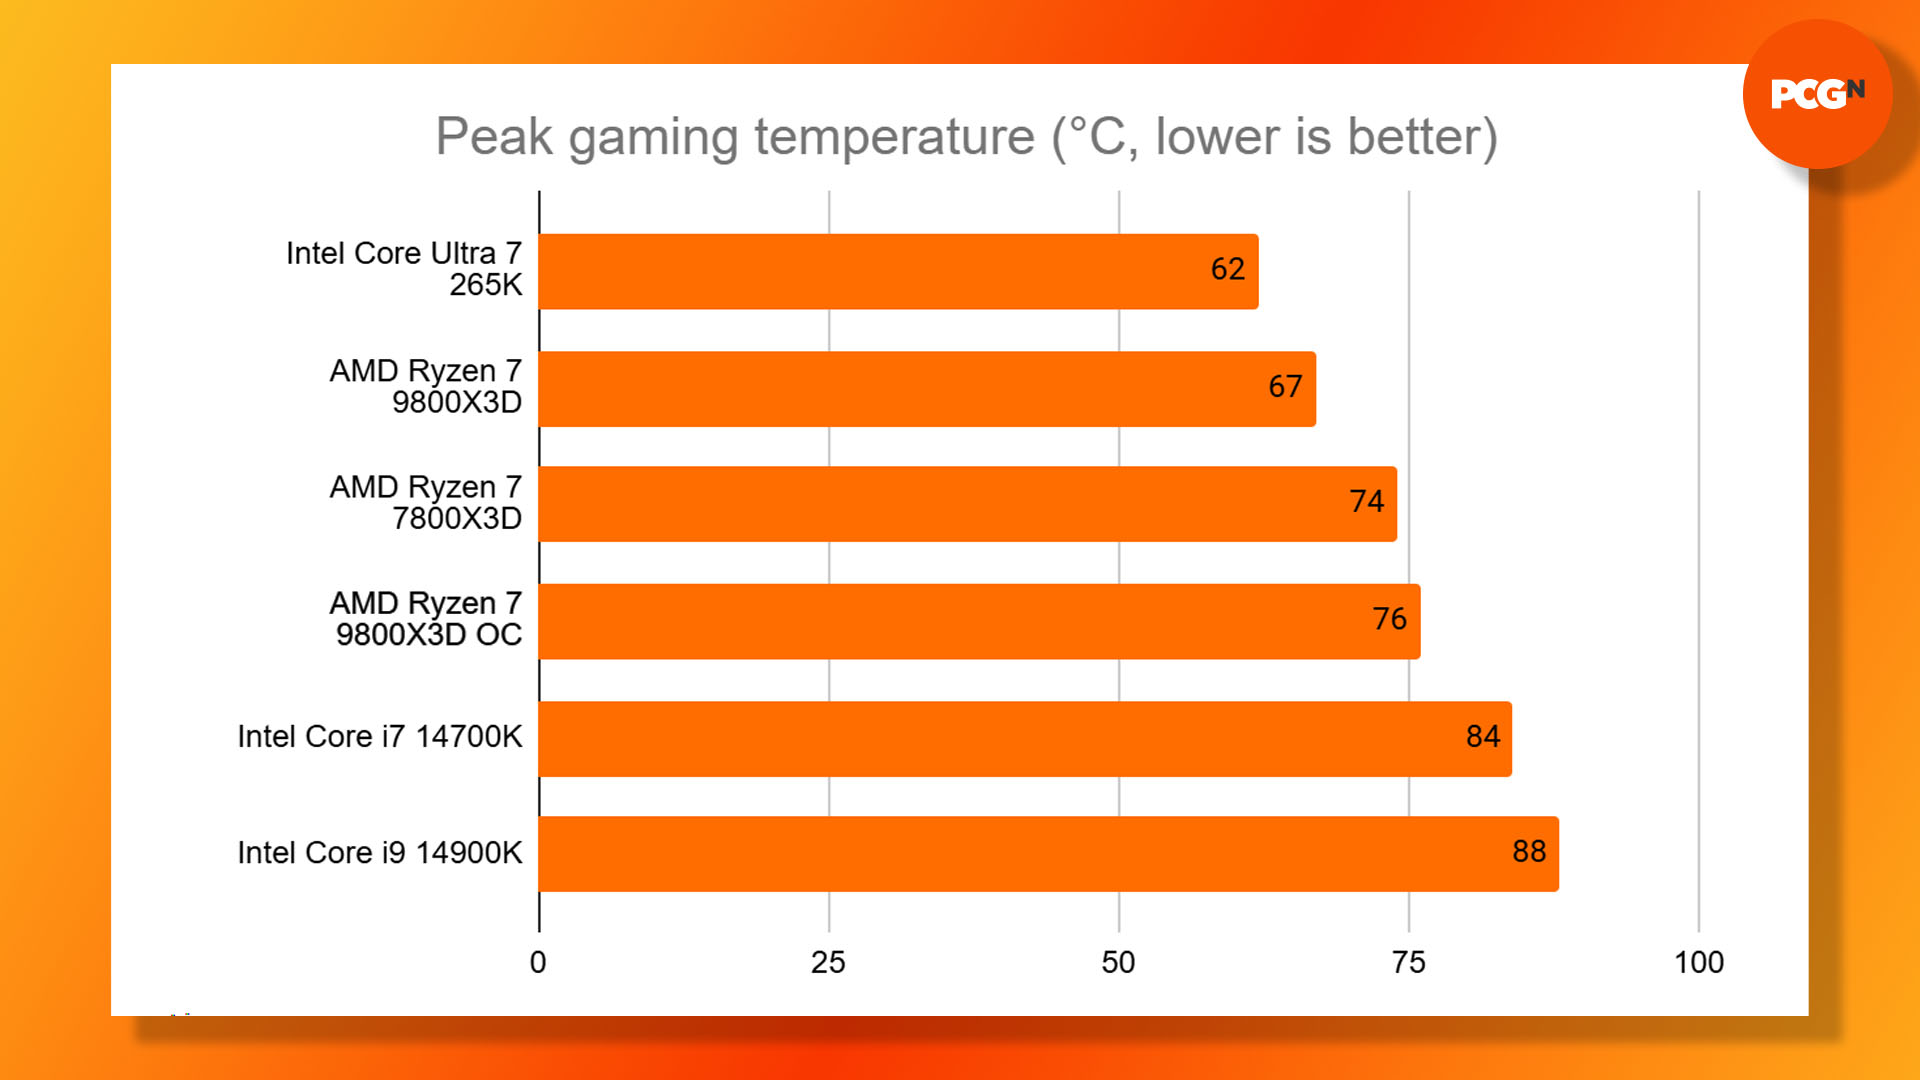
Temperatures were also fine, with the 9800X3D hitting 76°C during games. That’s a good 9°C warmer than at stock speed, but it’s still well out of the danger zone. However, during monitoring, we were interested to see that the CPU voltage was occasionally boosting as high as 1.35V to maintain that overclock, which explains the extra heat output.
9800X3D PBO BIOS overclock
If you want to make your overclock permanent, but don’t want to risk forcing all your CPU cores to run at the same clock speed the whole time, you can also apply a boost override overclock in your motherboard’s BIOS, while taking advantage of AMD’s Precision Boost Overdrive (PBO) tech.
PBO isn’t an overclocking technology in itself, but rather a way for your PC to dynamically change the CPU voltage on the fly, according to temperature and CPU workload. This in turn means your CPU can sometimes be supplied with more voltage, which can enable it to boost its clock speed further.
This method has the advantage of meaning the overclock is applied by the motherboard when your PC starts, rather than using Windows software, but also enables you to improve your CPU’s performance without having to permanently run the voltage above its stock settings. Compared to a manual overclock, this method reduces the heat output of your CPU, as well as the power draw.
1. Enter the BIOS
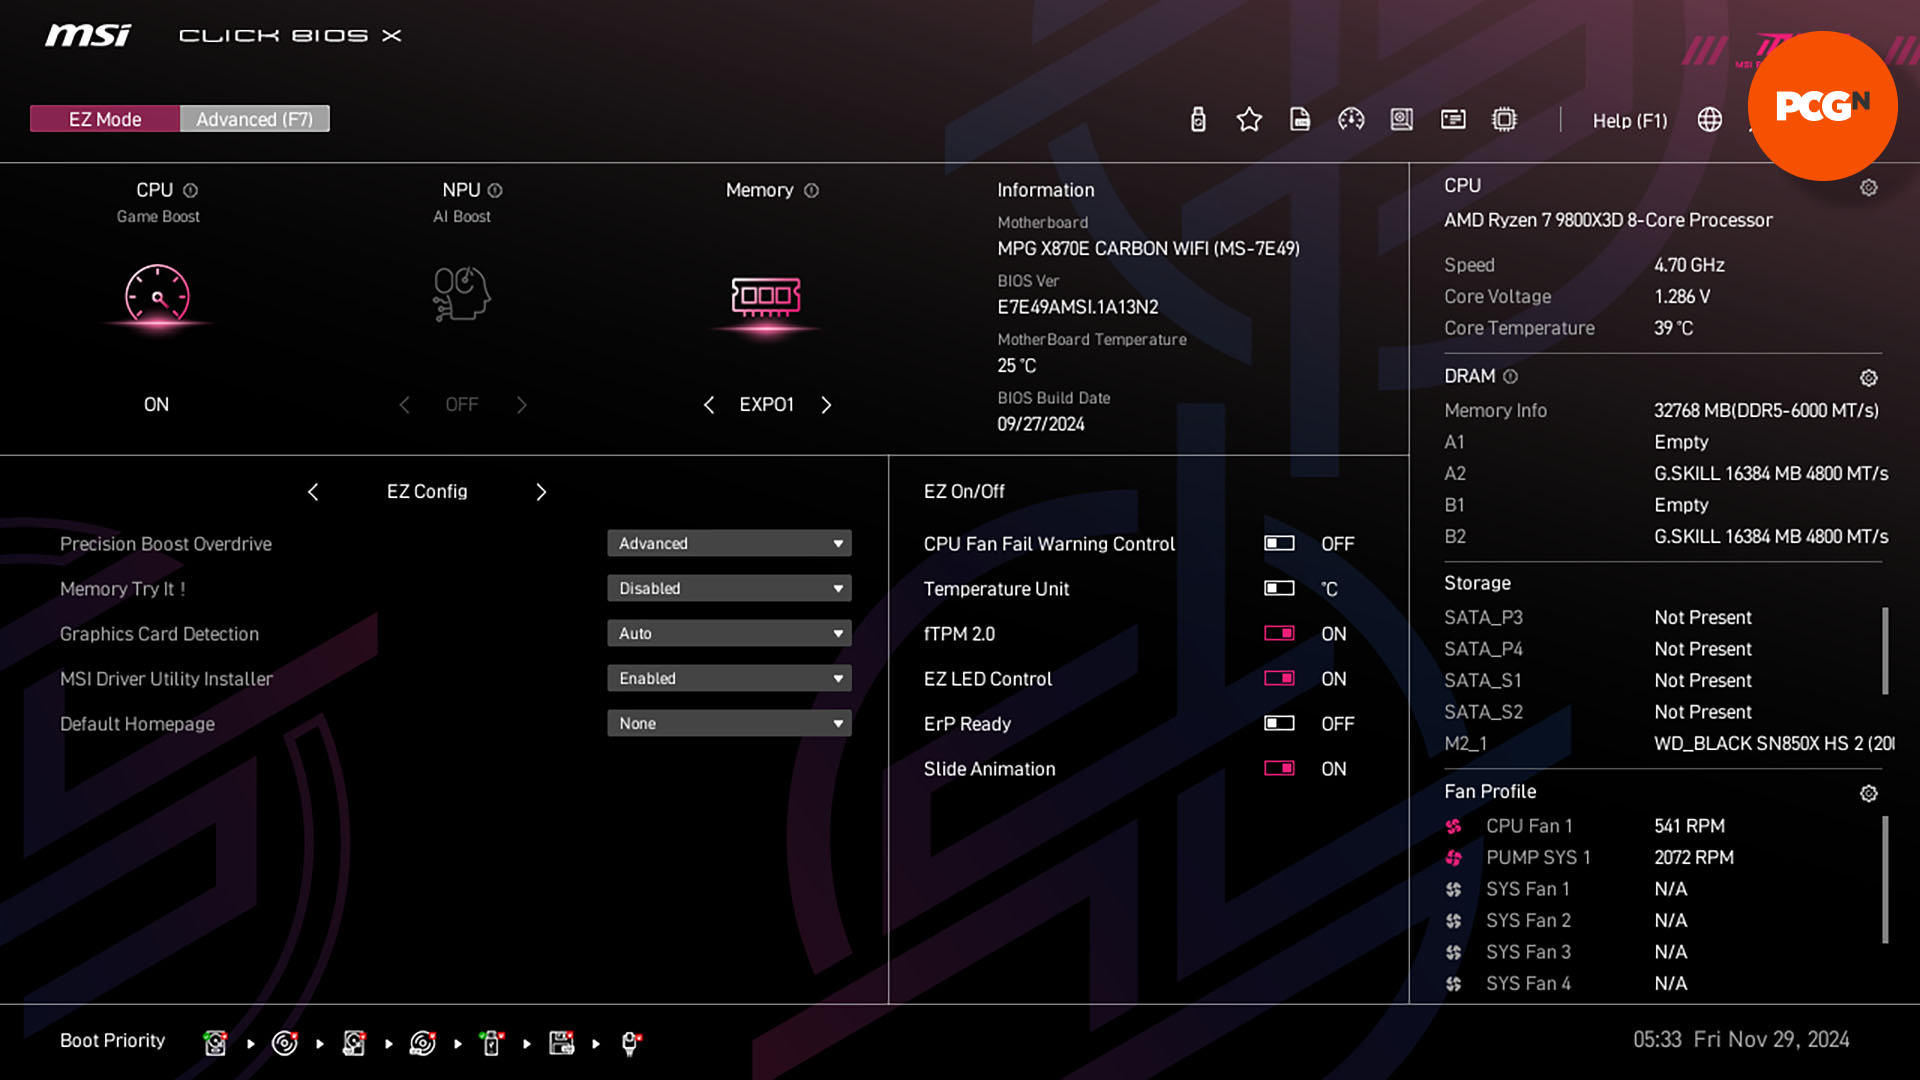
Switch on your PC, and hammer the Del key until your machine takes you into your motherboard’s Setup software, otherwise known as the EFI, or BIOS. If your PC boots into Windows then you’ve missed the window, so restart your PC and try again.
2. Find PBO section
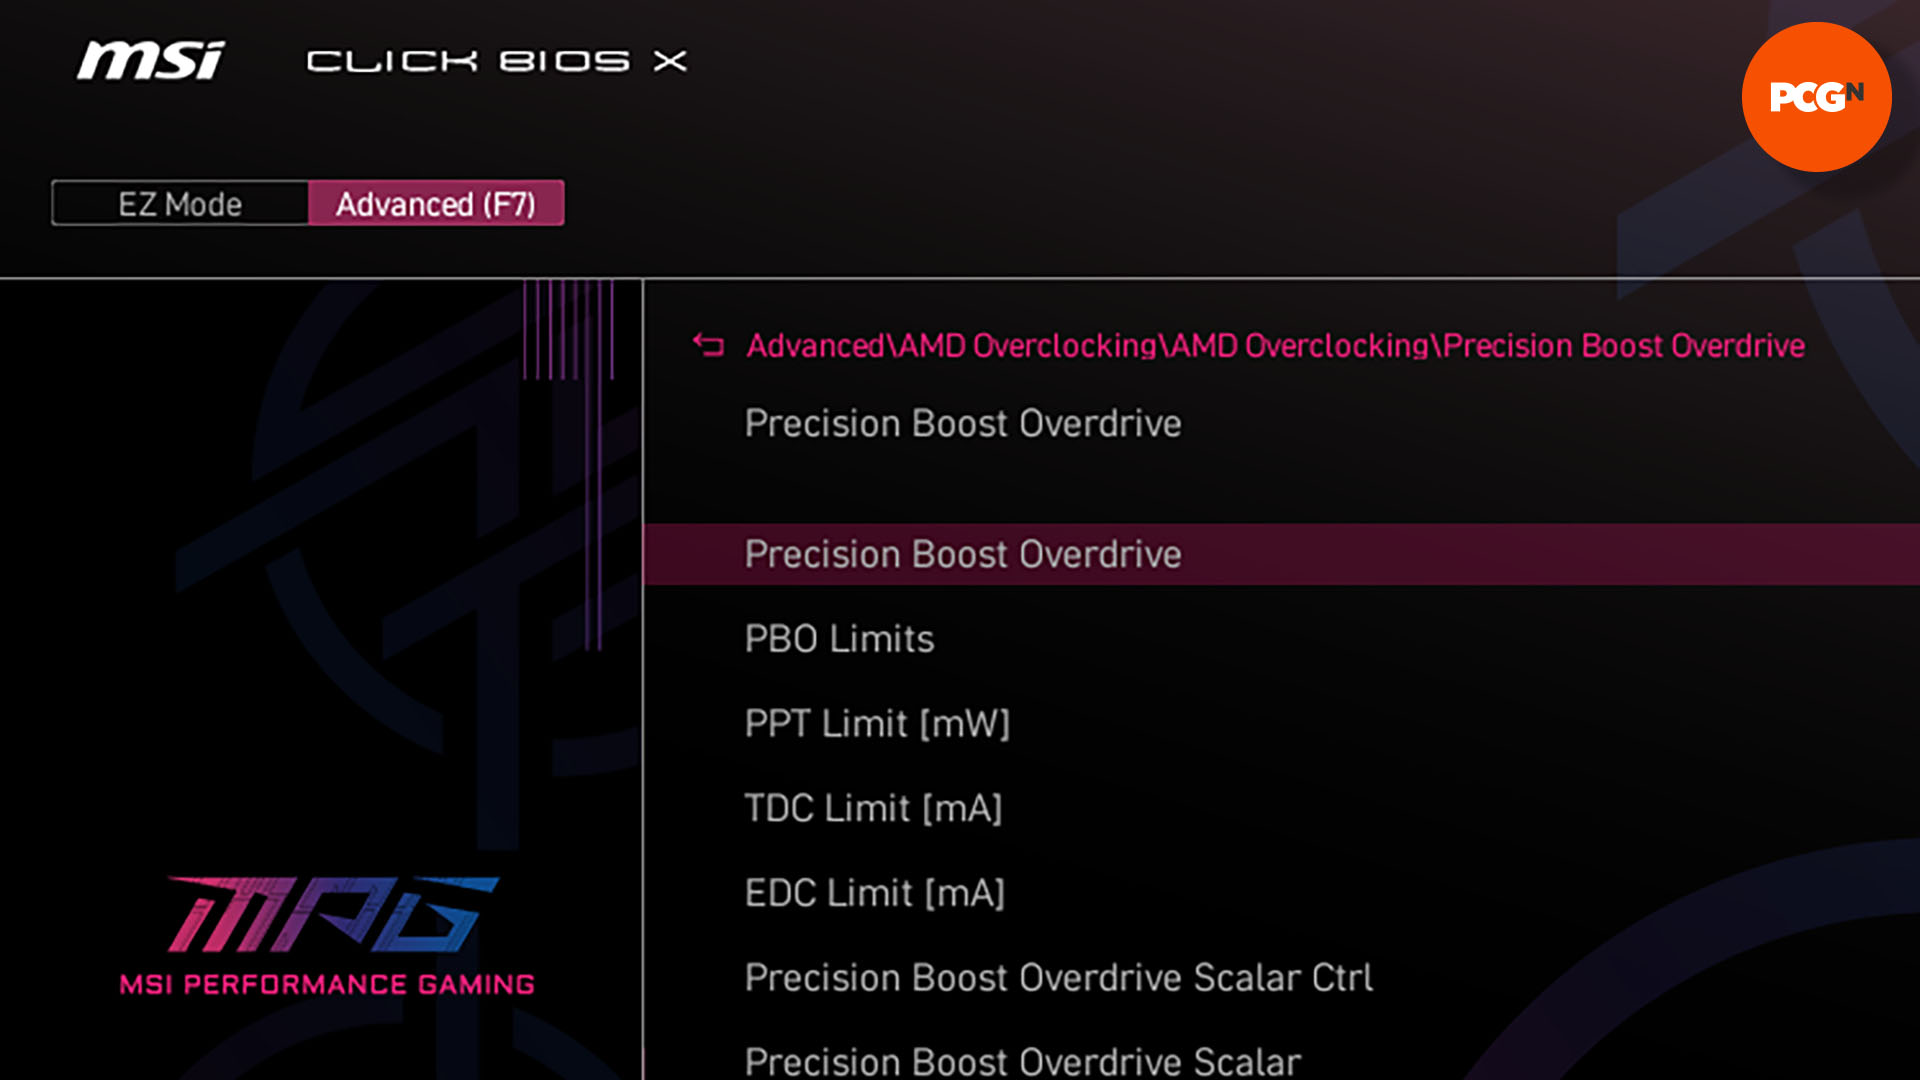
Your motherboard should have a section where you can adjust the PBO settings. They were found in the AMD Overclocking menu on our MSI X870E Carbon WiFi, but a bit of Googling should tell you where they are on your motherboard if you can’t find them.
On some motherboards, you may need to switch the BIOS to its Advanced mode in order to access these settings, and you can normally make this switch by pushing one of the F keys – it will tell you how to do it somewhere on the opening screen, and it involved hitting F7 on our MSI X870E Carbon WiFi motherboard.
3. Enable PBO and set limits
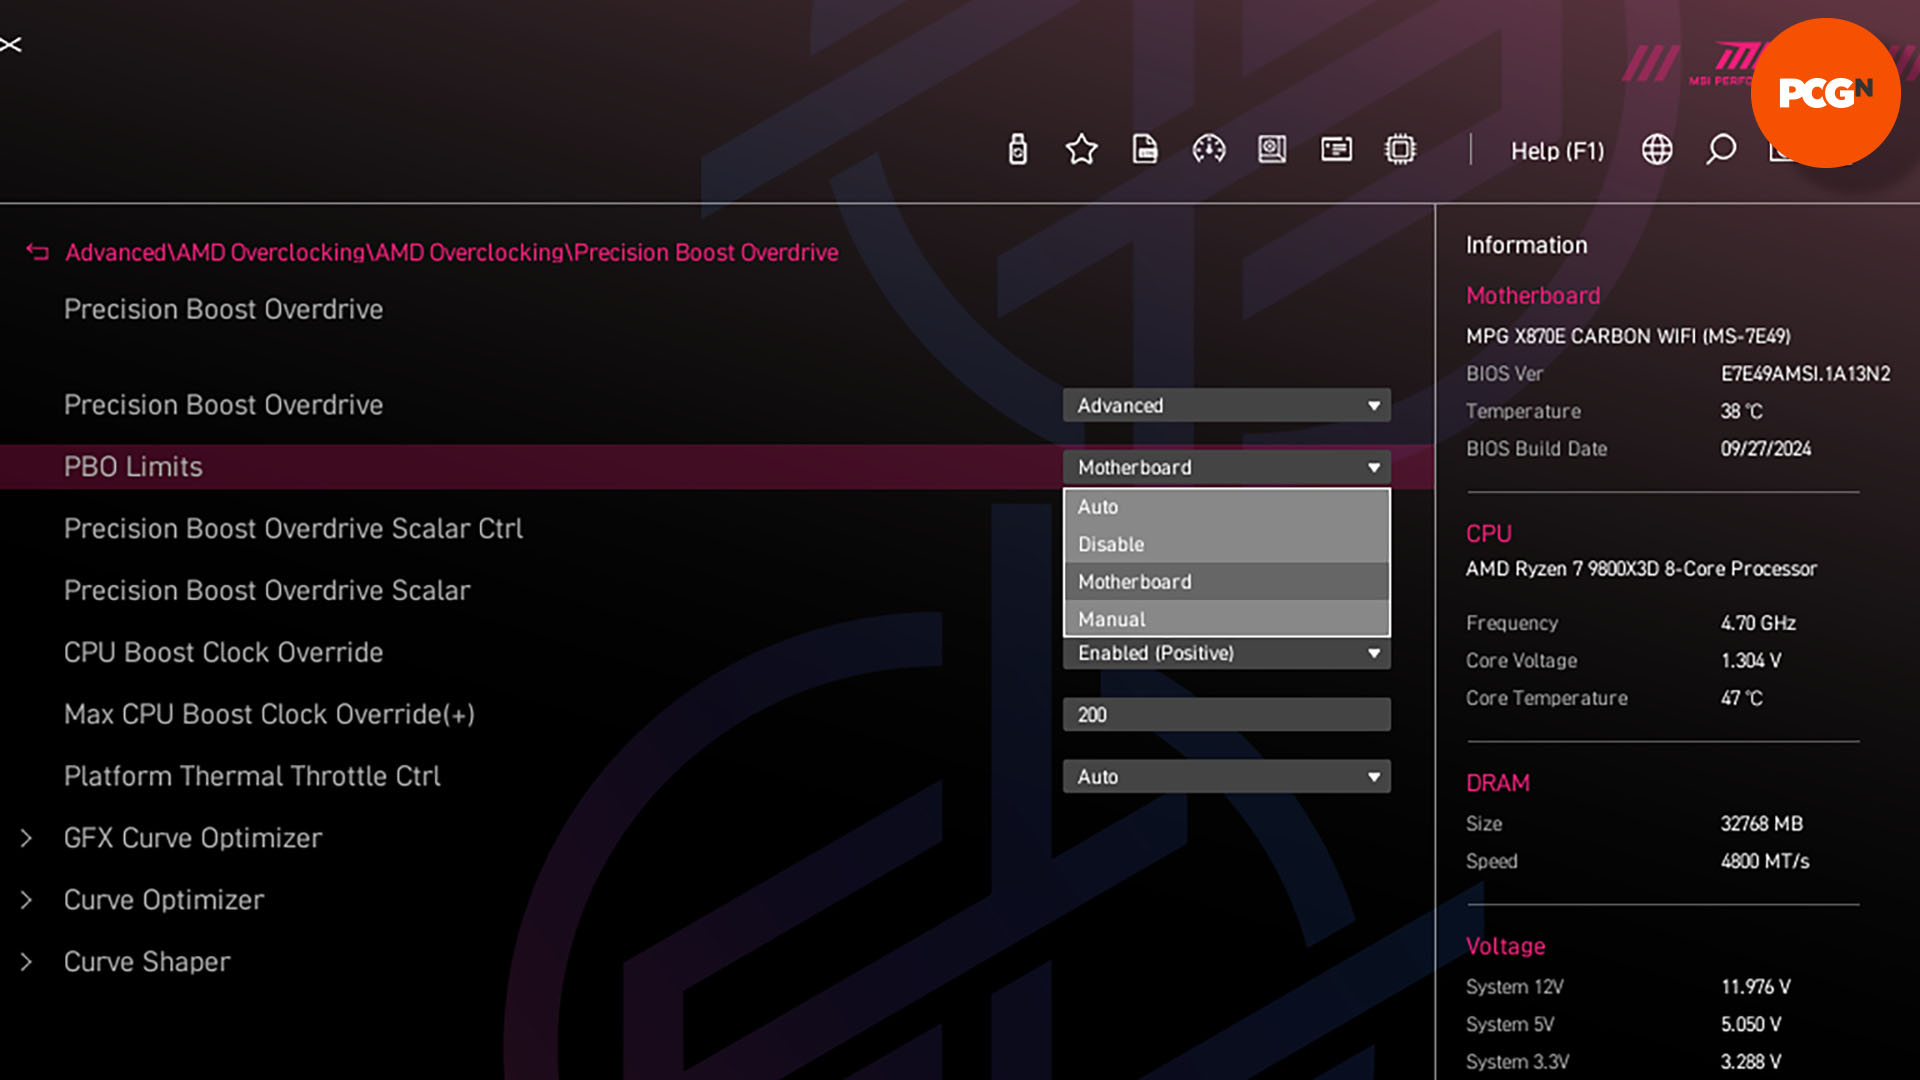
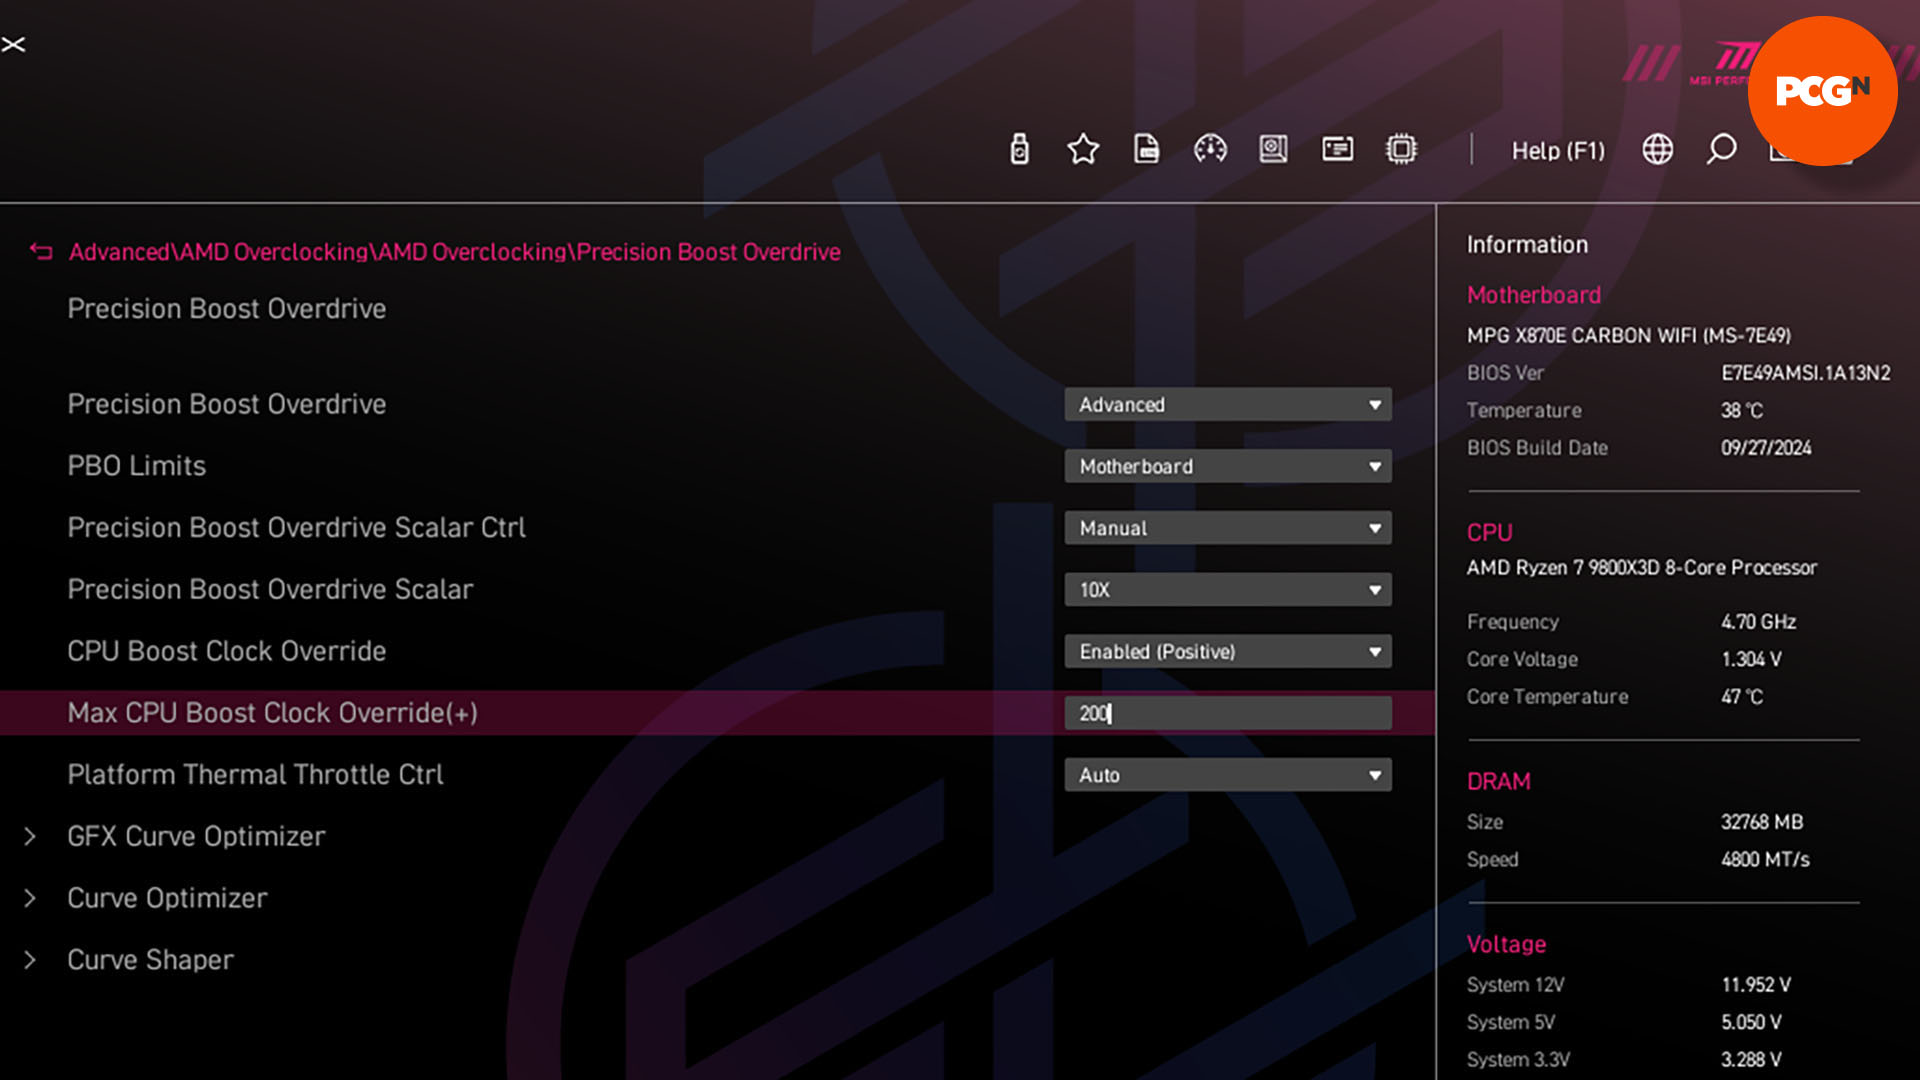
Find the option to enable Precision Boost Overdrive (PBO) in your EFI, and set it to its Advanced mode in the menu. Then set the PBO limits to “Motherboard.”
4. Set PBO scalar
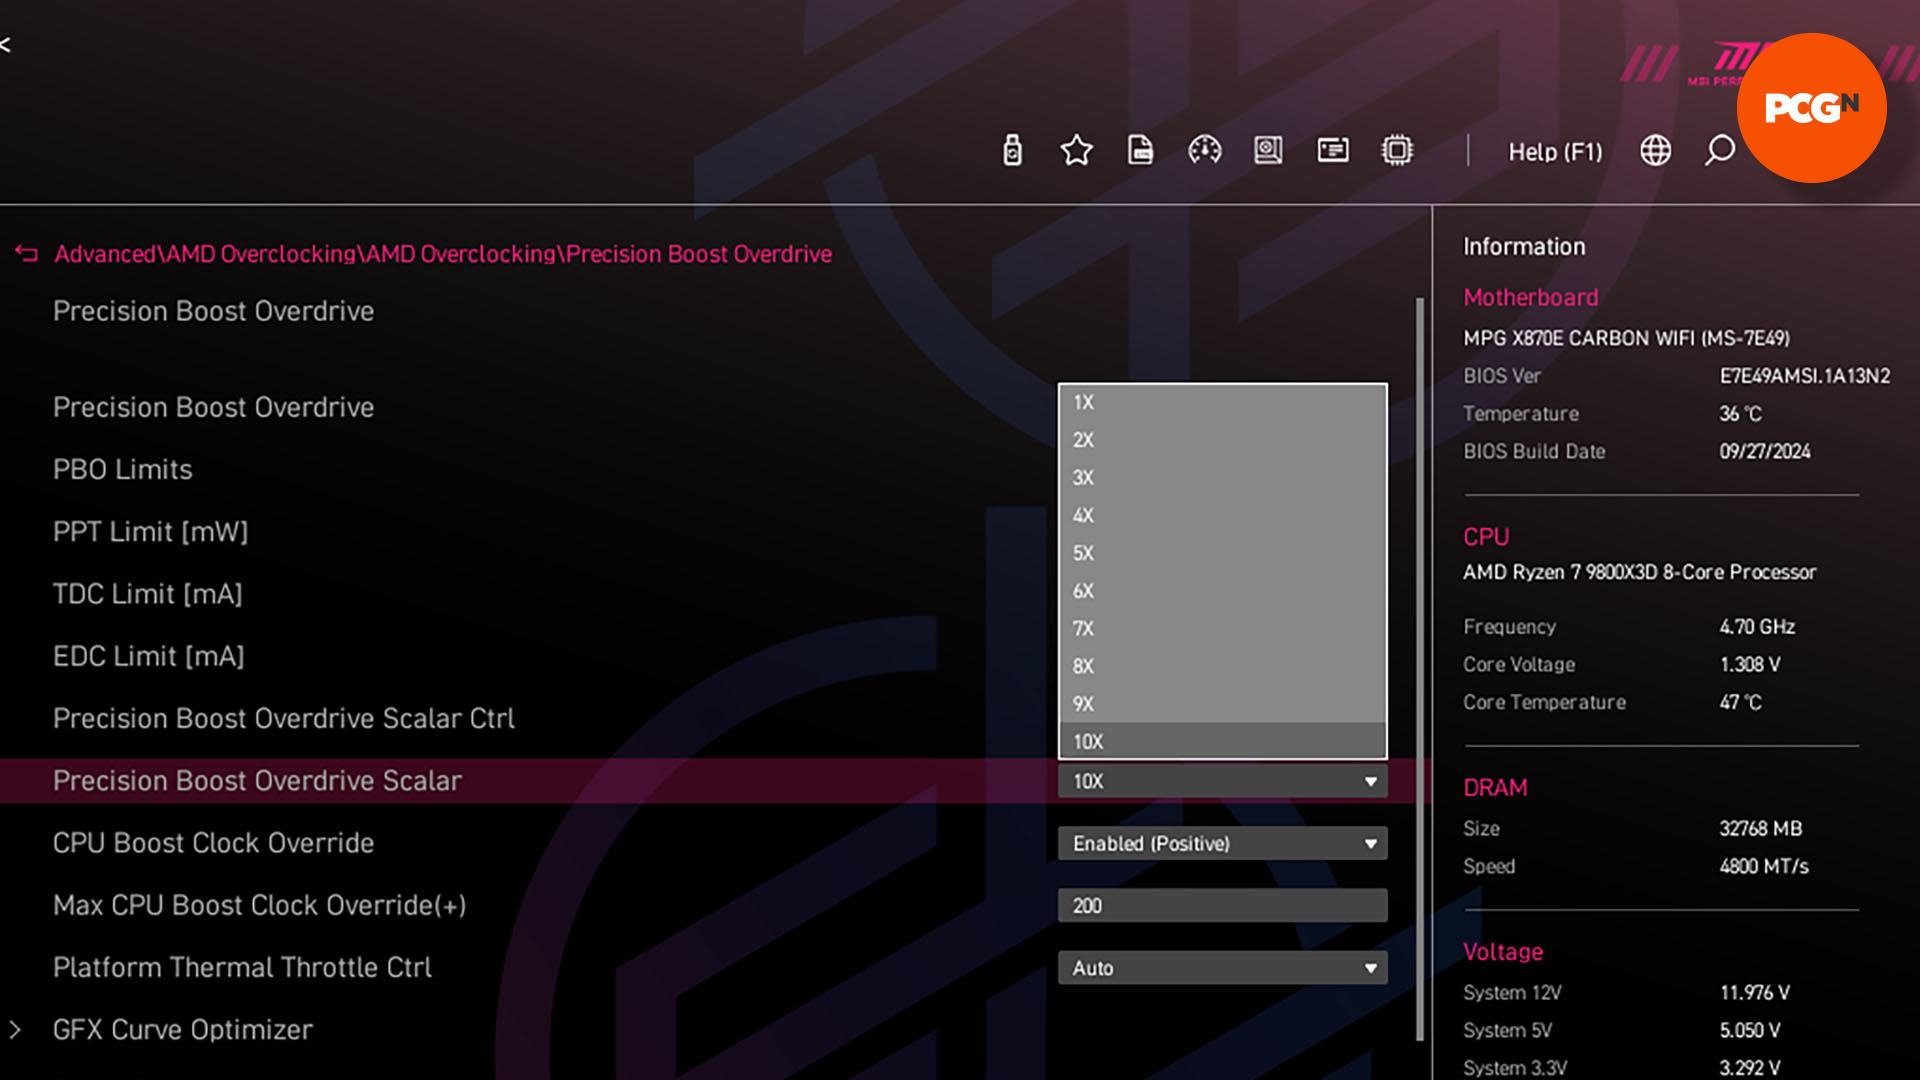
Find the Precision Boost Overdrive scalar controls, and set it to Manual. Then set the scalar to somewhere between 7x and 10x. Setting it to 10x worked well for our overclock.
5. Set boost clock override
Make sure that CPU boost clock override is enabled, as this will enable you to increase the maximum boost clock of your CPU. As with Ryzen Master, you then just need to input the number of megahertz by which you want to increase the maximum clock speed. We set it to 200, so it can go as high as 5,400MHz when conditions allow.
6. Set curve optimizer
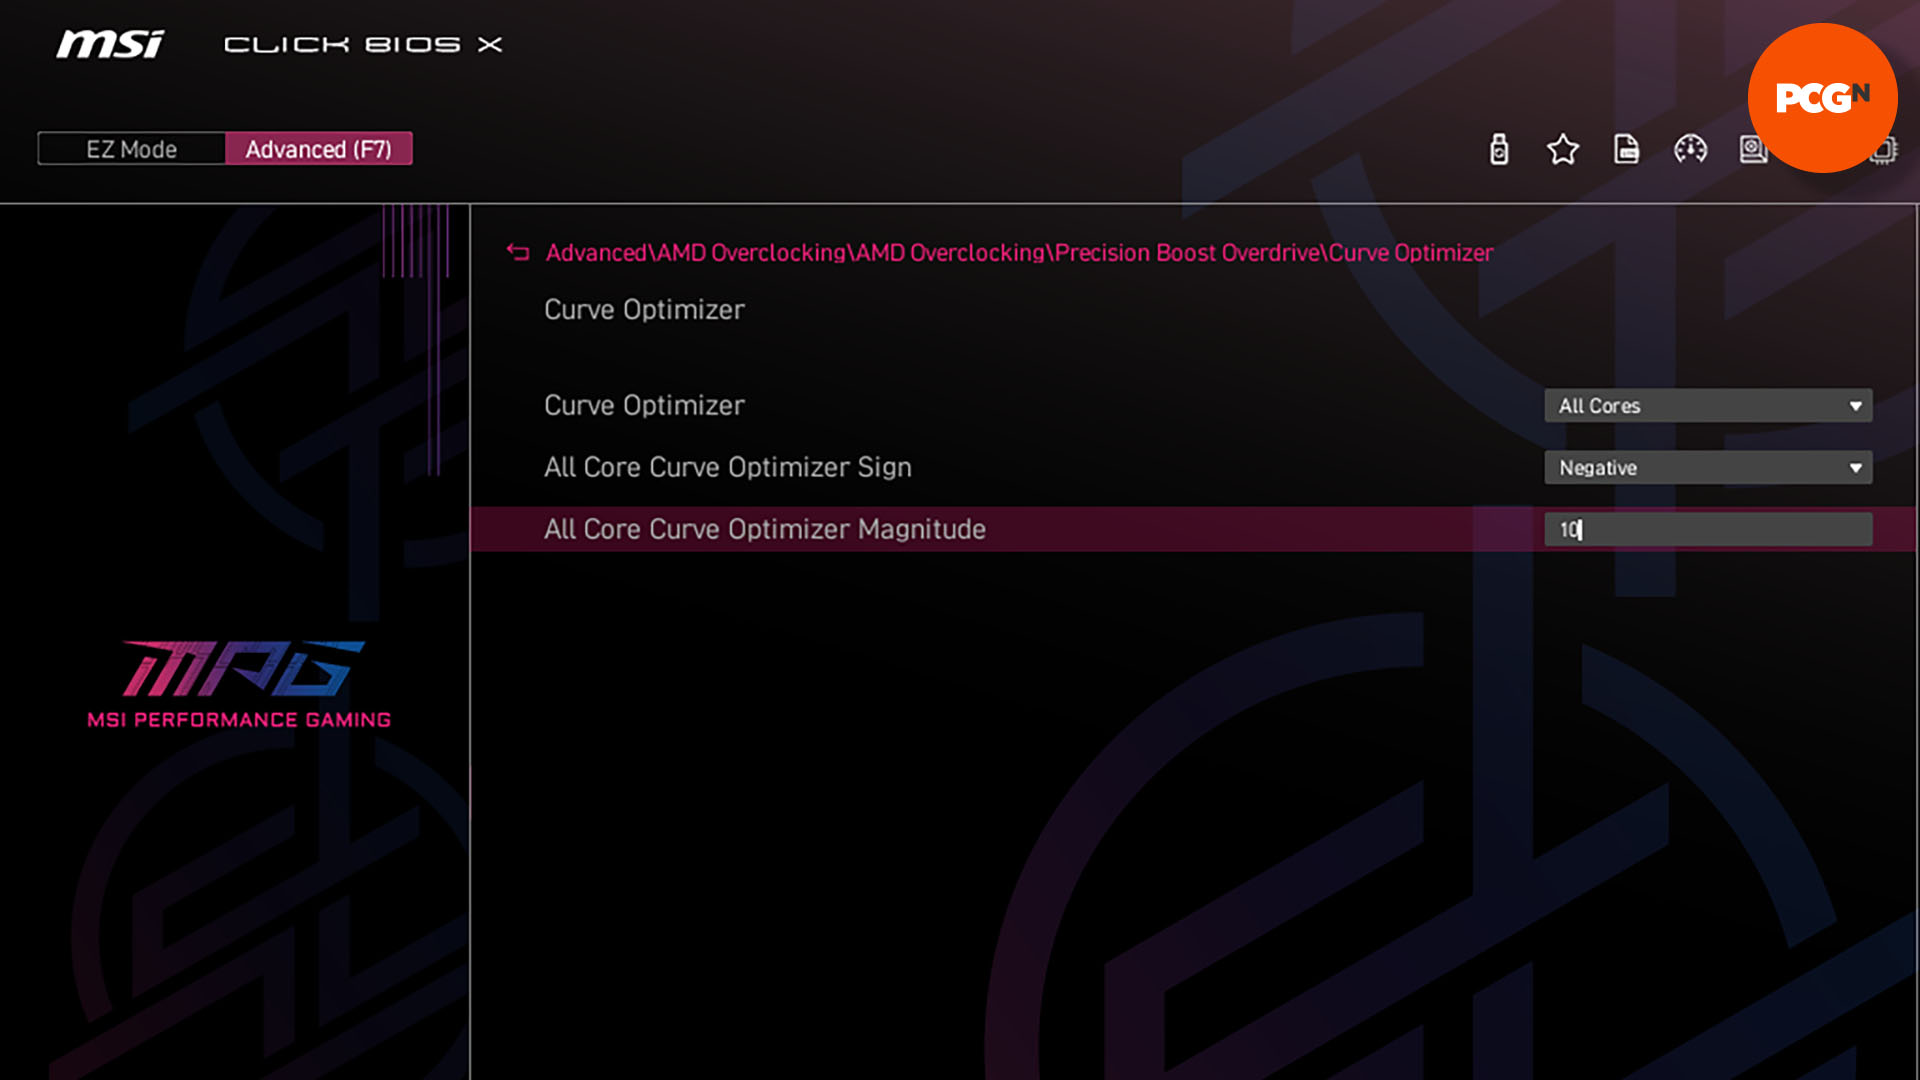
One final tweak is to set the curve optimizer, with which you can change the curve (imagine plotting the voltages on a graph), or size of the voltage-change steps available to the CPU. If you reduce these margins, you can help your CPU maintain a boosted clock speed for longer. Set the optimizer sign to negative, and then set the magnitude to -10, which worked fine with our sample.
7. Save settings and exit
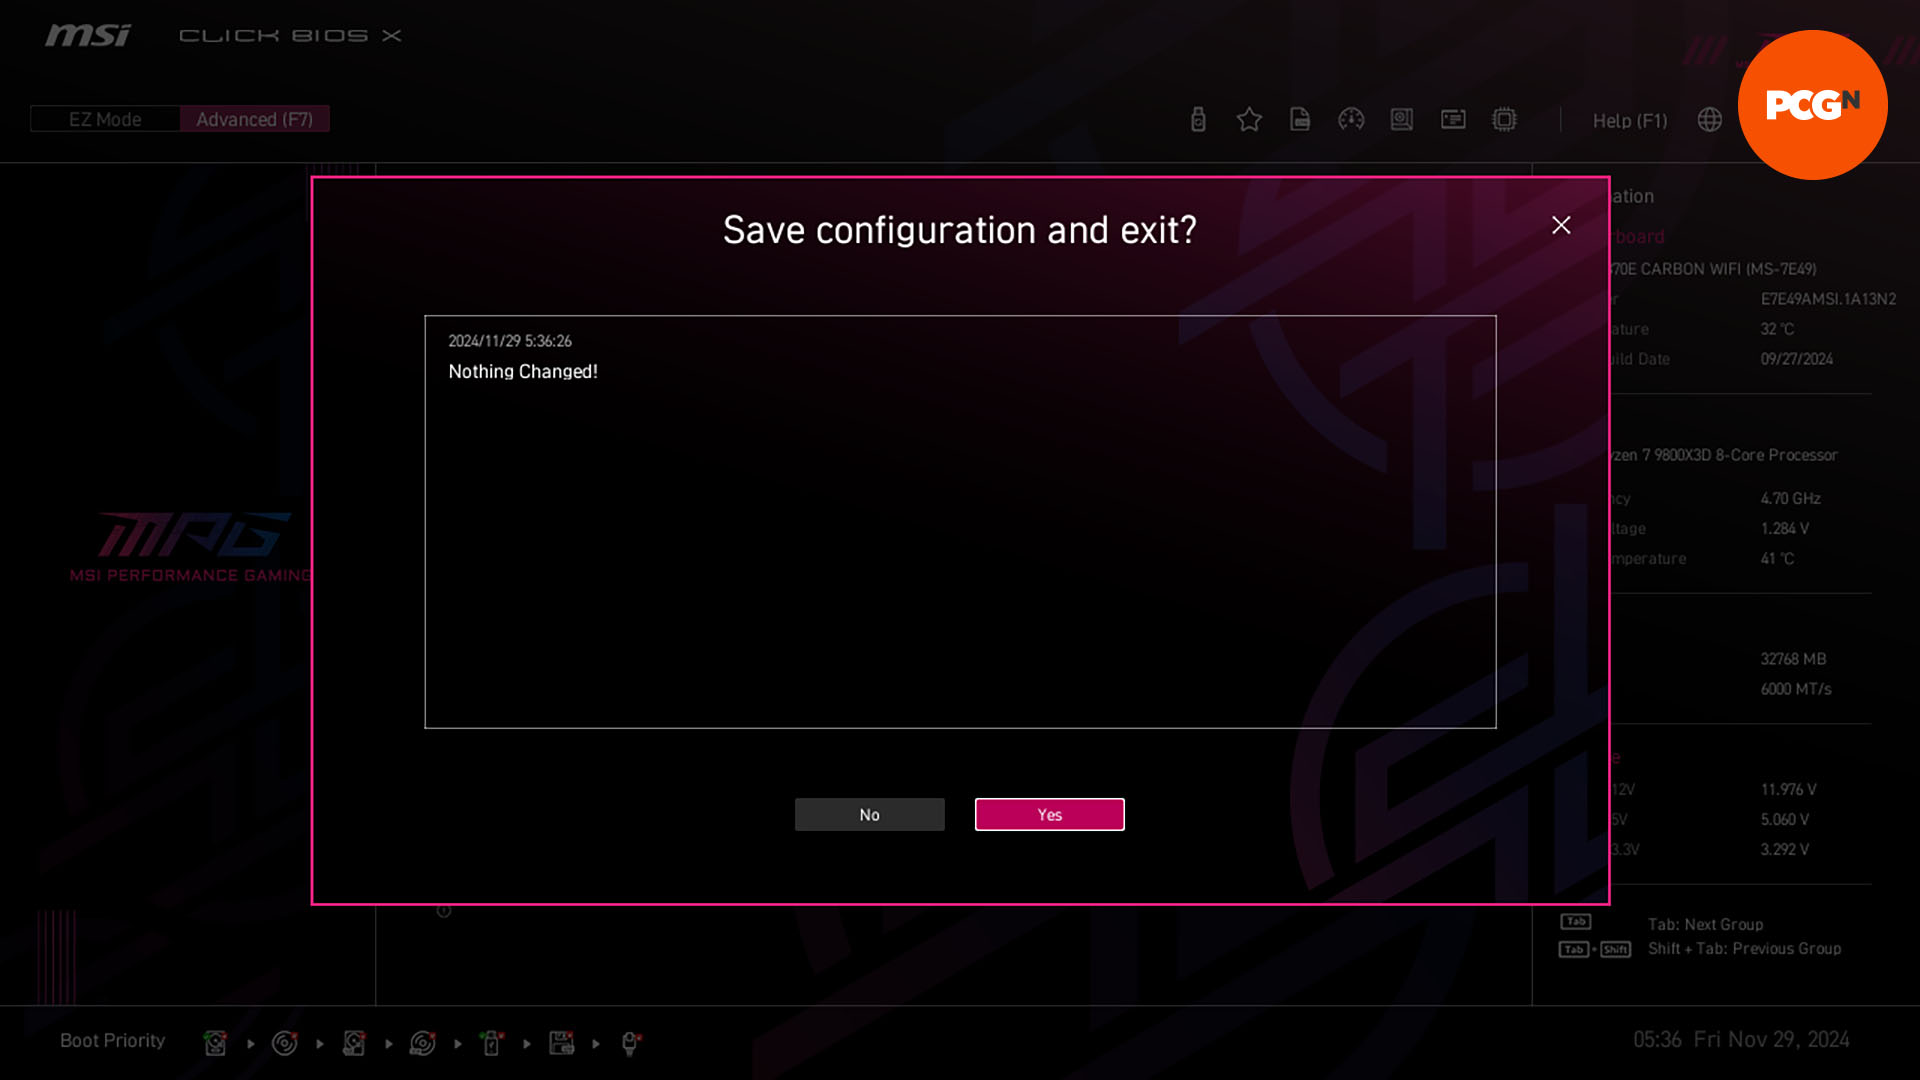
Save and exit the BIOS, either by pressing F10 or by finding the section in the BIOS menus. Your PC will then shut down and reboot itself. In our case, the BIOS mysteriously thought we hadn’t made any changes, but the BIOS still made our requested changes anyway, and we were able to verify them in Windows.
8. Stress test and benchmark
As you don’t have Ryzen Master to stress-test your system settings here, try running a couple of benchmarks to make sure your system is stable, while running CPU-Z to check the clock speed, and CoreTemp to monitor the temperature, at the same time.
We suggest running the full ten minute Multi Core test in Cinebench R24, and then fire up a game for a few minutes too. As you can see in the screenshot above, our CPU happily boosted to just over 5.4GHz when running Far Cry, although it ran at around 5.3GHz in Cinebench. If your CPU is staying under 88°C during these benchmarks, and it’s not throttling, then you’ll be fine. CoreTemp won’t detect the correct clock speed of your CPU when using PBO, but don’t worry about this, as you can see the actual clock speed in CPU-Z.
9800X3D manual BIOS overclock
The classic way to overclock your CPU, of course, is getting down and dirty with your motherboard’s EFI (extensible firmware interface), which is sometimes called a BIOS (basic I/O system). This low-level setup software controls how your motherboard interacts with your components. This overclock behaves differently from the automatic overclock outlined above, as it permanently applies the clock speed across all the CPU’s cores, rather than just the boost speed.
Motherboards use a variety of terminologies here, but the basic principles are the same. We don’t recommend this method of overclocking if you just want your CPU to be faster in games, but forcing your CPU to run all its cores at this clock speed can result in improved multi-threaded performance if you’re doing a lot of video encoding, for example.
Your CPU has a base clock of 100MHz, and then a multiplier that tells the motherboard how many multiples of the base clock make up the CPU clock speed. So, as standard, the 9800X3D can boost to a maximum of 5.2GHz, meaning the multiplier is 52 (52 x 100 = 5,200MHz, or 5.2GHz). In this guide, we’ll show you how to raise this to 5.3GHz, and also apply more voltage to your CPU.
1. Enter the BIOS
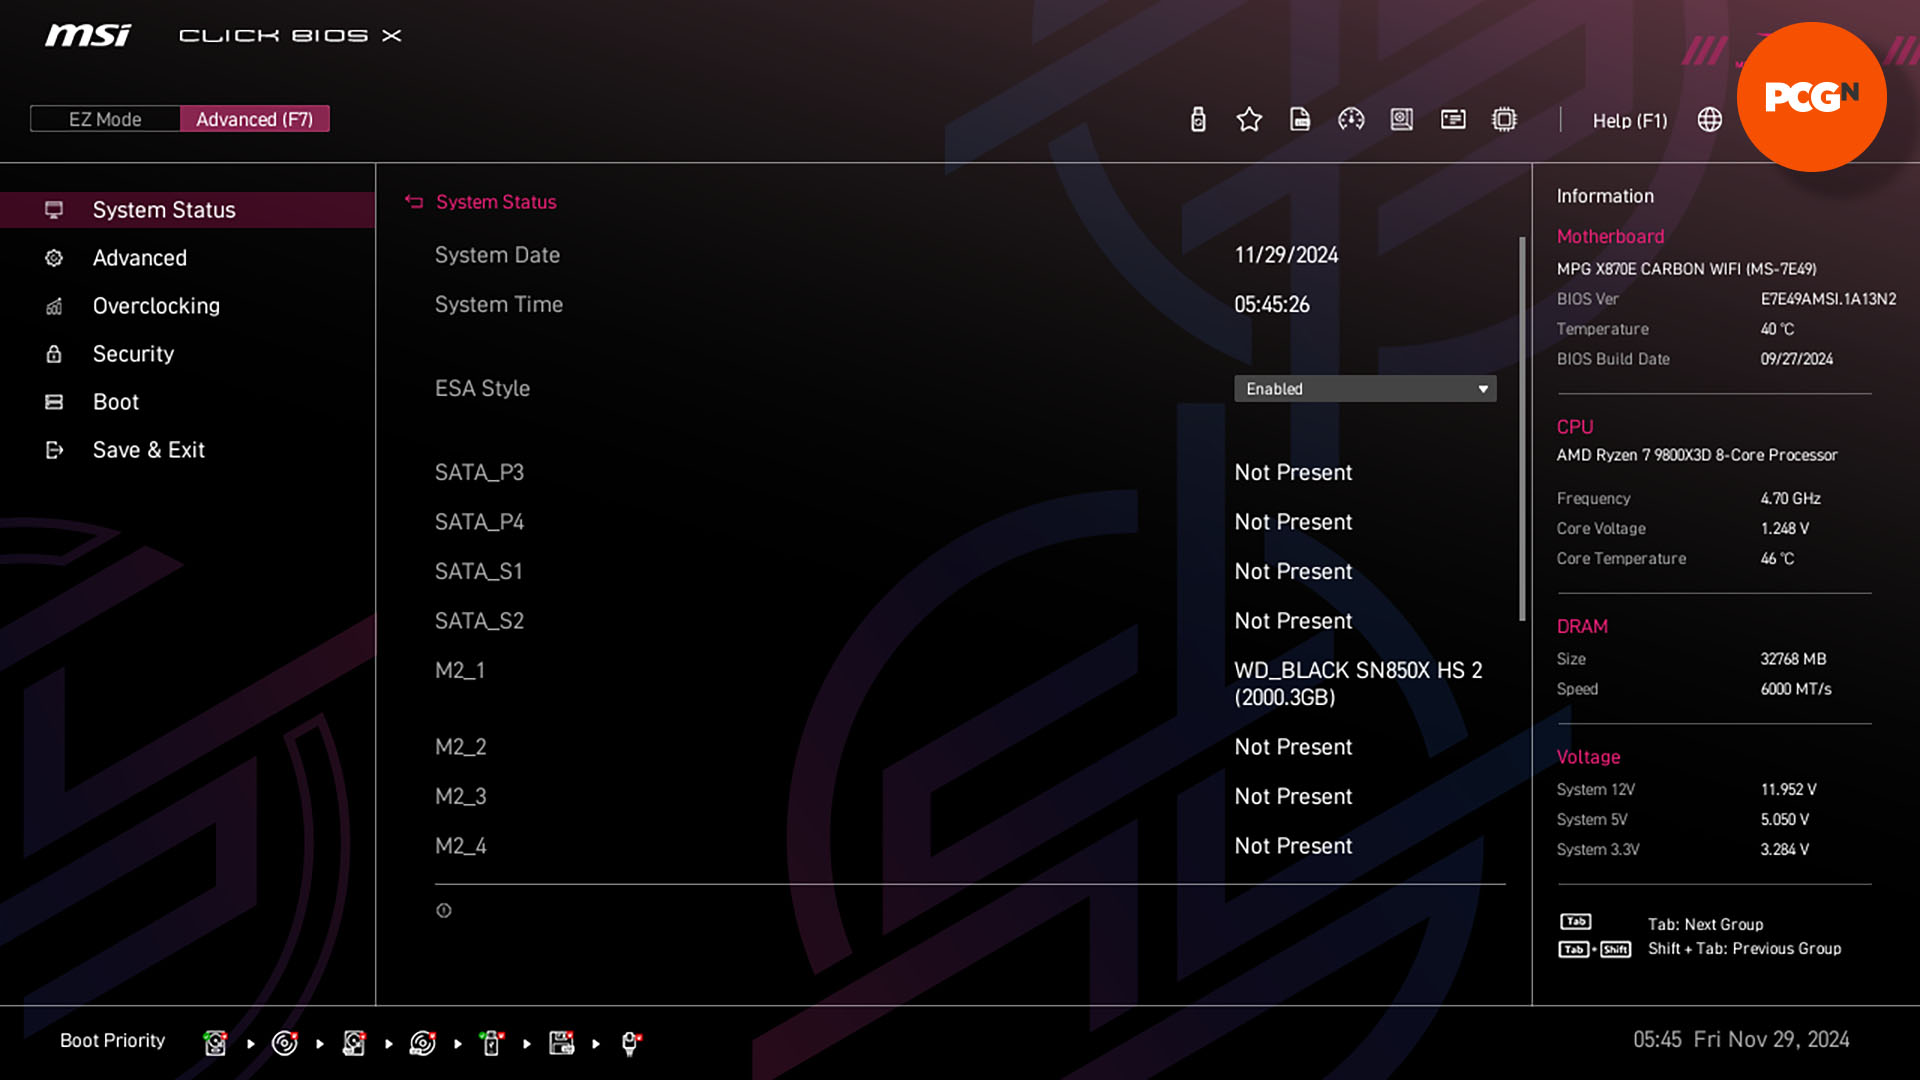
Power on your PC, and keep pressing the Del key until it enters your motherboard’s Setup software, otherwise known as the EFI, or BIOS. If your PC boots into Windows then you’ve missed the window, so restart your PC and try again.
2. Find the overclocking section
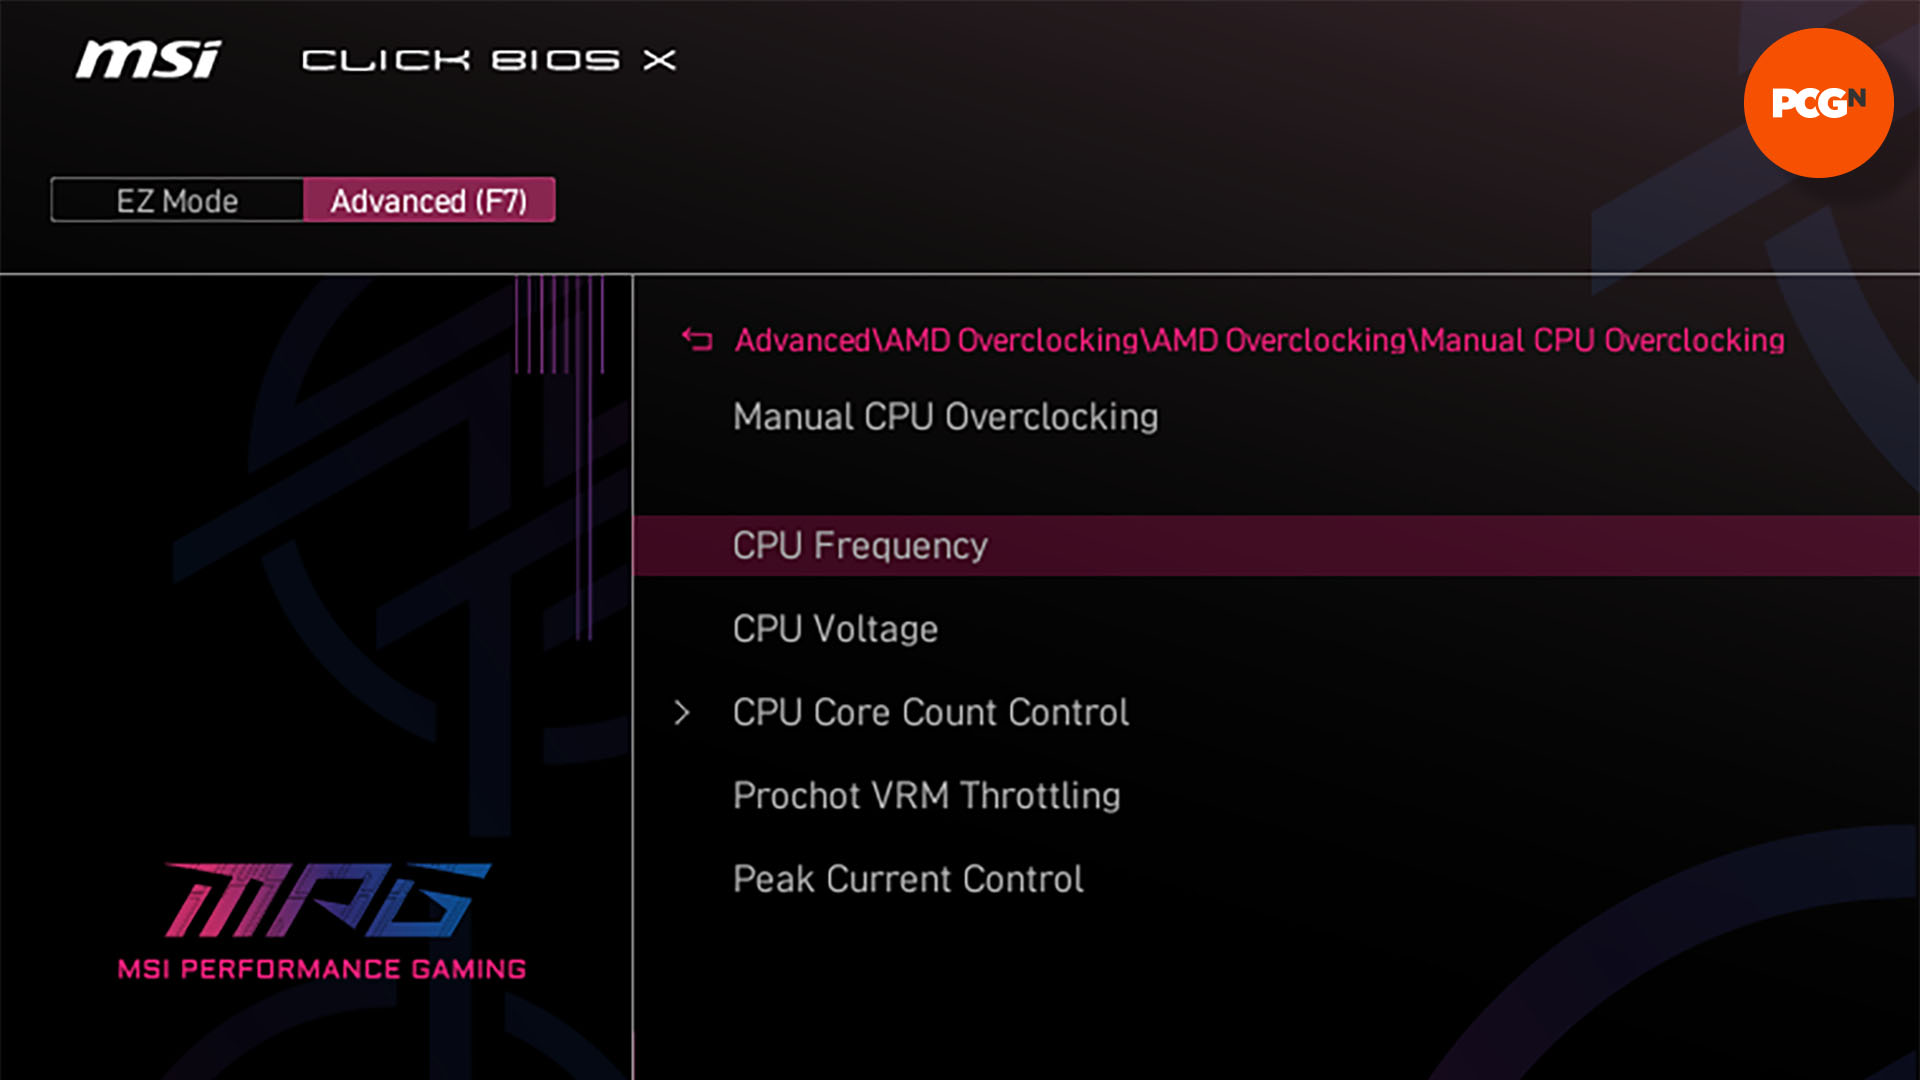
Your motherboard should have an overclocking section that gives you access to the CPU clock speed and voltage settings. On some motherboards, you may need to switch the BIOS to its Advanced mode in order to access these settings, and you can normally make this switch by pushing one of the F keys – it will tell you how to do it somewhere on the opening screen, and it involved hitting F7 on our MSI X870E Carbon WiFi motherboard.
Sometimes the overclocking settings will be found in a special section called Extreme Tweaker, or something along those lines. Or, on some motherboards, including our MSI X870E Carbon WiFi, there’s an AMD overclocking section in the Advanced menu, and you can then open the Manual CPU Overclocking submenu.
3. Change clock speed and voltage
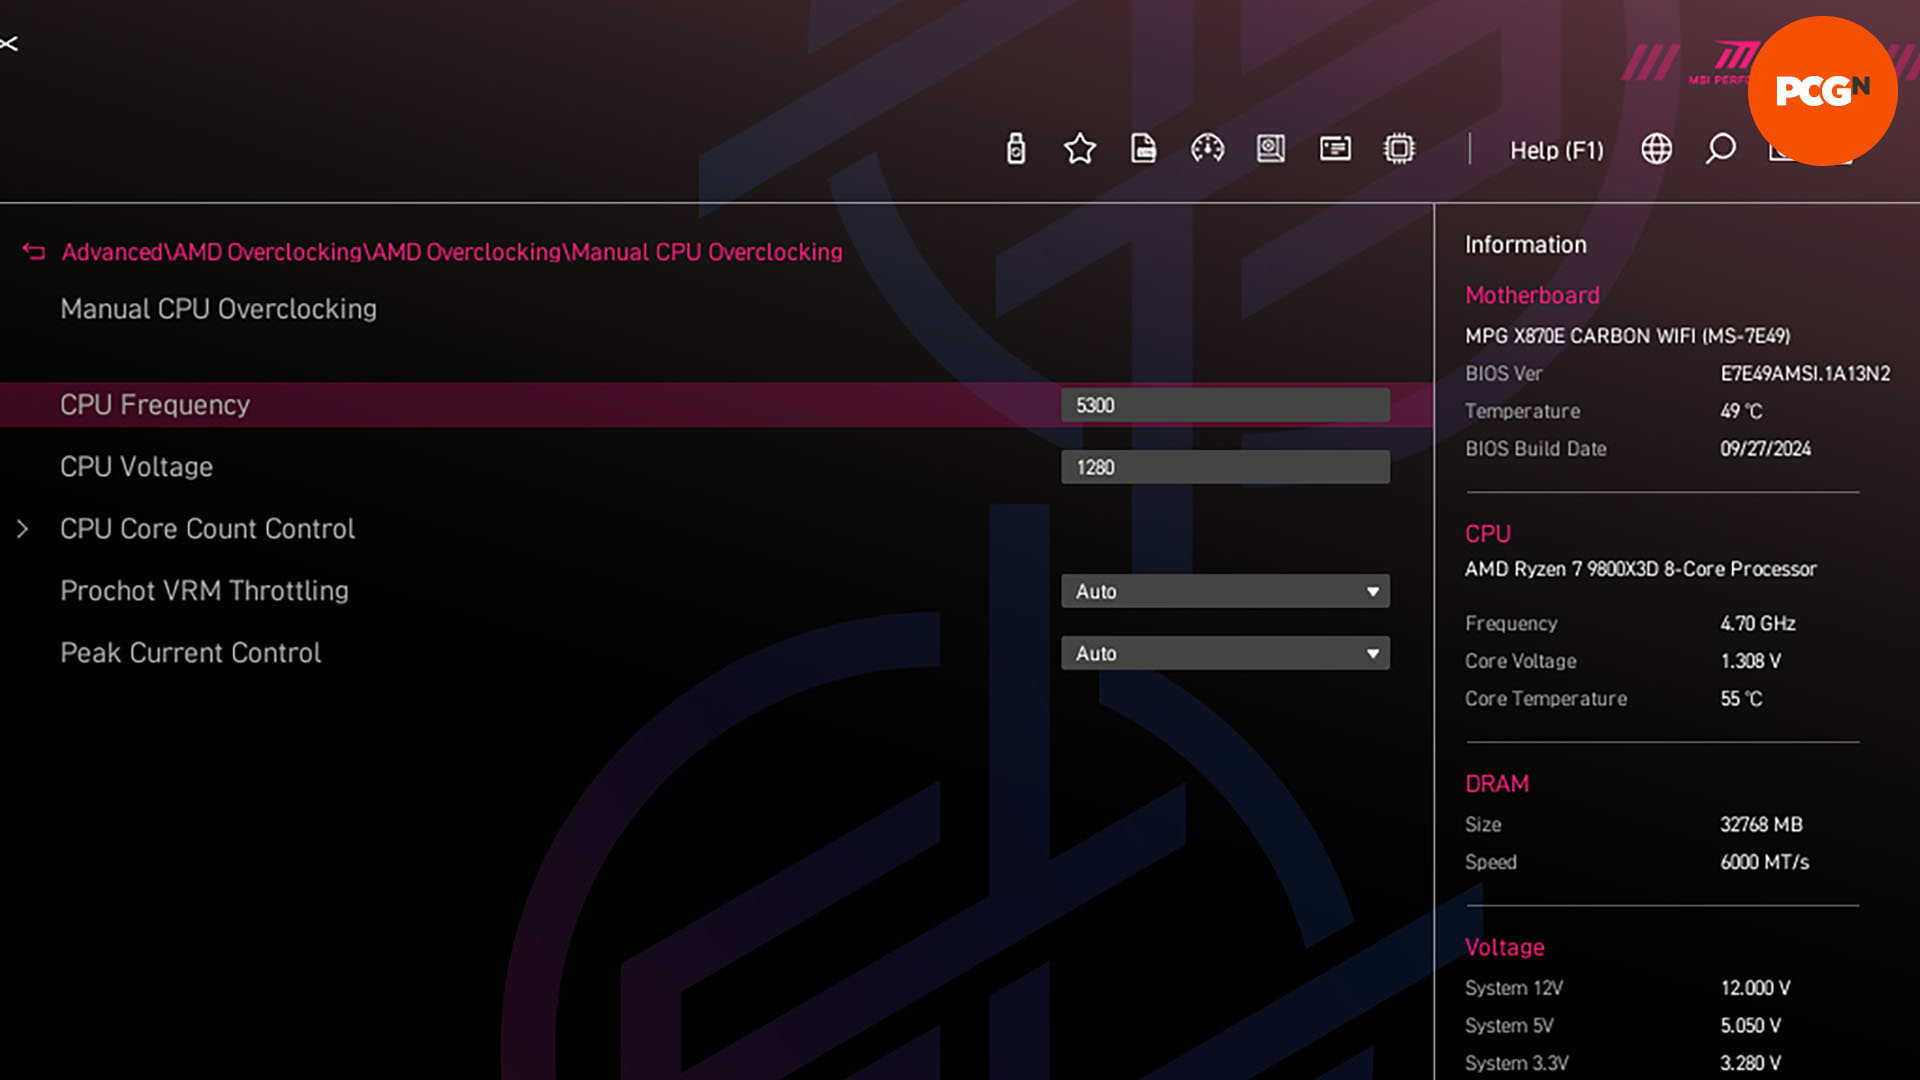
The terminology for changing the clock speed varies between motherboard manufacturers, but there are a few key terms to look for. In our case, our MSI X870E Carbon WiFi motherboard gives us the option to simply type in the offset, which means the amount by which you want to overclock your CPU. In this case, we want the offset to be 100MHz, to overclock our CPU to 5.3GHz.
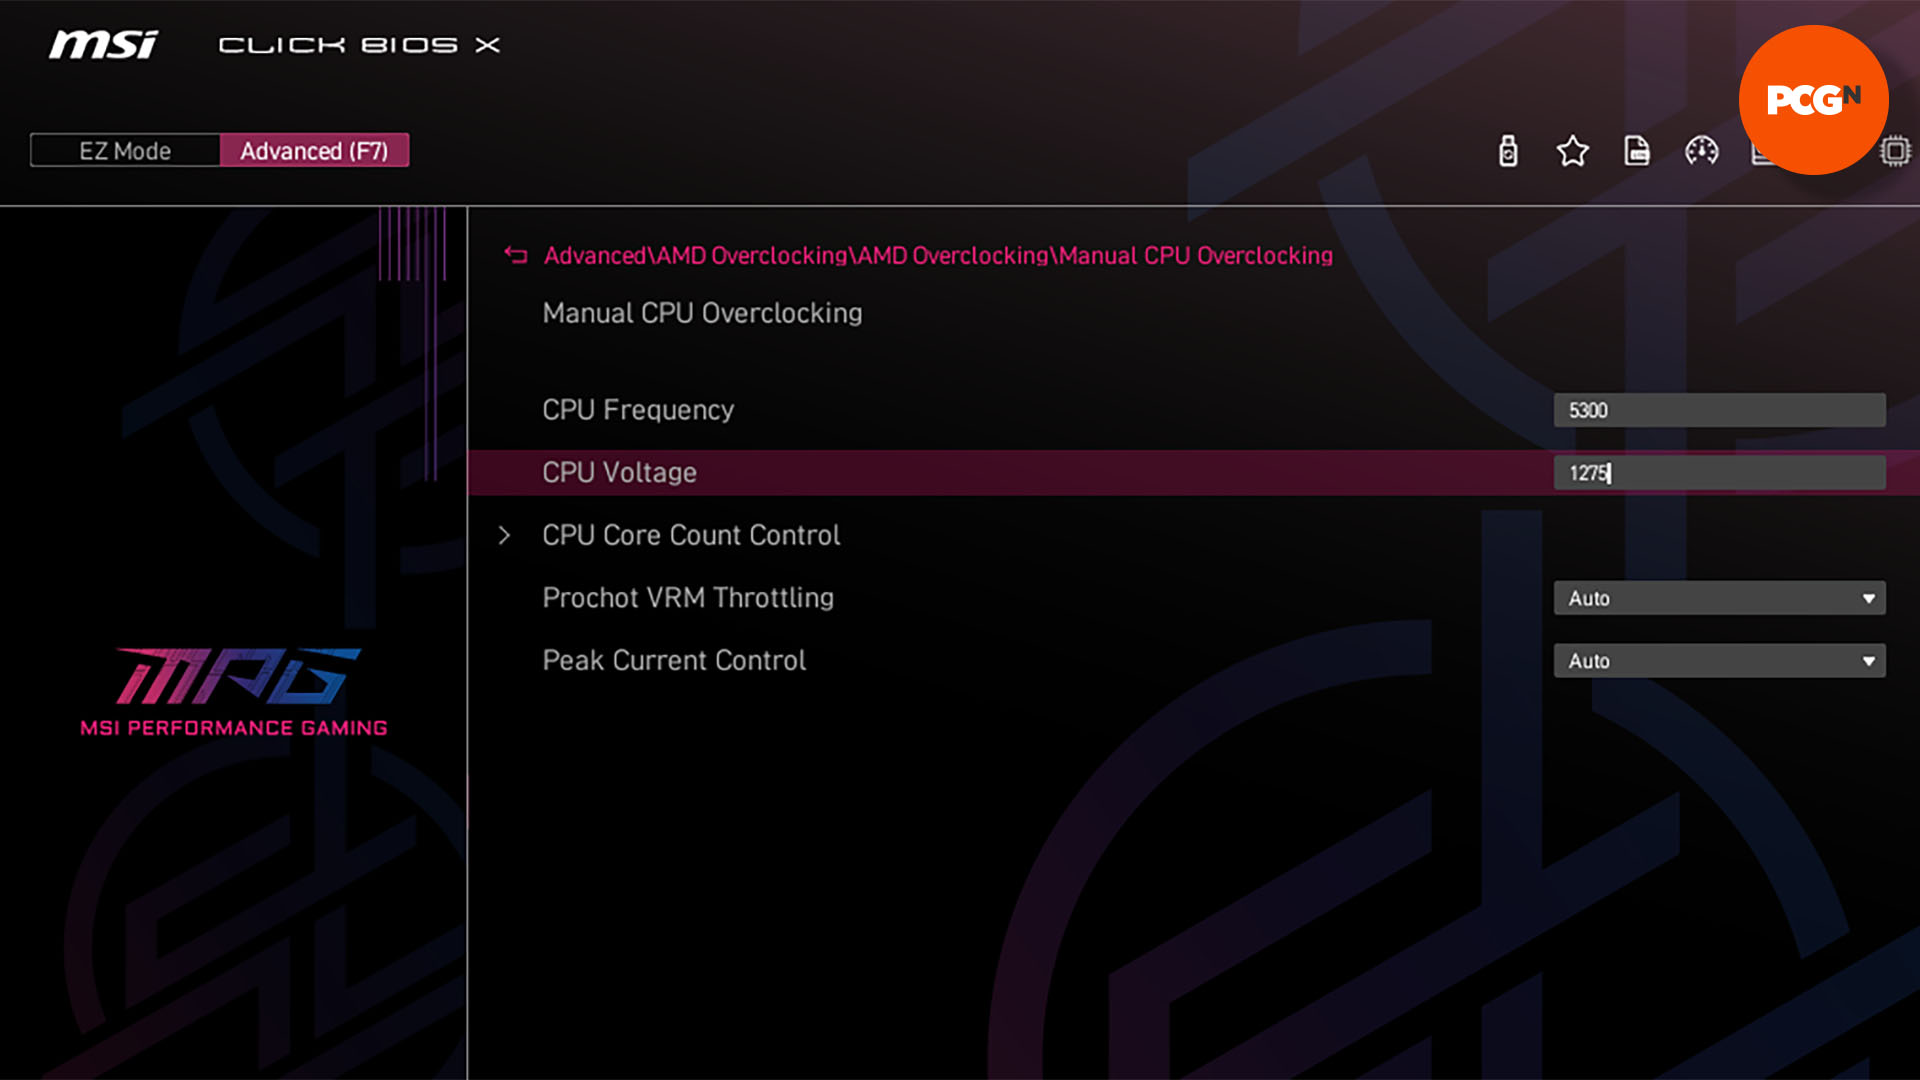
However, other motherboards may instead require you to type in the total clock speed, which in our case is “5300” (5,300MHz or 5.3GHz). Others may also require you to input a multiplier or ratio, in which case you need to select or type 53 into this field.
We’ll also need to apply some extra voltage to the CPU so it has enough power to maintain the extra clock speed. Bear in mind that your CPU will be running at this voltage the whole time, so we don’t recommend going over the 1.31V limit specified by AMD. On our test system, we found 1.28V was fine for keeping the CPU stable at 5.3GHz.
As with the clock speed, the terminology for this setting varies between motherboards, but you want to look for the basic CPU voltage section. On our MSI X870E Carbon WiFi motherboard, we simply input the total voltage we wanted to run, so we just typed “1280” (1.28V) into the field. Others may require you to input (or select) the offset or override instead, though, in which case you need to type in the difference between the stock 1.22V and your target voltage, so you would type “0060” to go from 1.22V to 1.28V, for example.

5. Save settings and exit
Once you’ve made your changes, and double-checked that you haven’t put any mistakes in them, save and exit the BIOS (you can usually do this by pressing F10). Your system will then shut down and reboot itself automatically.

6. Troubleshooting
AMD systems sometimes take a while to reboot when they’re making fundamental changes to CPU settings, so give your PC a good few minutes to reboot before you panic. Hopefully, it will then go into Windows, and you can verify that it’s hitting your specified clock speed in CPU-Z. If nothing happens, though, you may need to clear your CMOS and try some more conservative settings.
Switch off your PC by holding down the power button, and then check your motherboard manual to find out how to clear the CMOS. Some motherboards have a handy clear-CMOS button on the rear I/O panel, or on the board itself, while others require you to move a jumper on the motherboard. Follow the instructions to clear the CMOS, and then try again with a more conservative overclock and voltage setting, or just stick to running your CPU at stock speed.
7. Verify your overclock
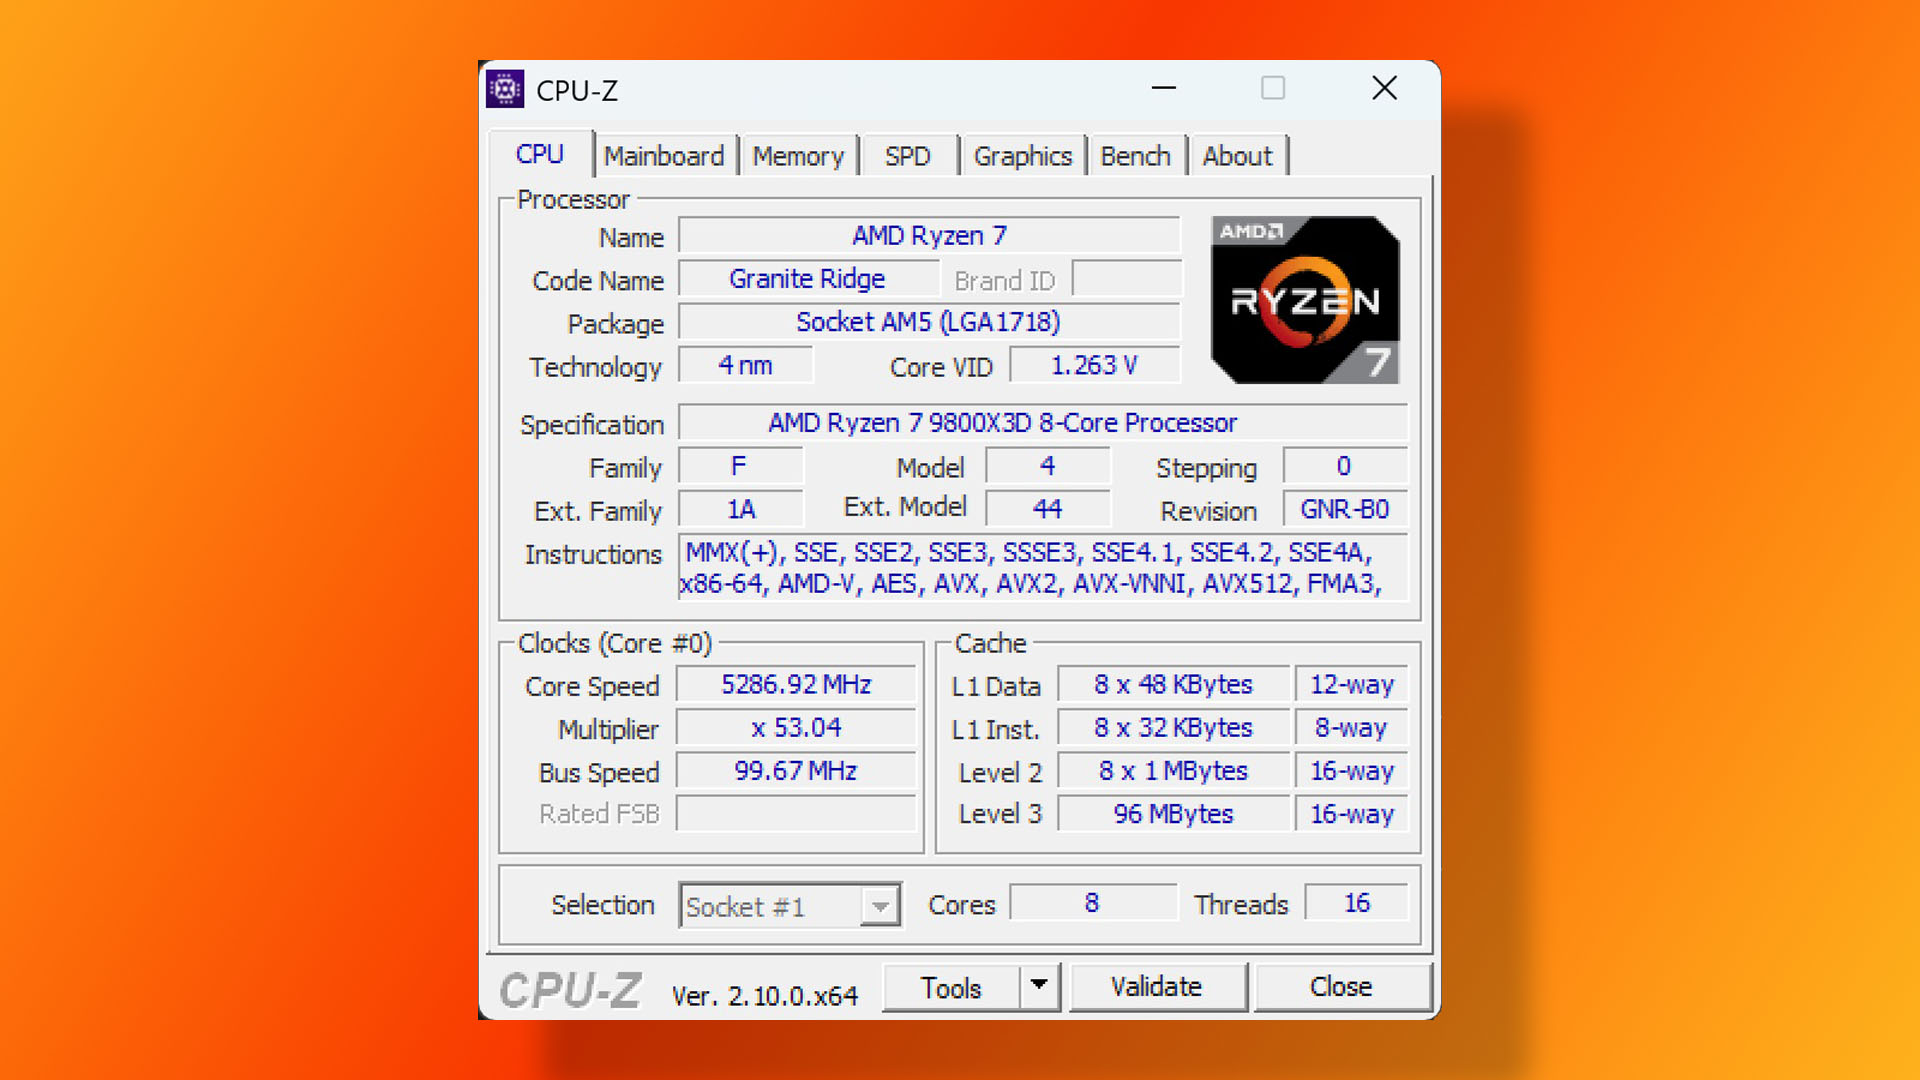
Once you’re into Windows, open CPU-Z to check that your motherboard is running at your set clock speed. It may be a near-enough figure such as 5,384MHz rather than a straight 5,400MHz, but that’s fine. Likewise, the actual reported voltage may be a little over or under what you set in the BIOS, but as long as it’s a good deal above 1.22V, it should be fine.
8. Stress test
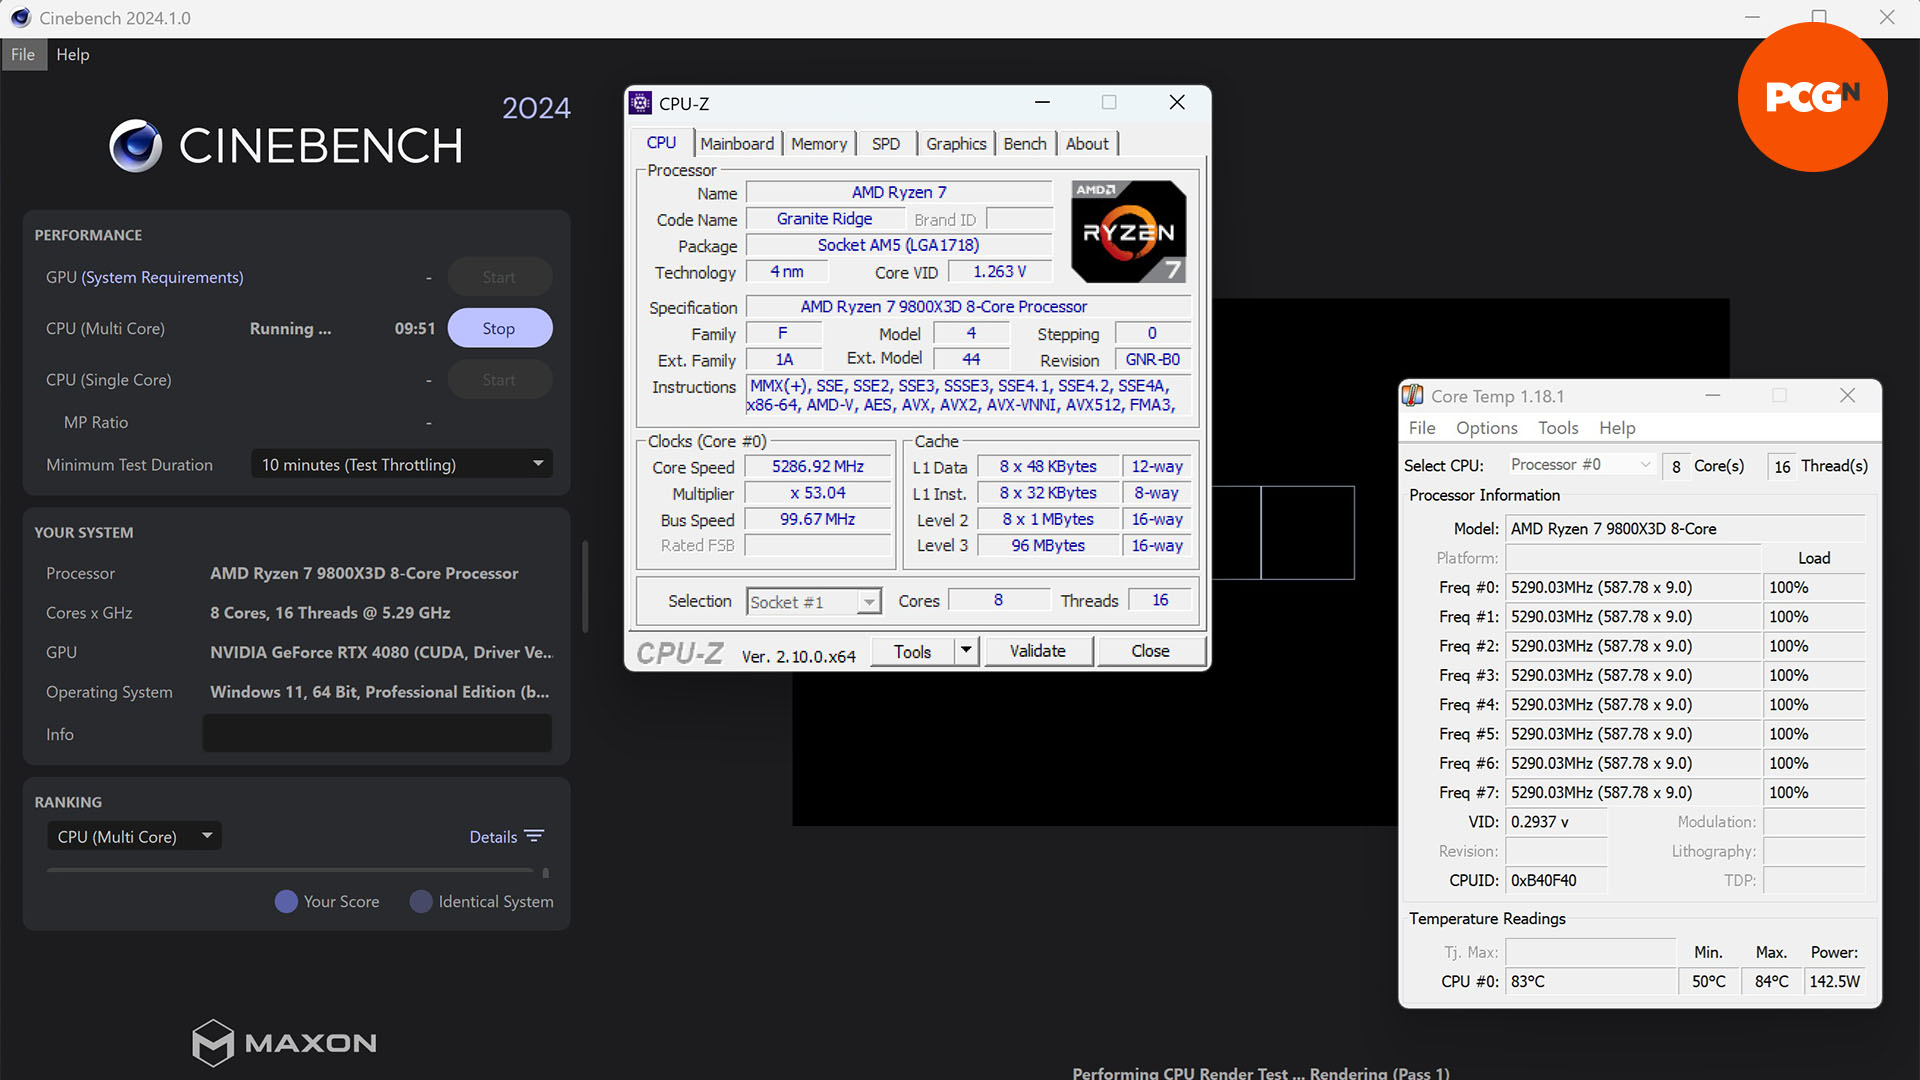
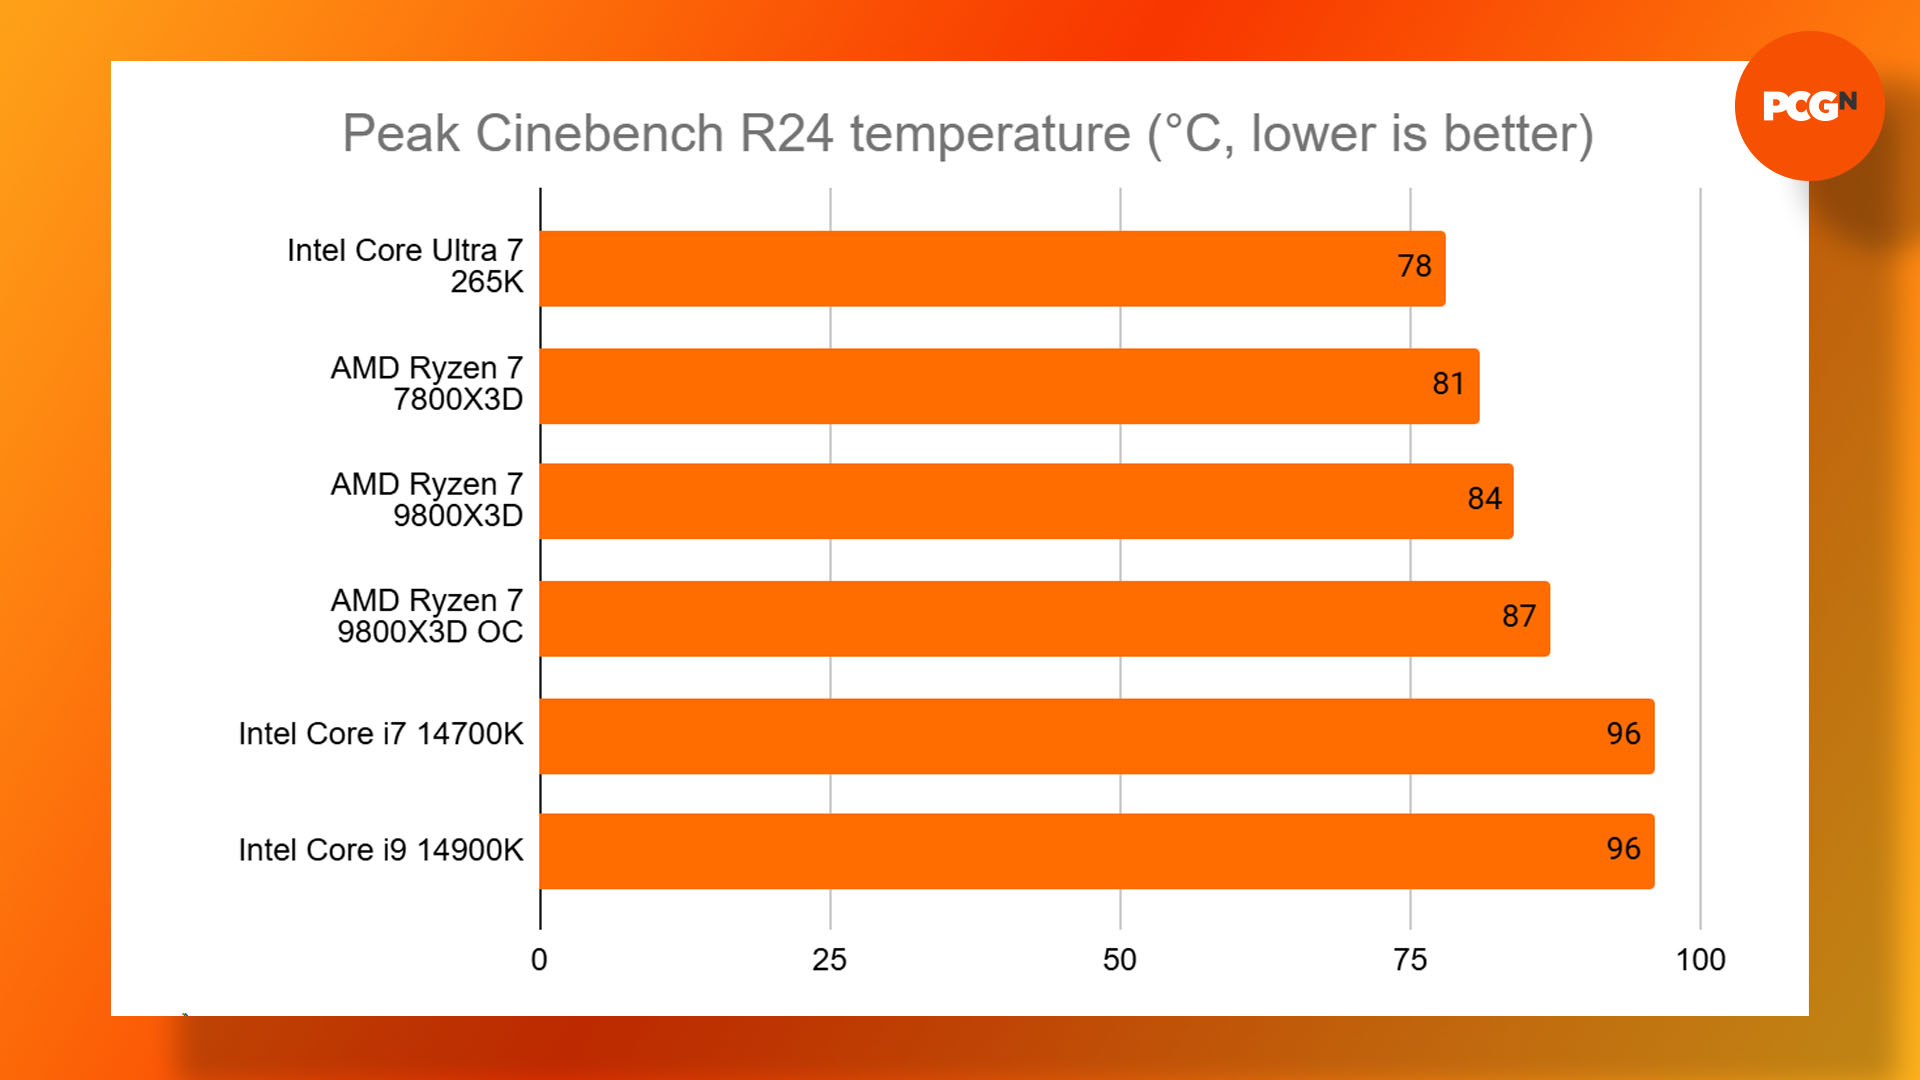
You now need to make sure your overclock is stable, so run CoreTemp to keep an eye on the peak temperature, and run the Cinebench R24 Multi Core test to push all your CPU cores to maximum load. Our CPU temperature hit 87°C at 5.3GHz with 1.28V using our Corsair H100X Elite cooler with a 240mm radiator, which is fine. If your system locks up, but the temperatures still look fine, the CPU may need a little more power, so try restarting your PC and inputting 1.29V instead.
9. Reduce the voltage
Once your overclocked CPU is stable, go back to the BIOS, and drop the voltage down a little, for example, to 1.275 from 1.28B, re-enter Windows, and stress test it again. If it’s still stable, then try dropping the voltage again, and repeat this until your system crashes during the stress test. When you find an unstable setting, go back to the voltage setting at which your system was last stable. Dropping the voltage as low as possible will help reduce the operating temperature and power draw of your CPU.
This is quite a conservative overclock, of course, and if you want to take the risk (and you have a powerful CPU cooler), you could also try for more. We found our sample could run at 5,365MHz with 1.31V, but the temperature hit 91°C with our 240mm cooler. This isn’t quite in the danger zone, but it’s not far off it, so you’ll need a decent cooler to aim this high.
10. Benchmark your overclocked CPU
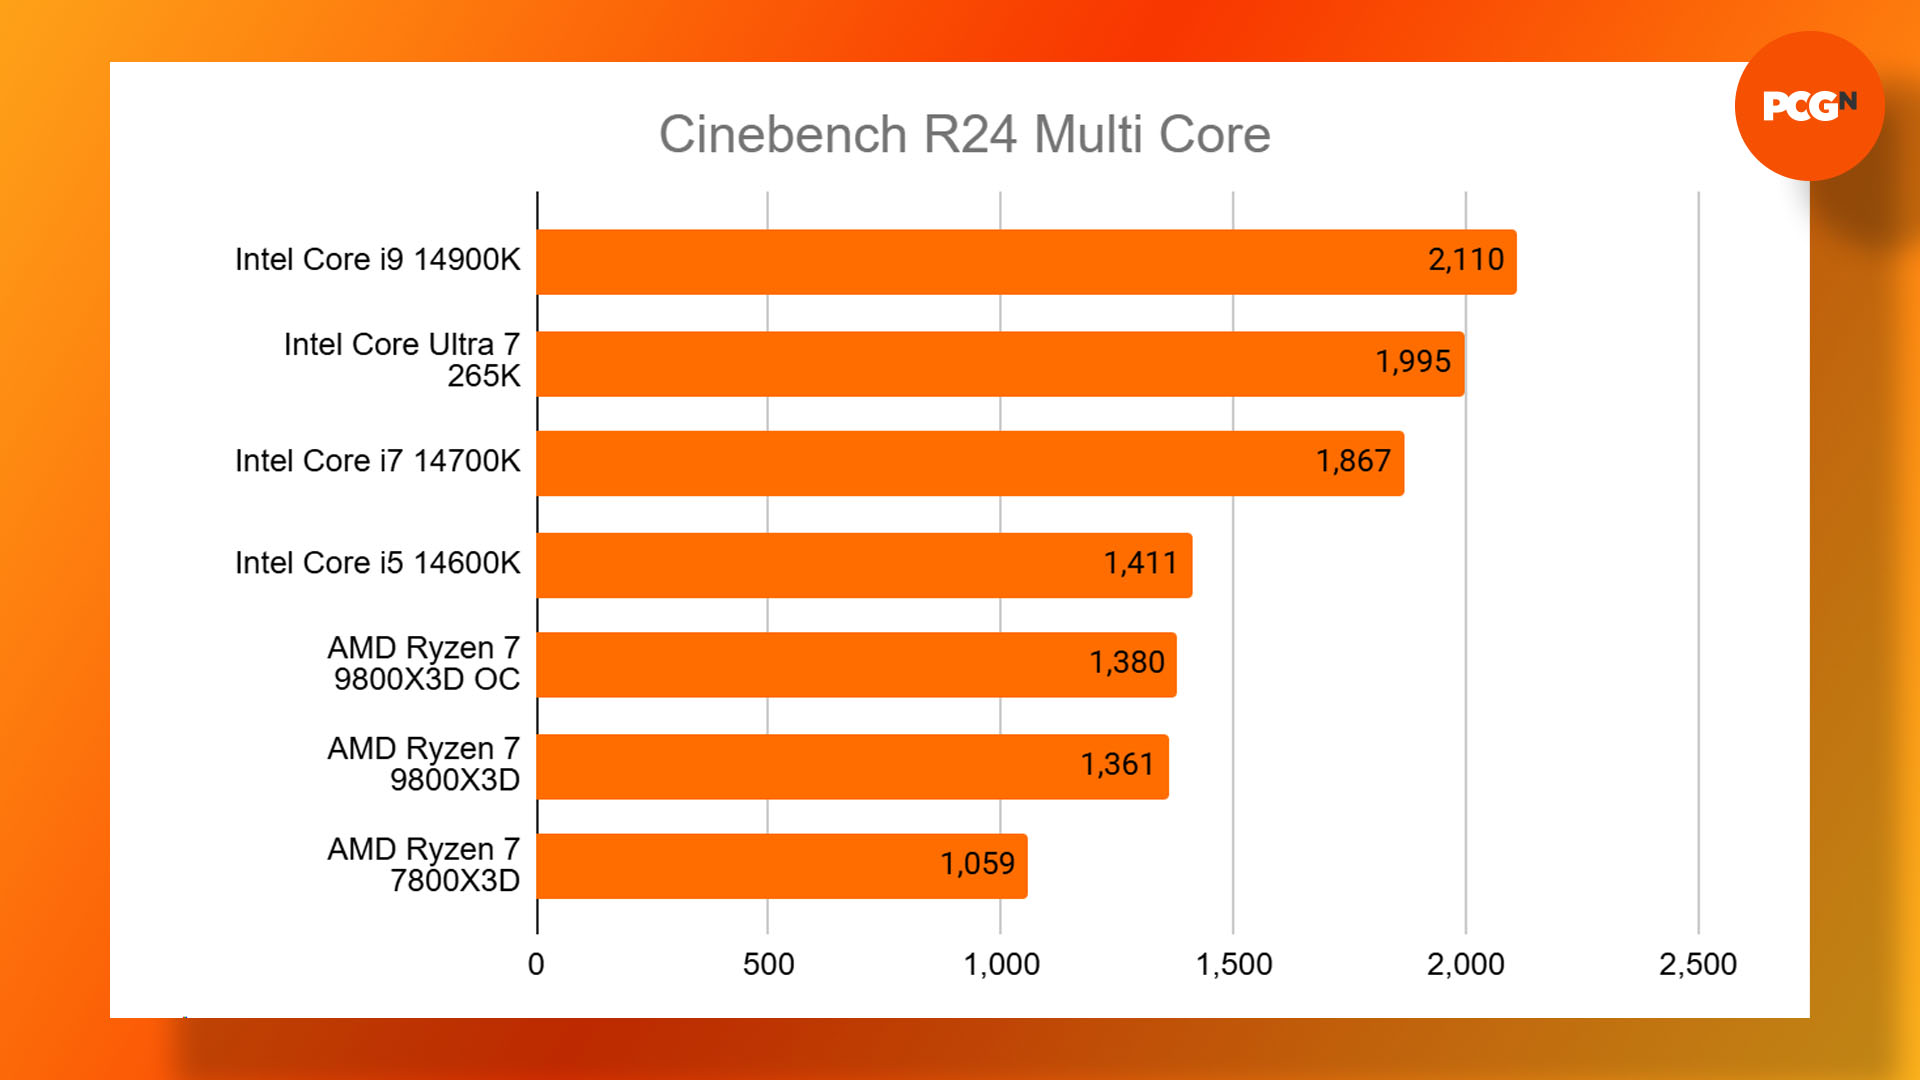
With all our CPU cores constantly running at 5.3GHz, we decided to fire up Cinebench R24 to see what it could do, and it is indeed quicker than at stock speed, with a score of 1,380 compared to 1,361, and with only a modest increase in peak CPU temperature from 84°C to 87°C.
That’s a small increase in speed, though, and demonstrates that a large part of the 9800X3D’s performance advantage over the 7800X3D is down to its use of the new Zen 5 architecture, and not just its faster clock speed. If you really want to run heavily multi-threaded software as well as games, you’ll be better off either buying an Intel 14th-gen CPU, or waiting for AMD’s future X3D Ryzen 9000 chips with more cores, rather than overclocking the 9800X3D.
Conclusion
We love the fact that AMD has made the 9800X3D overclockable, as it gives enthusiasts a way to experiment with their chip and make it even faster in games. The fact that you can get a decent frame rate boost in games from the comfort of Windows is also great for gamers who want to get started in overclocking.
If you’re looking to overclock your 9800X3D, we recommend using AMD’s Auto Overclock feature in Ryzen Master, which keeps the temperature in check, continues to adjust the voltage and clock speed on the fly, and still gives you a decent boost to frame rates in games. The fact that you can do it all from the comfort of Windows is an added bonus.
The benefits of a manual overclock are dubious, though, with our sample struggling to get beyond 5.36GHz without needing more than 1.31V, and even then it got hot and still couldn’t overtake the Core i5 14600K in Cinebench. If you really want a CPU that can race through heavily multi-threaded workloads, while also being good for gaming, you’ll be better off reading our Core i9 14900K review or waiting for AMD’s future X3D CPUs with more cores.
If you think you might need some more cooling power to overclock your 9800X3D, check out our guide to the best CPU cooler, where we take you through all our favorite options to suit every budget.




Leave a Reply